TL;DR
This is a practical, hands-on assignment that walks you through the end-to-end ISO 19650 information management workflow inside Plannerly. You’ll build real outputs, starting with information requirements, turning them into a coordinated delivery plan, verifying what’s delivered, and finally completing handover acceptance. It’s designed to move you from theory to real implementation by practicing the exact steps used on real projects.
Watch: Why this assignment is different from traditional ISO 19650 training
Less theory. More execution. Clear, defensible deliverables.
- Complete every activity inside a live project environment
- Focus on real outputs - not abstract definitions
- Build deliverables you can actually use on projects
- Step into the role of Appointing Party, Lead Appointed Party, and Appointed Party
- Plan, assign, coordinate, and verify information properly
- Experience how responsibility flows across the delivery team
- Clearly define what was required
- Demonstrate what was delivered
- Confirm what was reviewed, accepted, and signed off
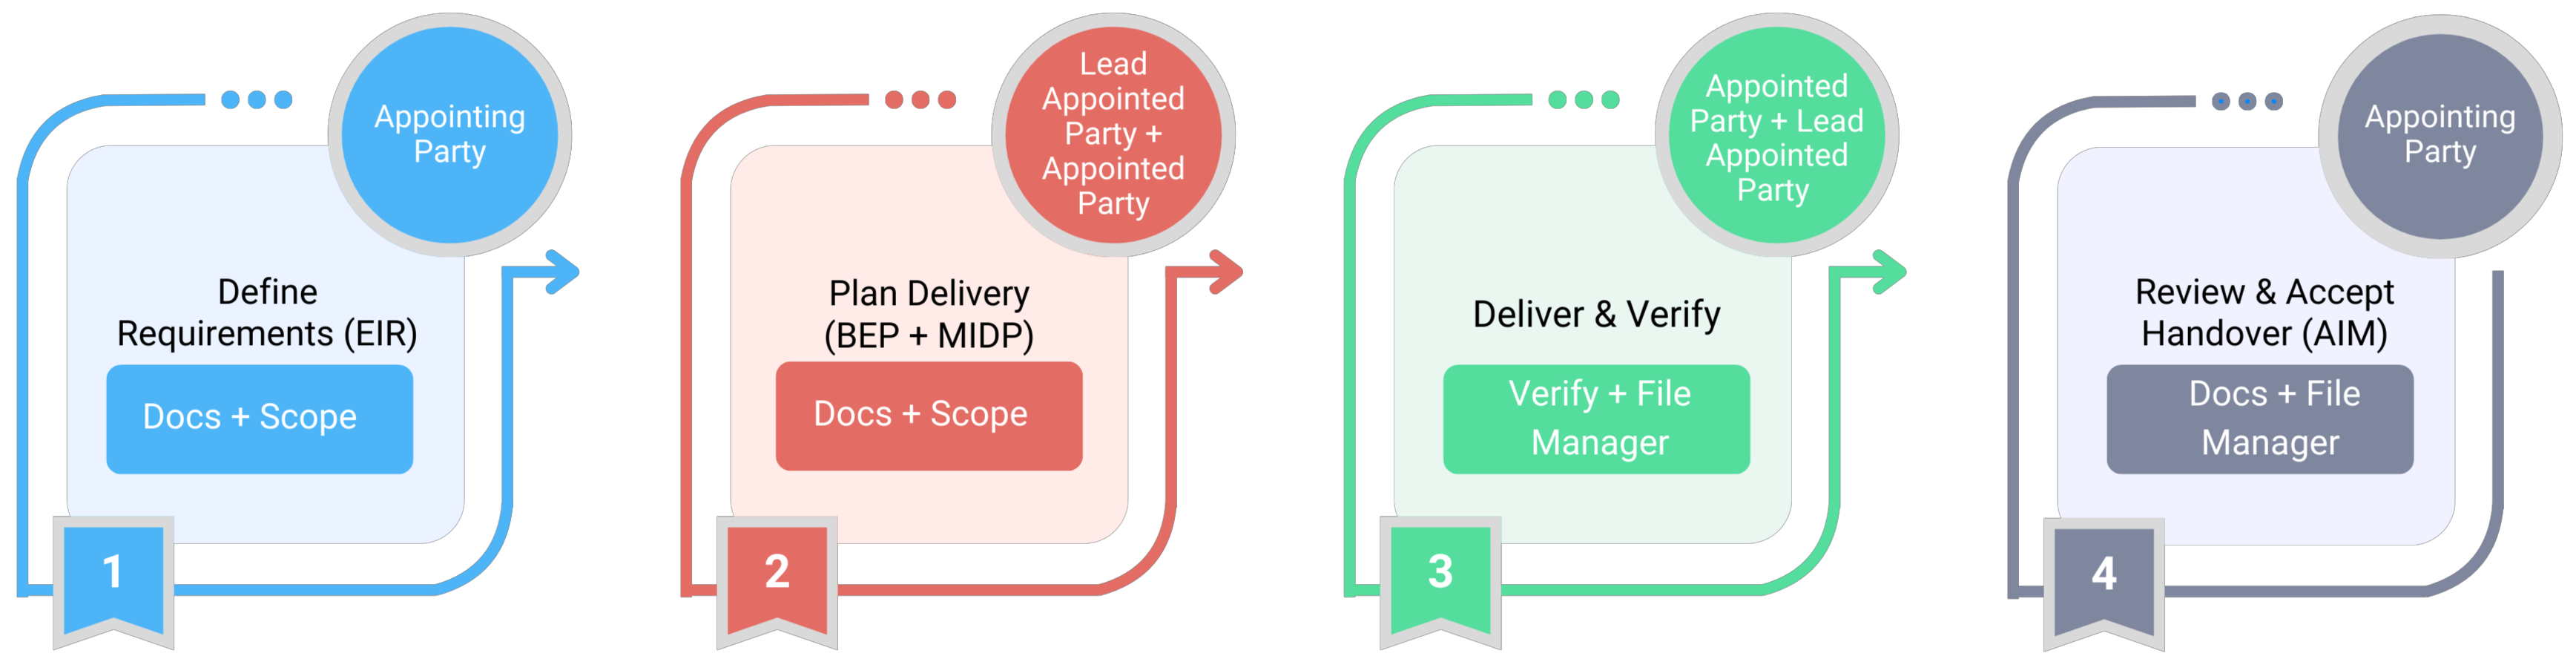
The 4-Part ISO 19650 Assignment
Complete the full ISO 19650 workflow inside Plannerly and build real project outputs, including EIR and BEP/MIDP, verification records, and handover acceptance evidence. The four assignments close the gap between knowing the standard and actually implementing it on a real project.
There are many strong ISO 19650 theory classes available, however real project outcomes depend on the quality of your implementation.
This practical assignment helps you turn knowledge into delivery confidence so you can apply the standard effectively and become certification ready. You will work through the complete information workflow in sequence so each stage connects clearly to the next, with extra support available through the free certified training courses.
This assignment takes you from owner goals to accepted information deliverables. As you work through each stage, think like an information manager and ask: what decision does this information support? If it does not support a decision, it is probably noise.
Orientation - Start Here
How the Assignment Is Structured
Watch this walkthrough introduction to understand how all four assignments connect and what you will build across the complete ISO 19650 workflow.
ISO 19650 Specialist Assignment - Introduction to All Four Assignments
Getting Started!
1. Sign in to Plannerly
If not, create a free account at app.plannerly.com
2. Create a new Project and add "Contract Template" document
-
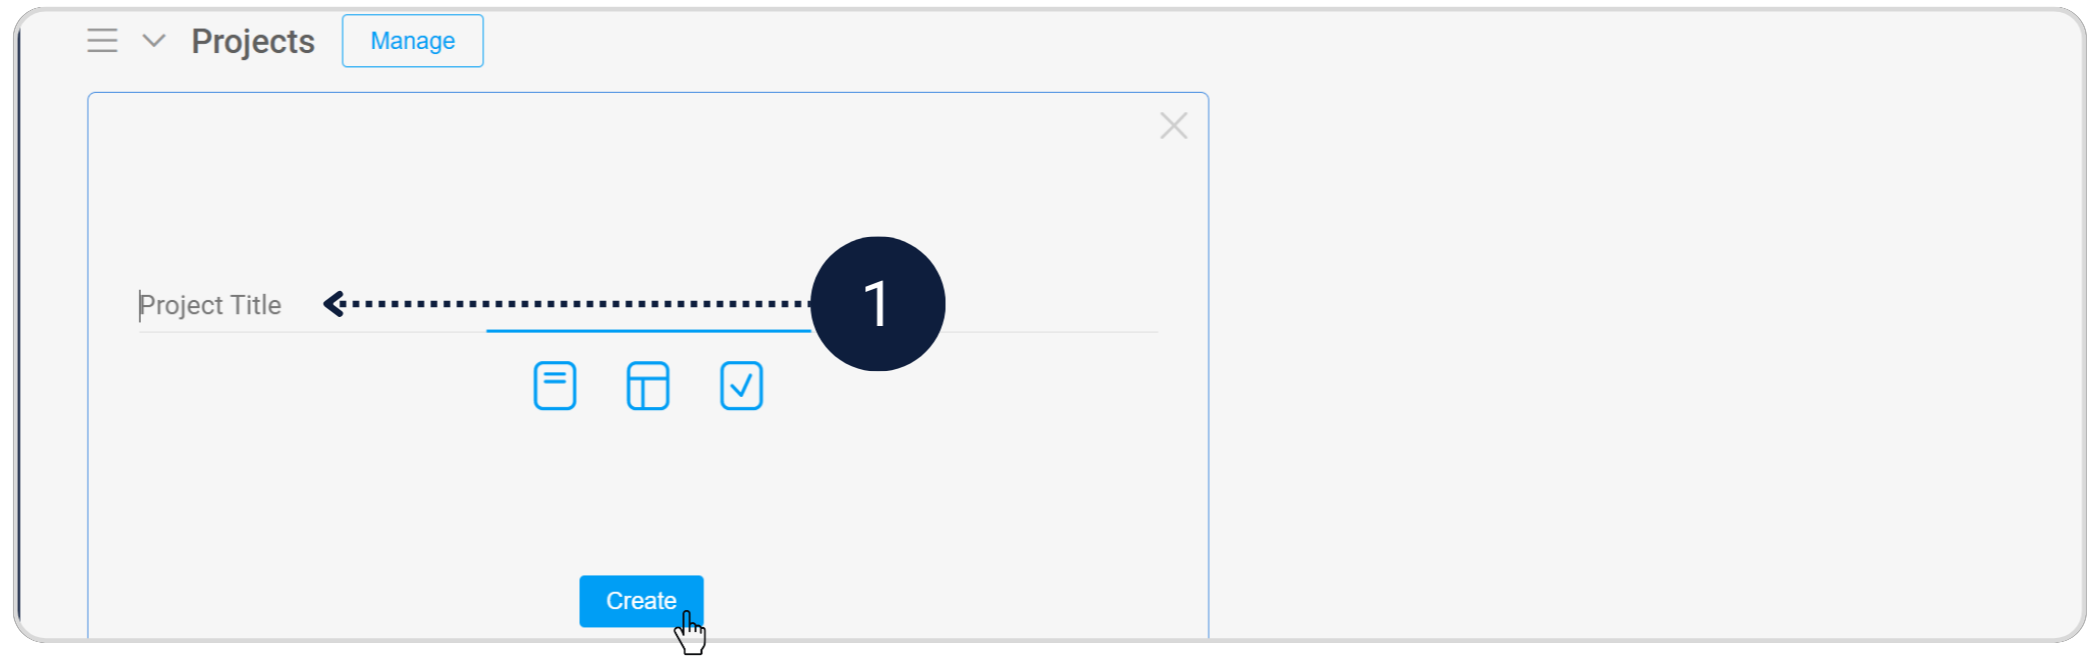
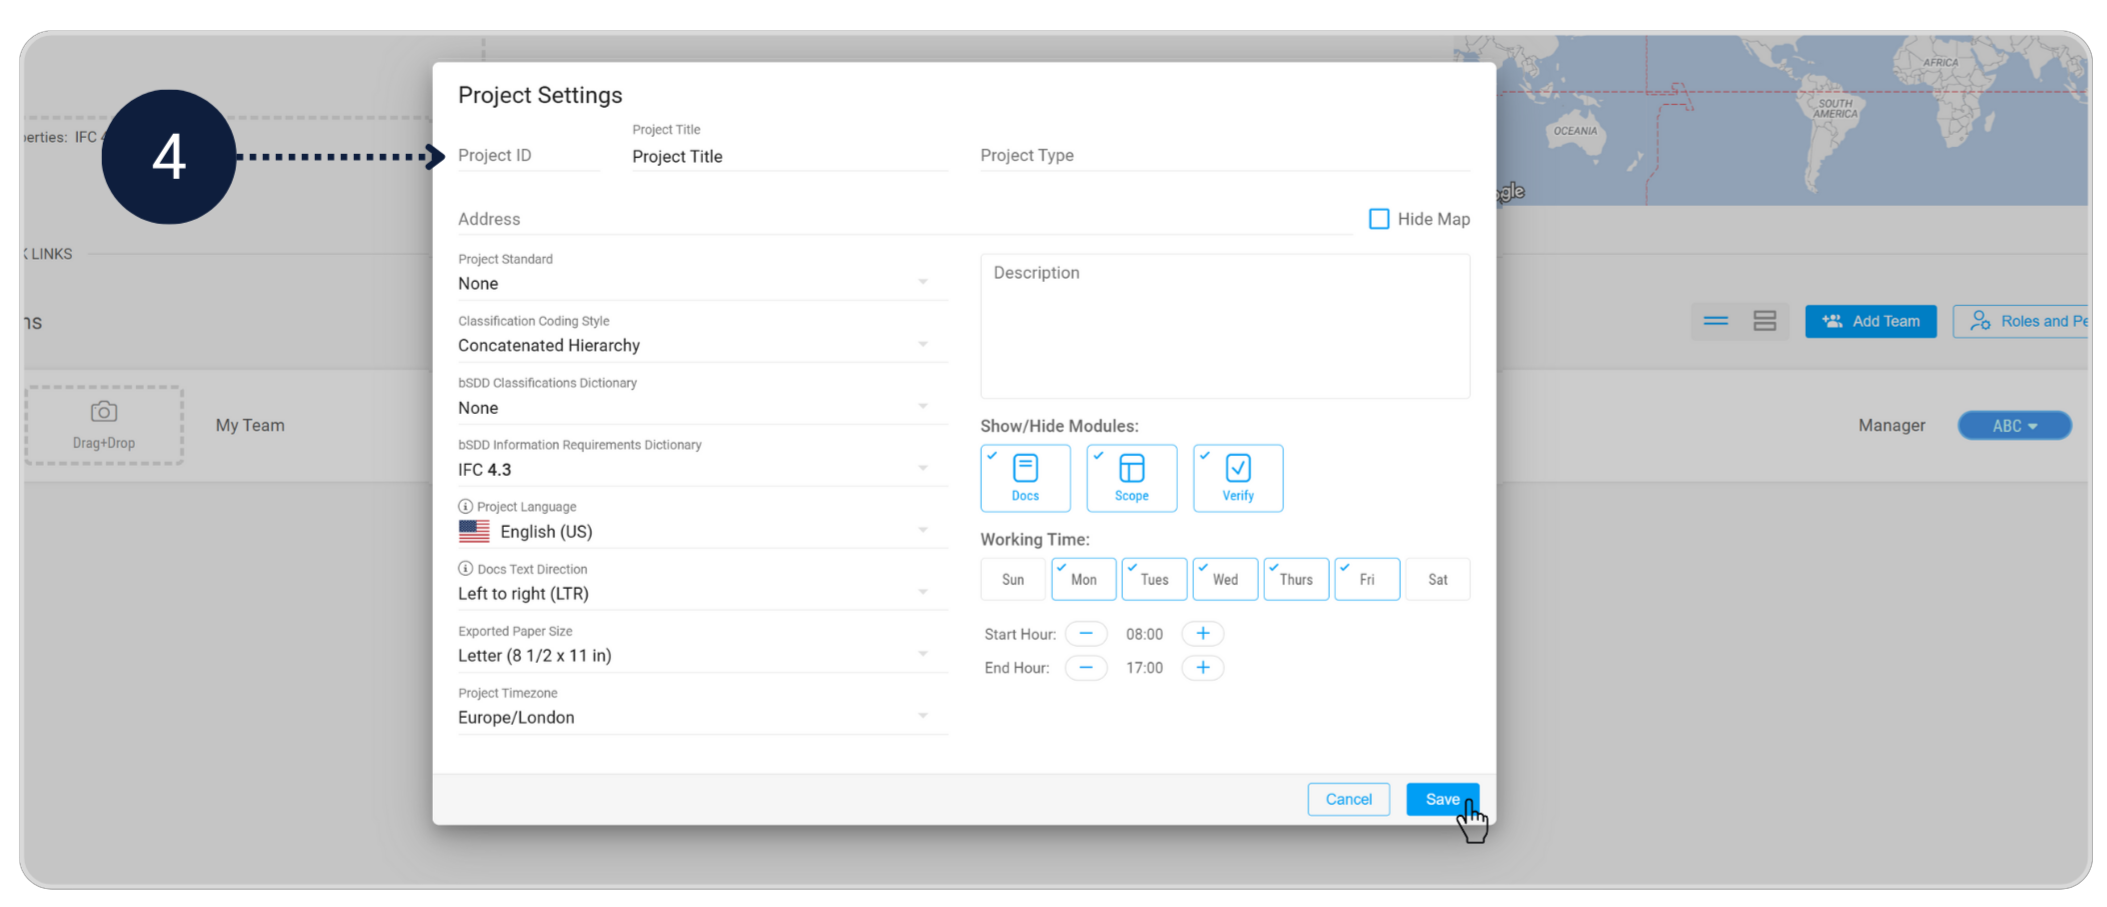
Go to your Projects workspace and click New Project. Give your project a suitable name. Once the project is created, review the project settings and add key details such as the project ID, location, and other basic information you consider appropriate. This project will be used to complete all tasks in this assignment.

-
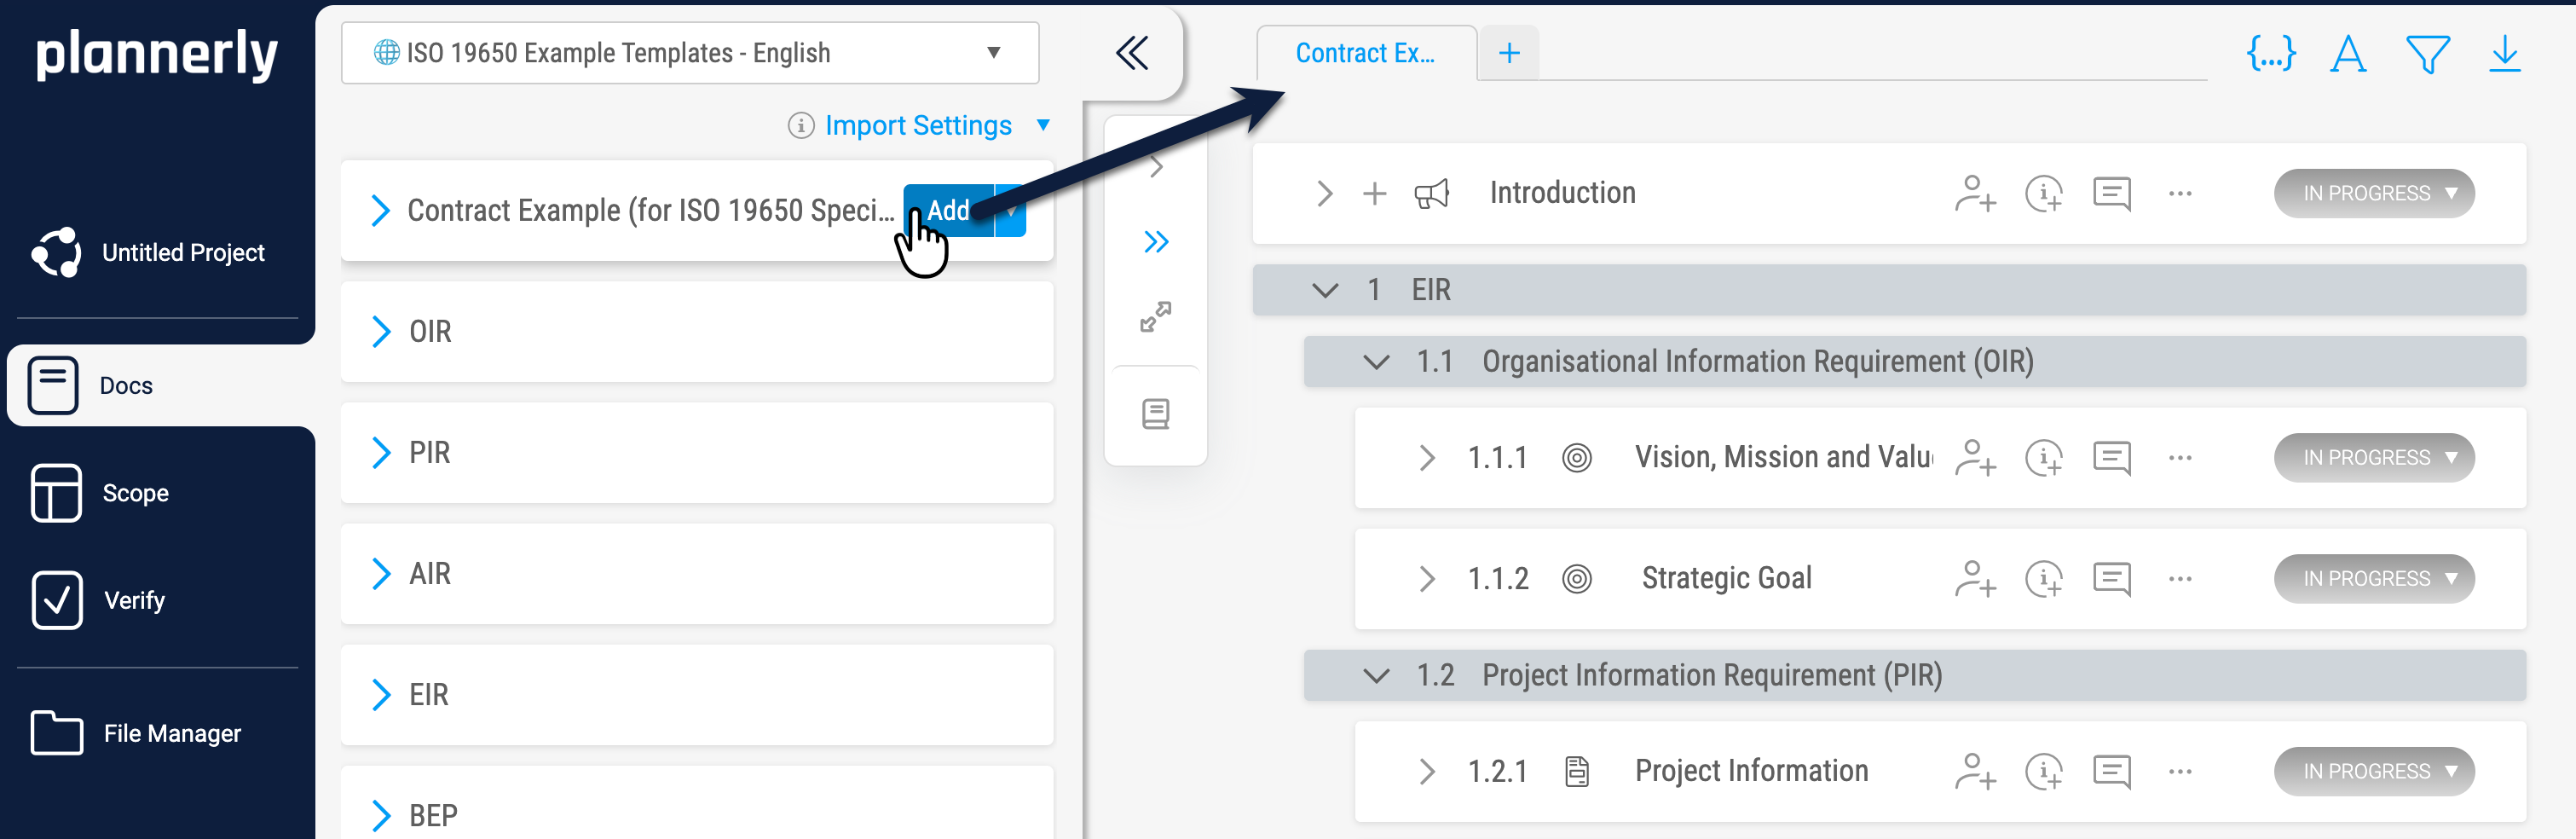
From the Plannerly Library → "ISO 19650 Example Templates - English", add the Contract Example (for ISO 19650 Specialist) to your project’s Docs module.
3. Work individually or as a group


Project Context Project Brief Context
About the project
The following project context should be used throughout all four assignments. Use it to inform every decision you make - from what information to request, to who is responsible for producing it, and by when.
Horizon House
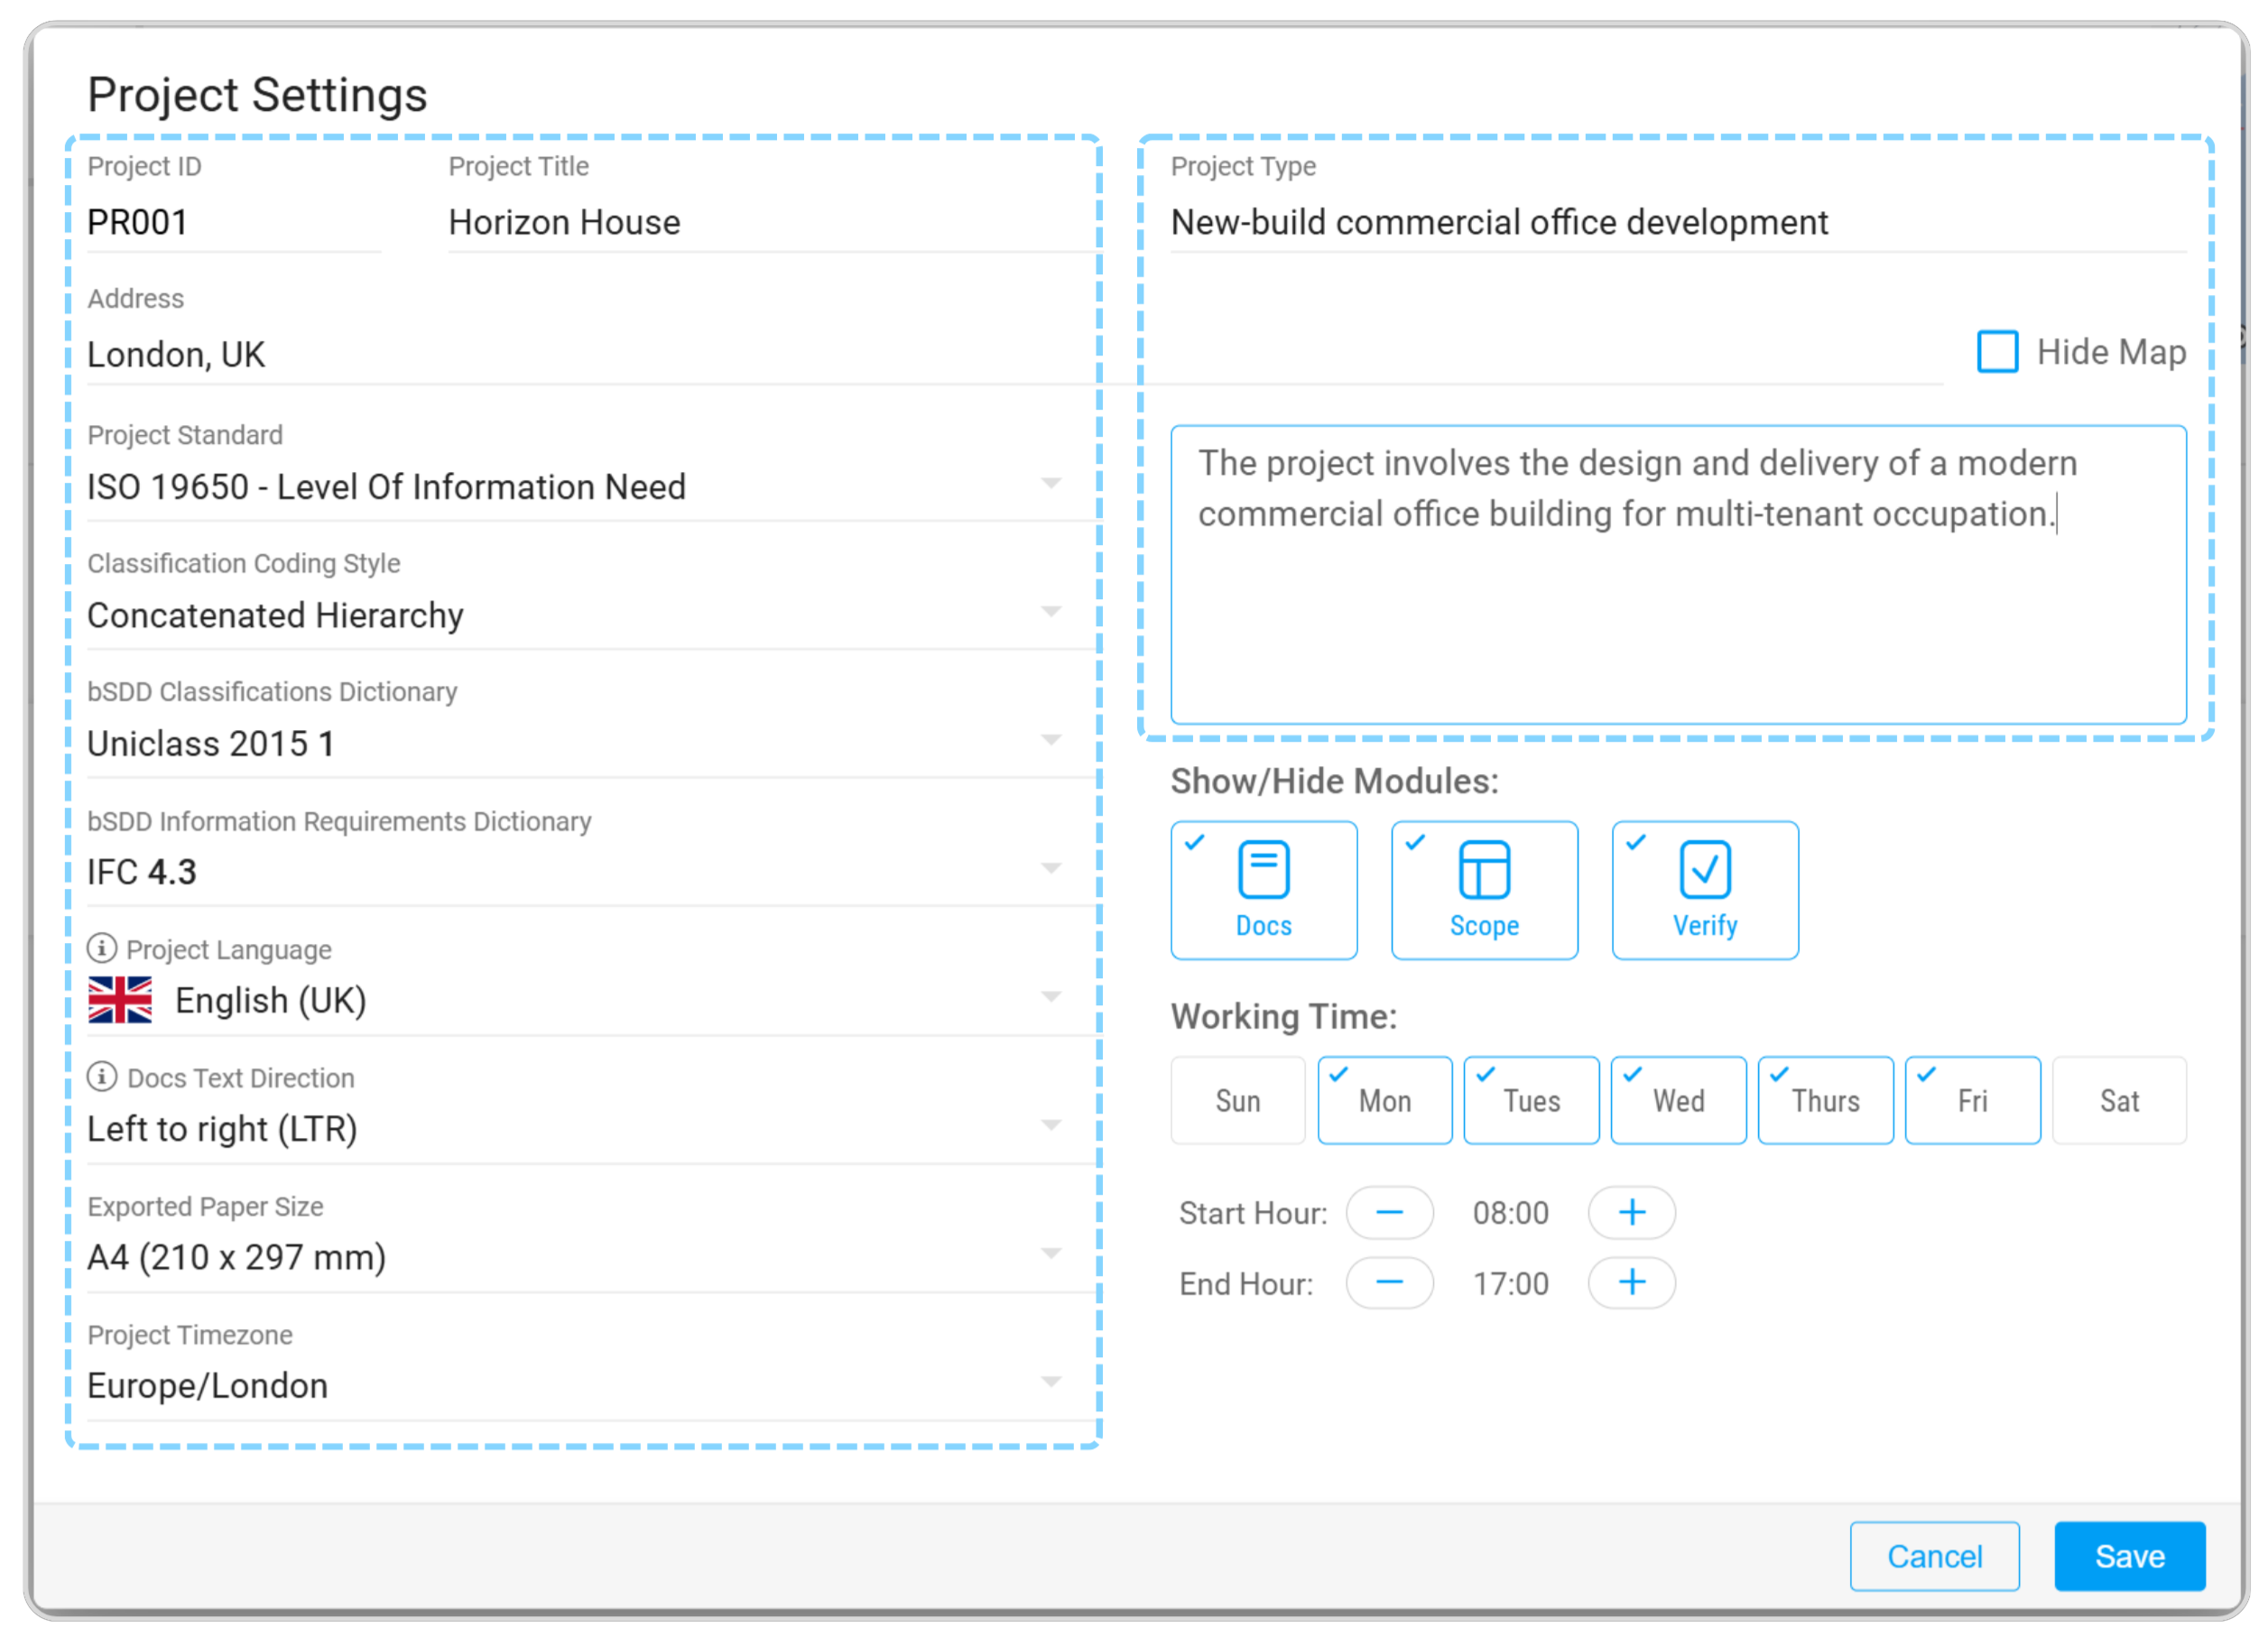
- Location: London, United Kingdom
- Project Type: New-build commercial office development
- Client / Appointing Party: Apex Developments Ltd
- Estimated Area: Approximately 3,500 m²
- Floors: 3 storeys above ground
- Project Standard: ISO 19650
- Classification Dictionary: Uniclass 2015 (bSDD)
Project objective
The project involves the design and delivery of a modern commercial office building for multi-tenant occupation. The project is being used to demonstrate how ISO 19650 information management principles are applied in practice - from defining information requirements through to model verification and handover. The Plannerly platform is being used throughout to manage, coordinate, and verify all project information.
General programme (indicative)
- Ground floor: entrance lobby, reception, meeting rooms, breakout spaces
- Upper floors: open-plan office accommodation (L2 and L3)
- Building services throughout: HVAC, electrical, fire protection, data infrastructure
- External: car parking, landscaping, site access
Professor/Teacher/Educator Guide Professor Guide Education Setup
Download the Professor's Guide (PDF)
A two-page educator overview that explains how to give your students the one thing most BIM programmes skip - the hands-on experience of a complete ISO 19650 workflow. Used by 250+ universities worldwide, this assignment is always up to date and fully supported with templates, walkthrough videos, in-app help, and a free certified training course.
Inside the guide you'll find how to introduce the assignment to your students in two simple steps, plus a ready-made student assignment brief - just add your logo and module details and share it with your cohort. The brief already covers everything students need: how to access the instruction page, complete the assignment, and submit their work. You'll also get clear guidance to help you decide how to run it - individual or team projects, with students working through the four ISO 19650 stages (Define → Plan → Model Verification → Handover) individually or inside a shared Education Workspace.
Best for solo assessment and quick setup. Each student can complete all four assignments inside a free Plannerly account.
- Students sign up for a free Plannerly account
- Start the assignment in their own free workspace
- Complete Assignments 1-4 in order
- Export deliverables to File Manager
- Submit exports and/or a short screen recording
Best for collaborative delivery practice. This option requires an Education Workspace so you can manage shared projects and student access.
- Set up one shared project per team inside the Education Workspace
- Assign each teammate a clear assignment owner role (Assignment 1, 2, 3, or 4)
- For larger teams, pair students on Assignment 2 and Assignment 3, then split steps within those assignments
- Use one student as delivery coordinator to track progress, statuses, and handover readiness
- Before submission, run a team review to confirm all outputs are complete, consistent, and ready for final sign-off
Setting up the Education Workspace
Team projects require an Education account so you can create workspaces, projects, and invite students.
How to Run the Assignment
- Exports saved in File Manager
- Verification evidence (screenshots or reports)
- Updated task statuses
- Final sign-off document with reflection
ISO 19650 Workflow Assignments
Assignment 1 - Define EIR OIR PIR AIR EIR
Define the EIR - set the rules for information delivery.
A structured information workflow starts with the Owner. In this task, you’ll translate the Owner’s strategic goal into clear, practical Exchange Information Requirements (EIR) - the document/resource that shapes what information is delivered, when it is delivered, and why it matters. For training purposes, this assignment uses a simplified and condensed version of ISO 19650 workflows. It represents a streamlined approach to real-world practice, focusing on how information requirements are defined, planned and verified. On live projects, these requirements may be distributed across multiple documents such as OIR, PIR, AIR, EIR, BEP, appointments and protocols. For education and clarity, this assignment brings those elements together into a manageable, structured workflow.
Assignment 1 - Video Walkthrough
Follow along as we complete every step of Assignment 1 live inside Plannerly. You will see exactly how to create the EIR document, structure your information requirements in Scope, assign them to the right assets, and export the final tender deliverable. Every click, every decision, right alongside you.
ISO 19650 Specialist Assignment 1 - Define the EIR
Owner’s strategic goal
What you will do
Step 1.1 - Access and complete the EIR document Docs EIR
Required checklist
- Review the pre-filled EIR sections and understand the Owner’s information needs
- Complete all highlighted SmartFields in this EIR template
- Ensure your responses focus on operational needs, not delivery methods
- Follow any inline guidance provided within each section
Accessing the pre-filled EIR document
Plannerly Templates → "ISO 19650 Example Templates - English" → "Contract Example" → Add
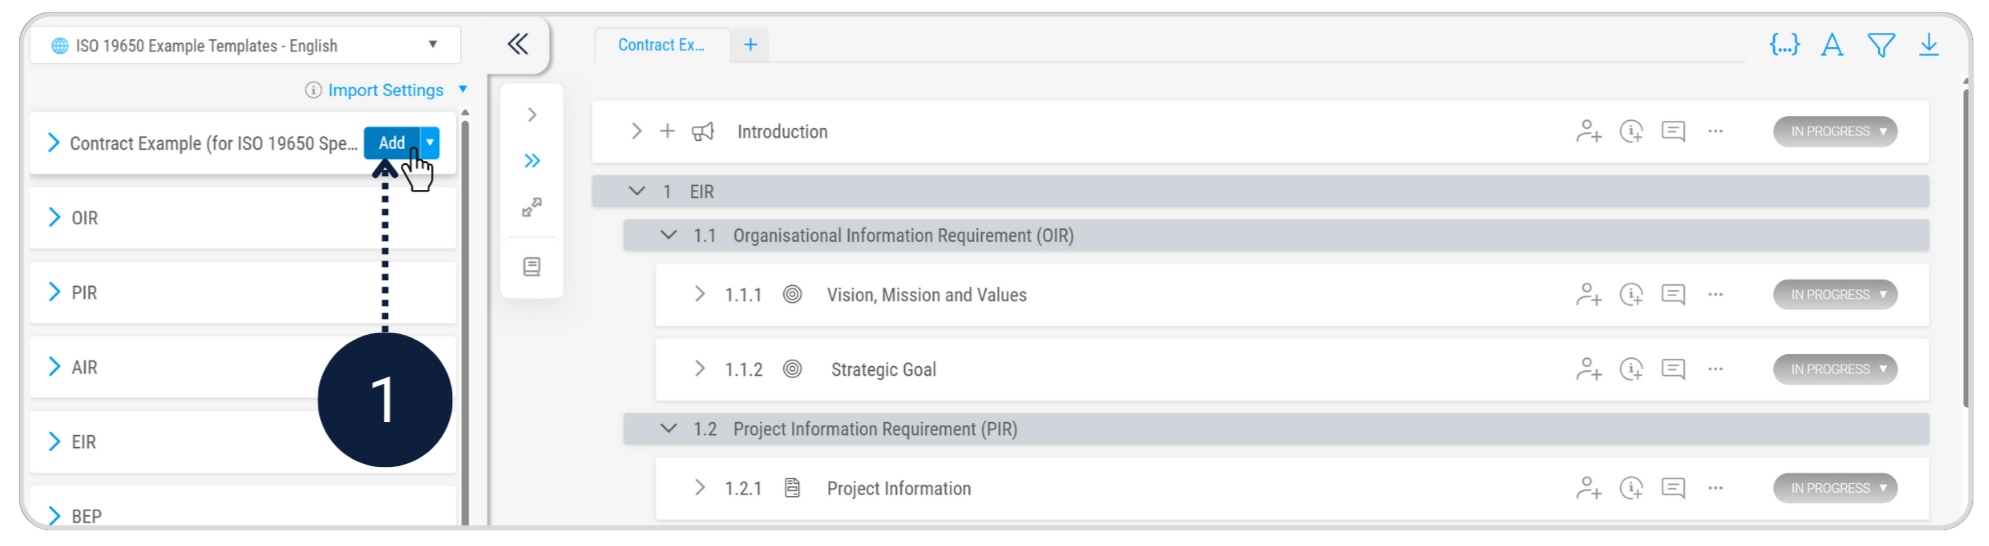
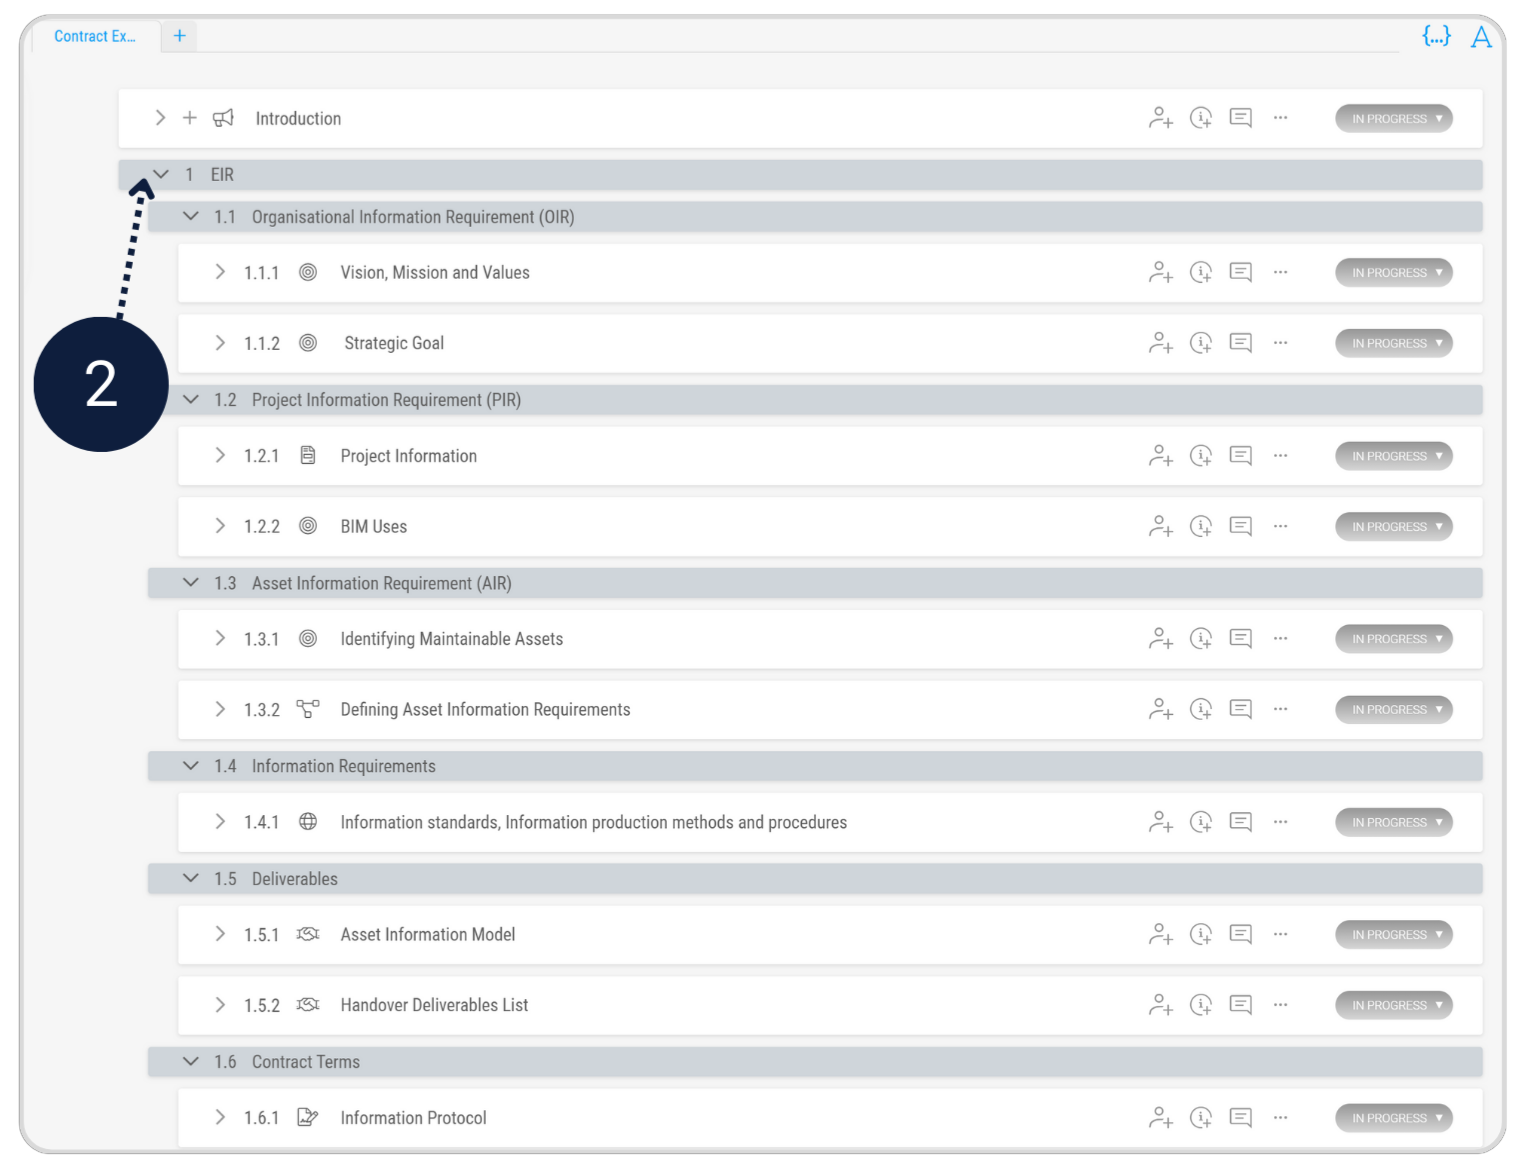
Once located, the EIR document will guide you through the task.
Follow the instructions in each section and complete the highlighted Smart Fields.
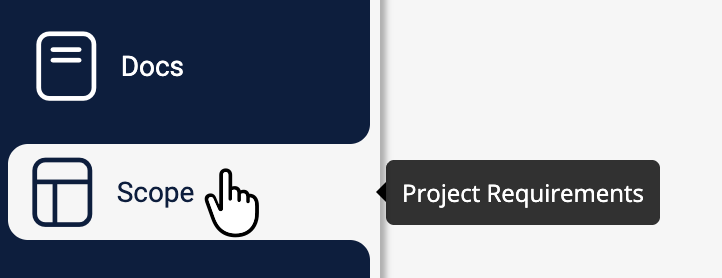
Step 1.2 - Define the information requirements in Scope Scope Import
Required checklist
- Create discipline folders in Scope: Architecture, Mechanical, Electrical
- Add tasks under each folder: Interior Walls, Air Terminals, Mechanical Equipment, Lighting Fixtures, Cable Tray with Fittings
- Rename Milestone 1 to Operation
- Download and Import the CSV: Download Asset Information Requirements (AIR) Template
- Assign the correct information requirements in the Operation column for each task (use the reference image)
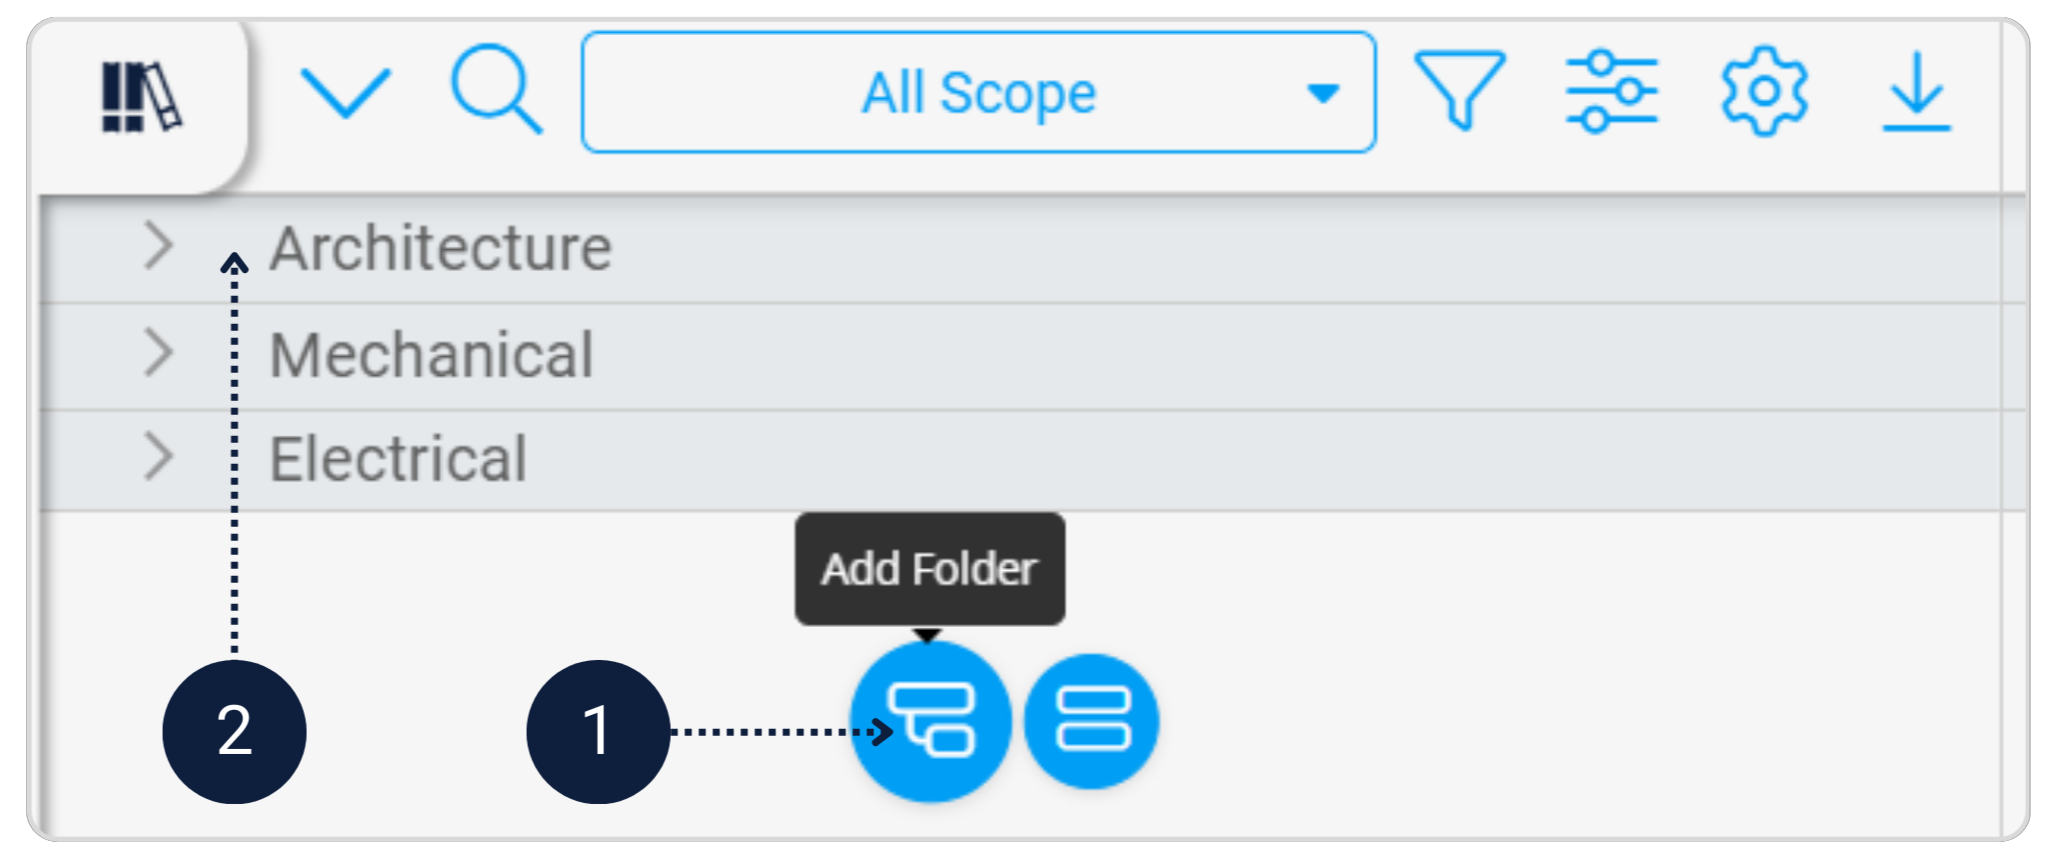
Create discipline folders
Your completed EIR document (from Step 1.1) explains Owner's goals and maintainable assets.
Now you will define these as structured requirements in the Scope so the project team can clearly see who delivers what - and so the requirements can be contracted as part of a tender package.
Add three Folders: Architecture, Mechanical, Electrical.
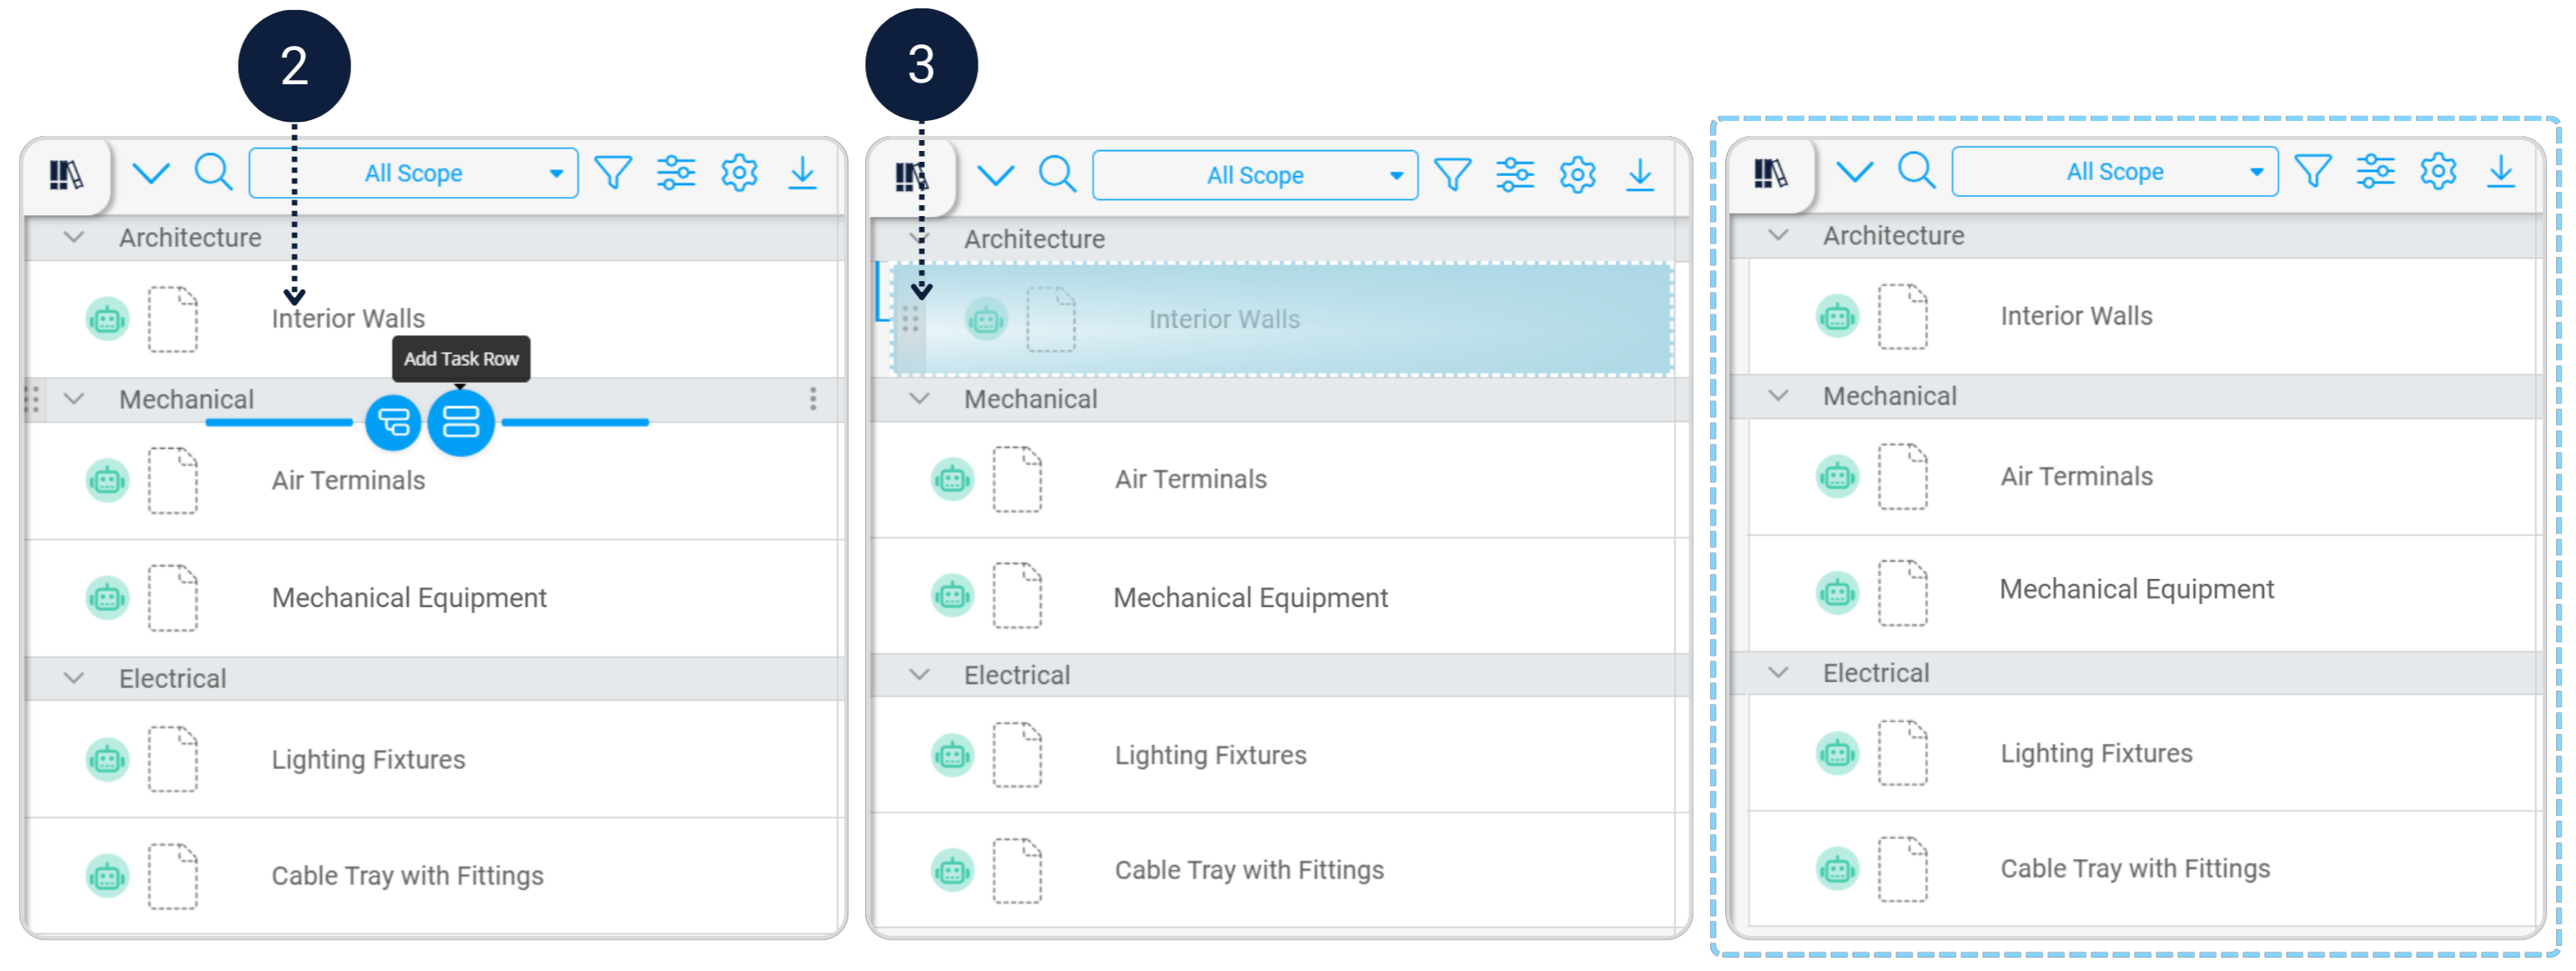
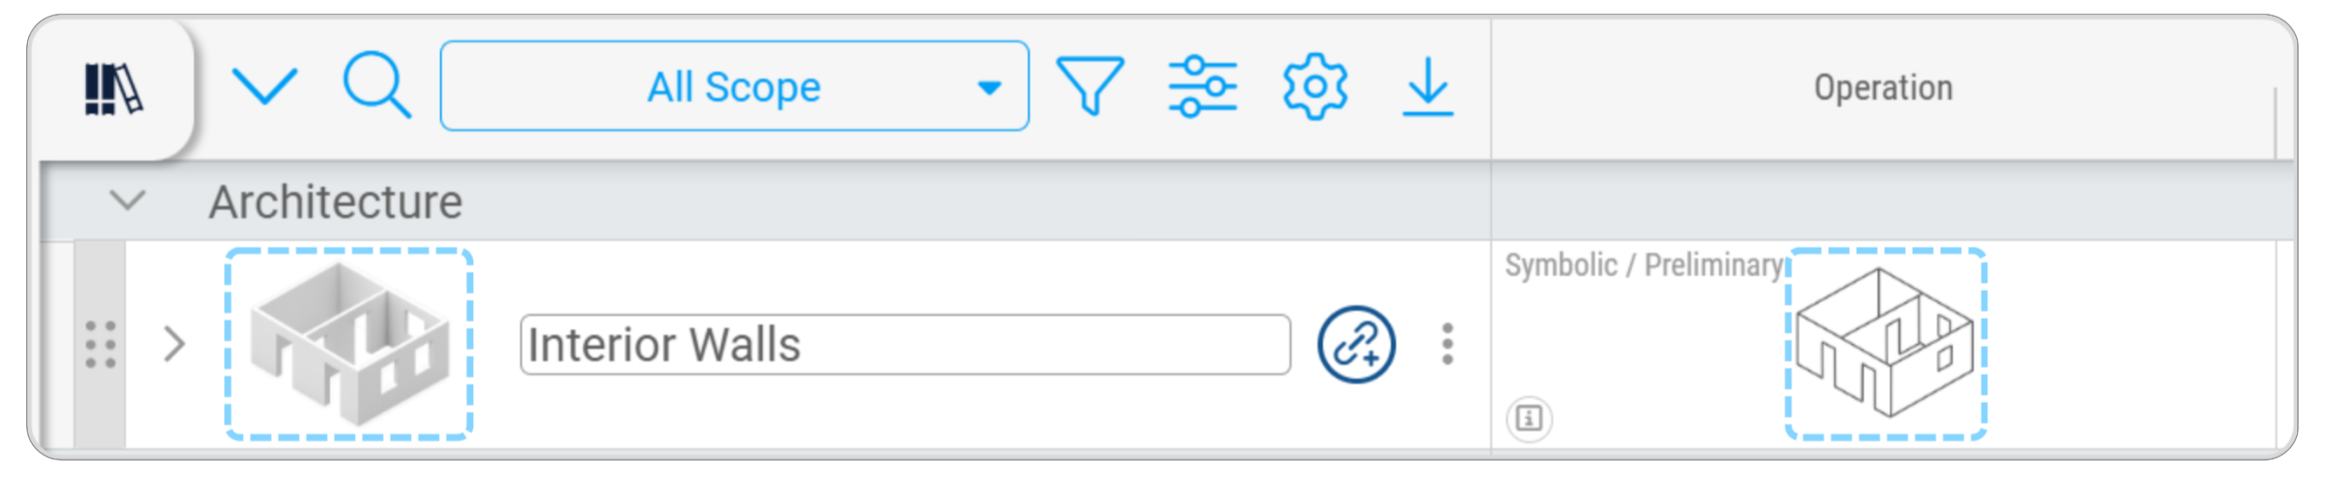
Add tasks under each folder
Add asset Task Rows under each discipline folder to represent the maintainable assets identified in the EIR.

- Architecture - Interior Walls
- Mechanical - Air Terminals, Mechanical Equipment
- Electrical - Lighting Fixtures, Cable Tray with Fittings
Each row represents an asset that will require structured information at handover.
Ensure each task is placed under the appropriate discipline folder (see 3 below):
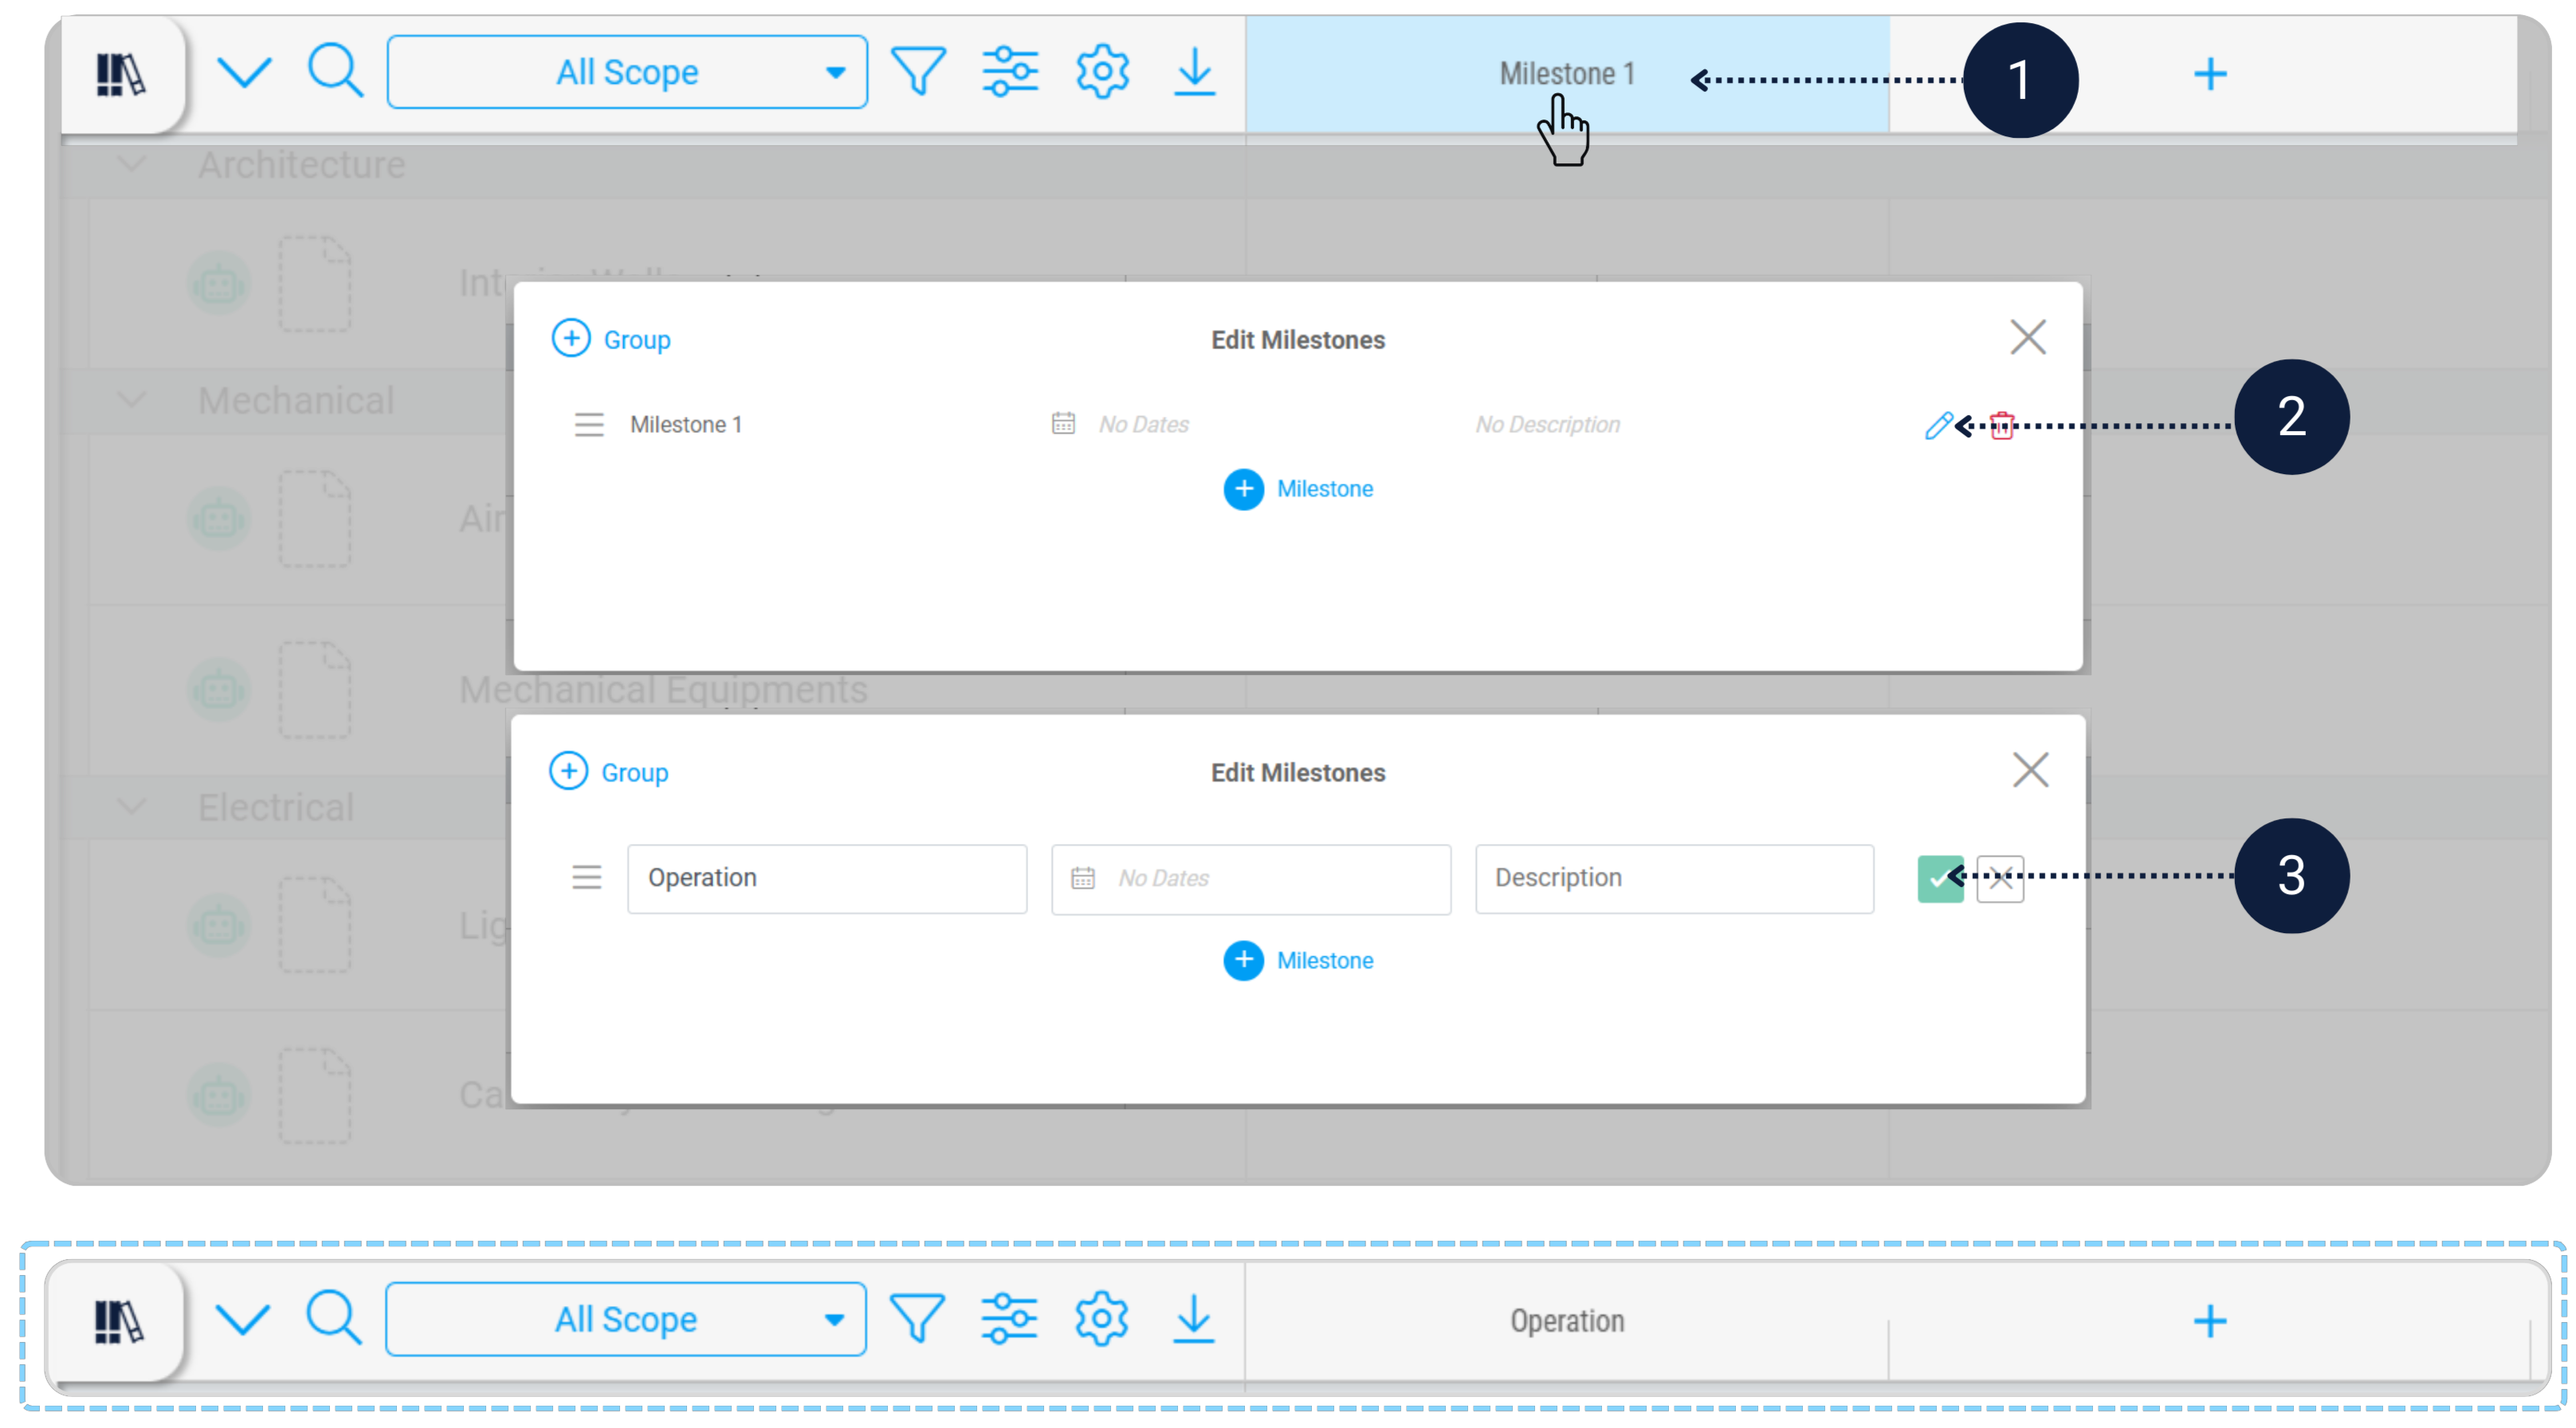
Rename Milestone 1
Rename Milestone 1 to Operation.
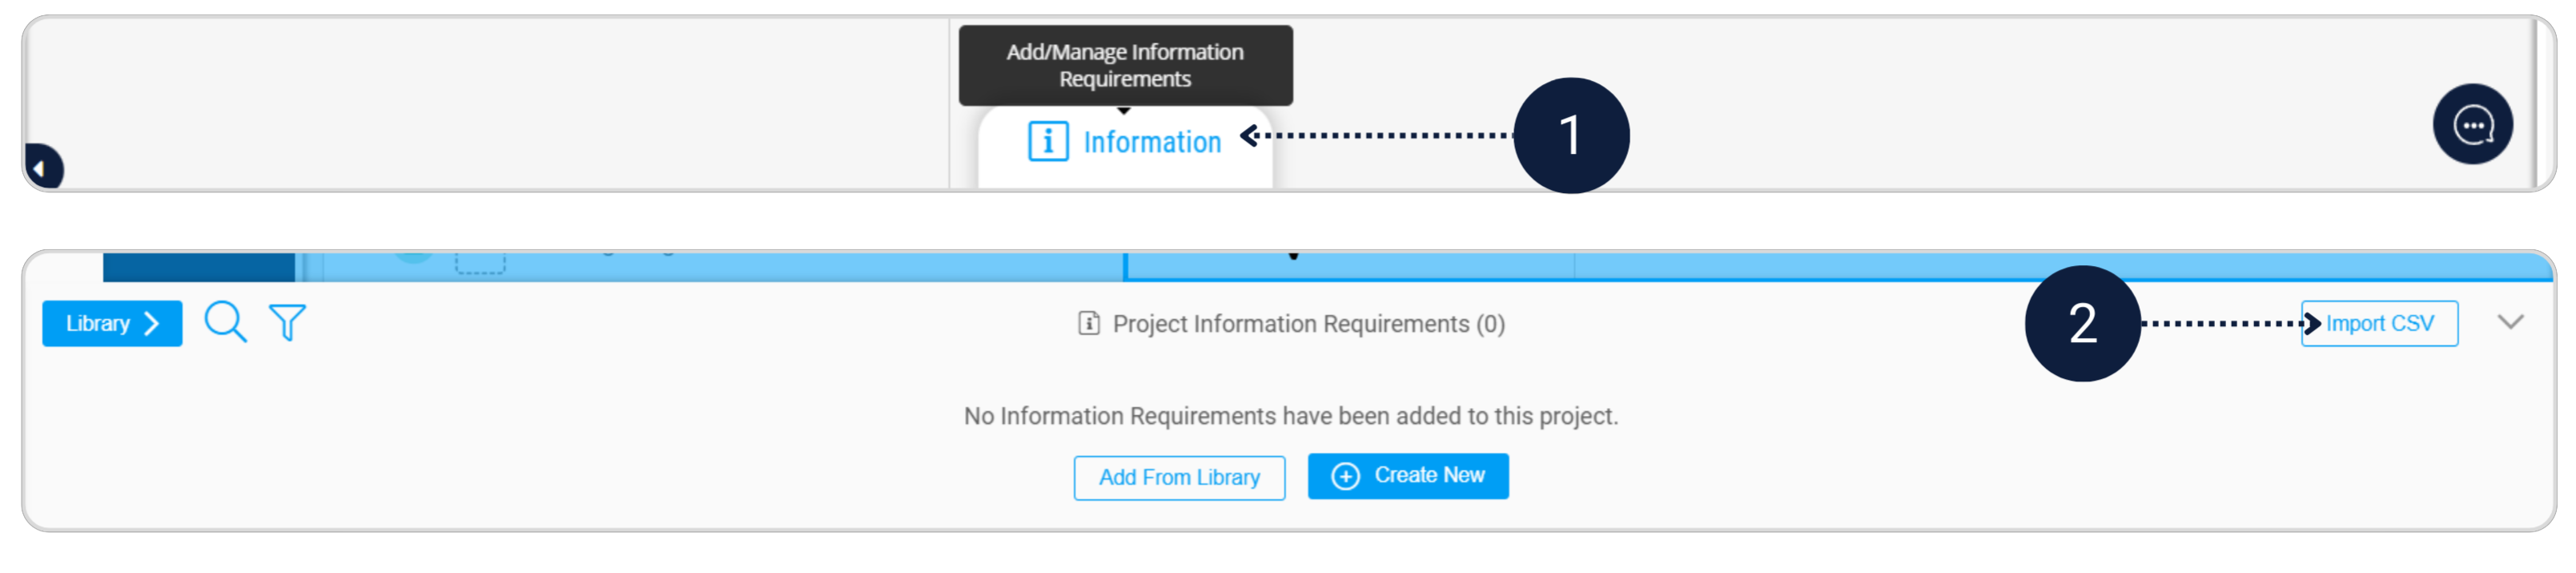
Import the CSV
Click Information at the bottom and import the CSV file to load the information requirements.
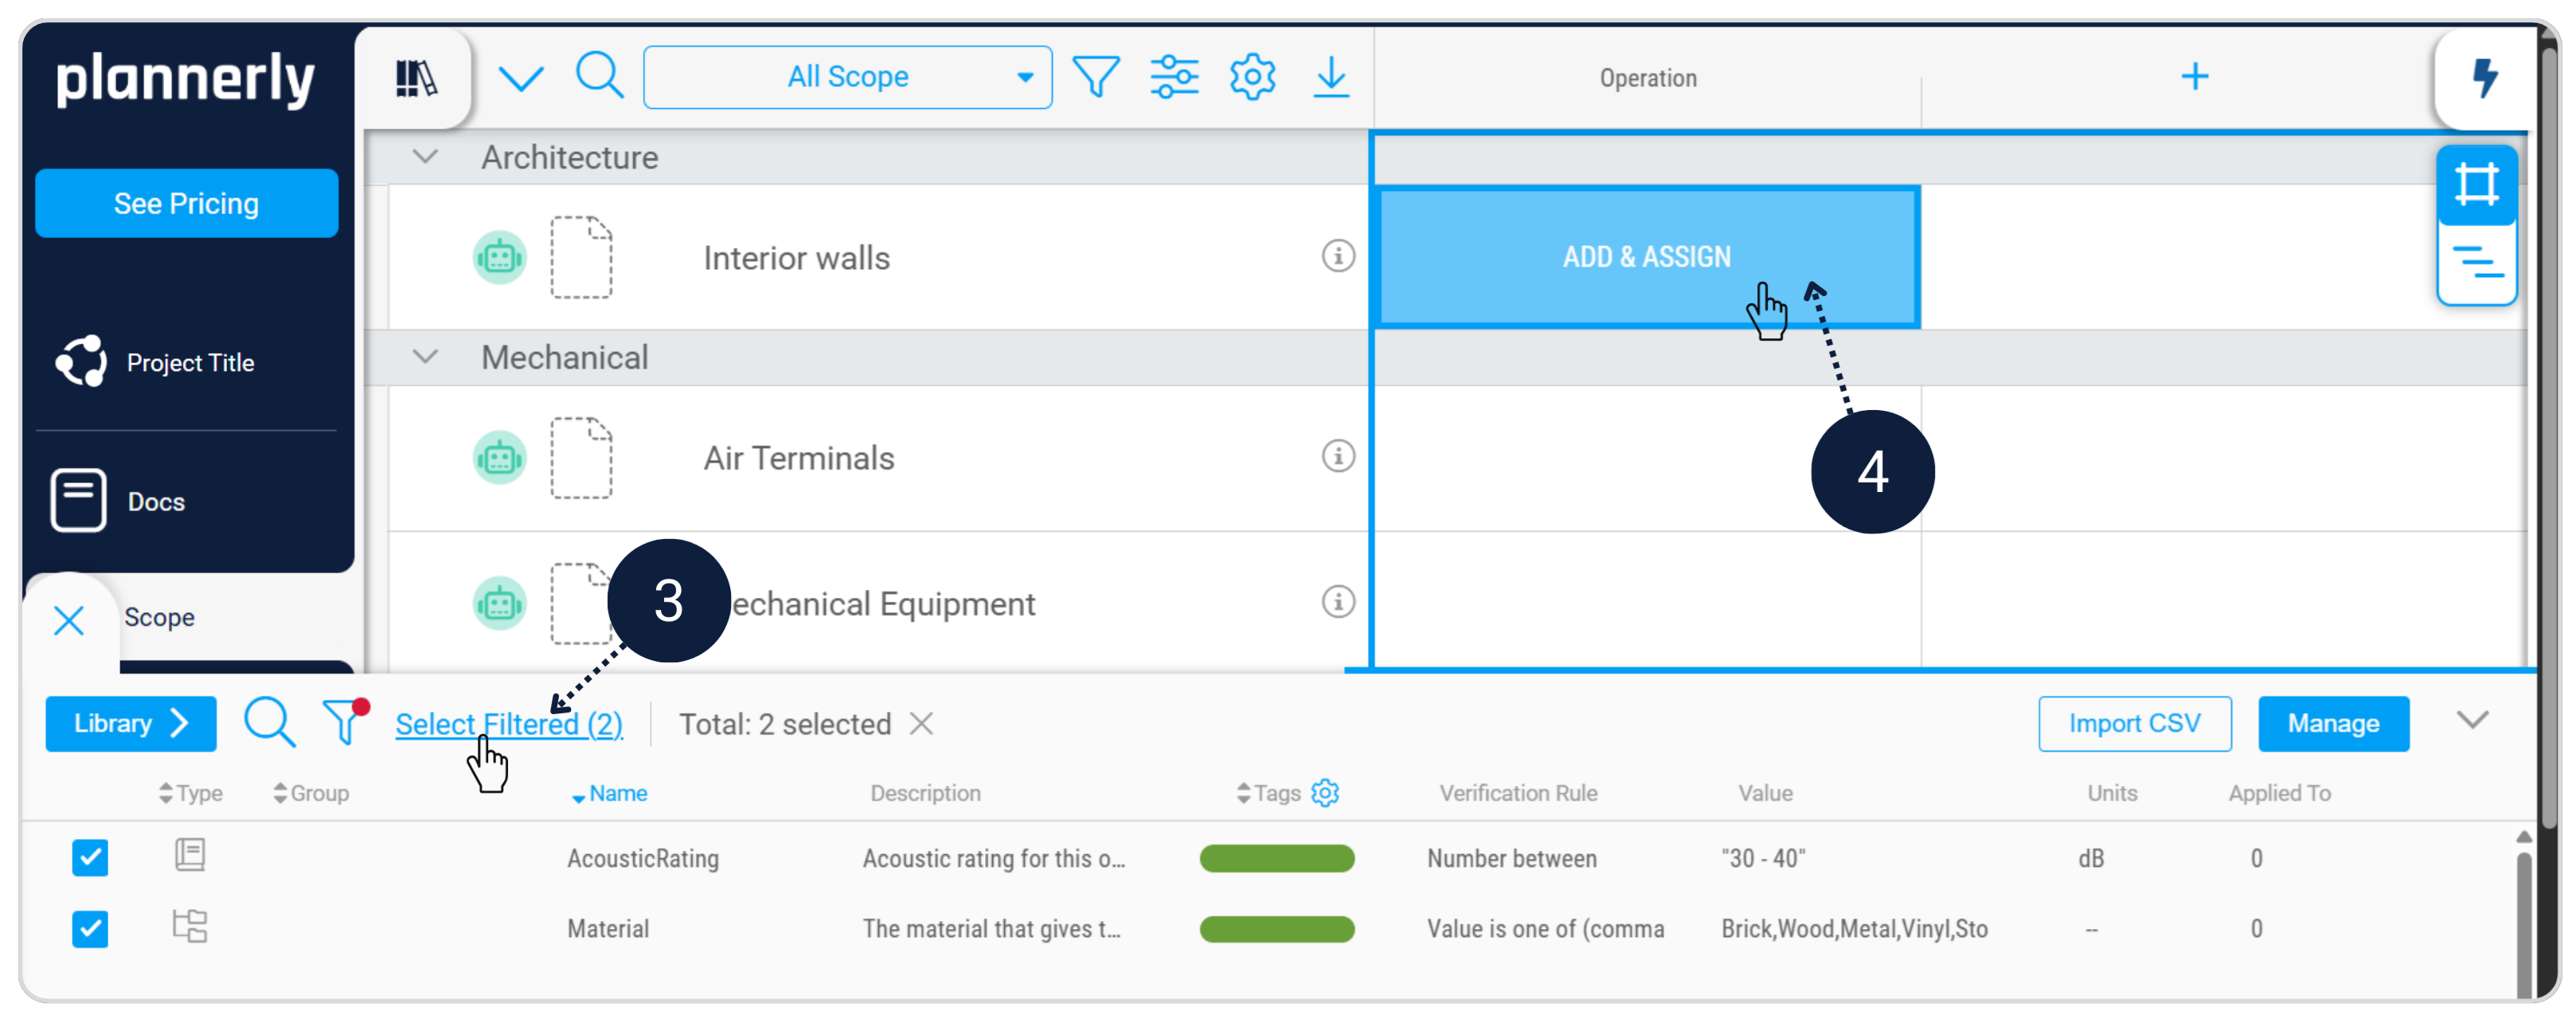
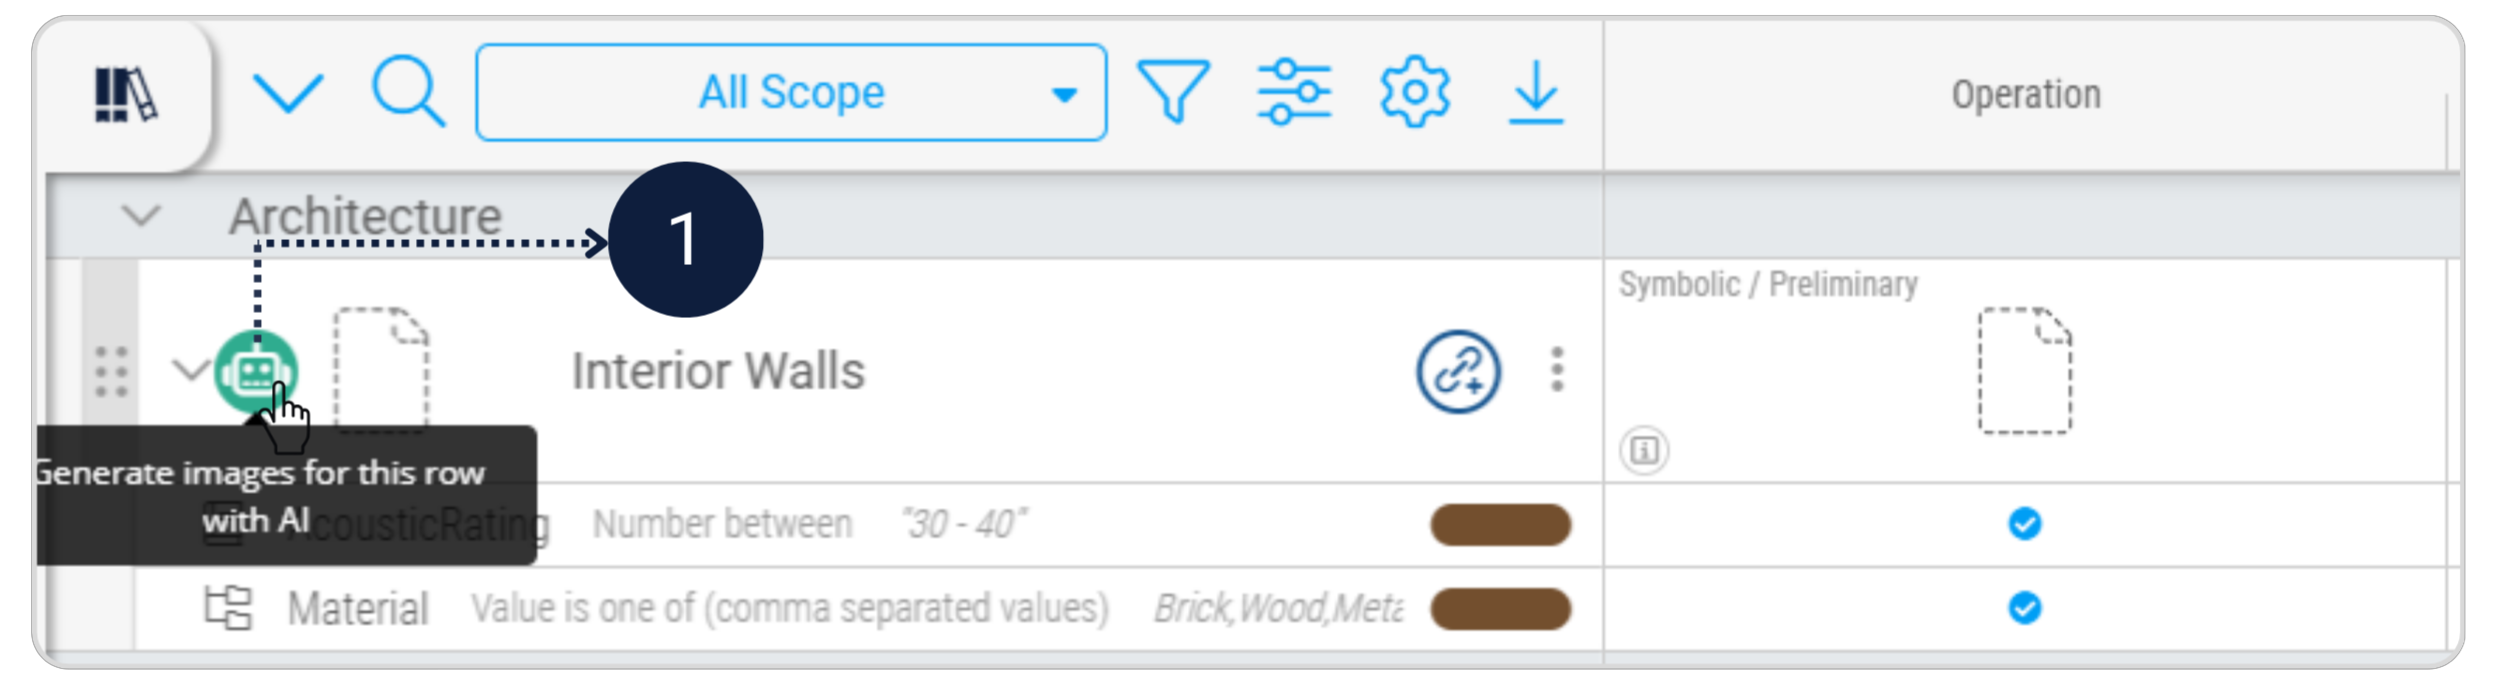
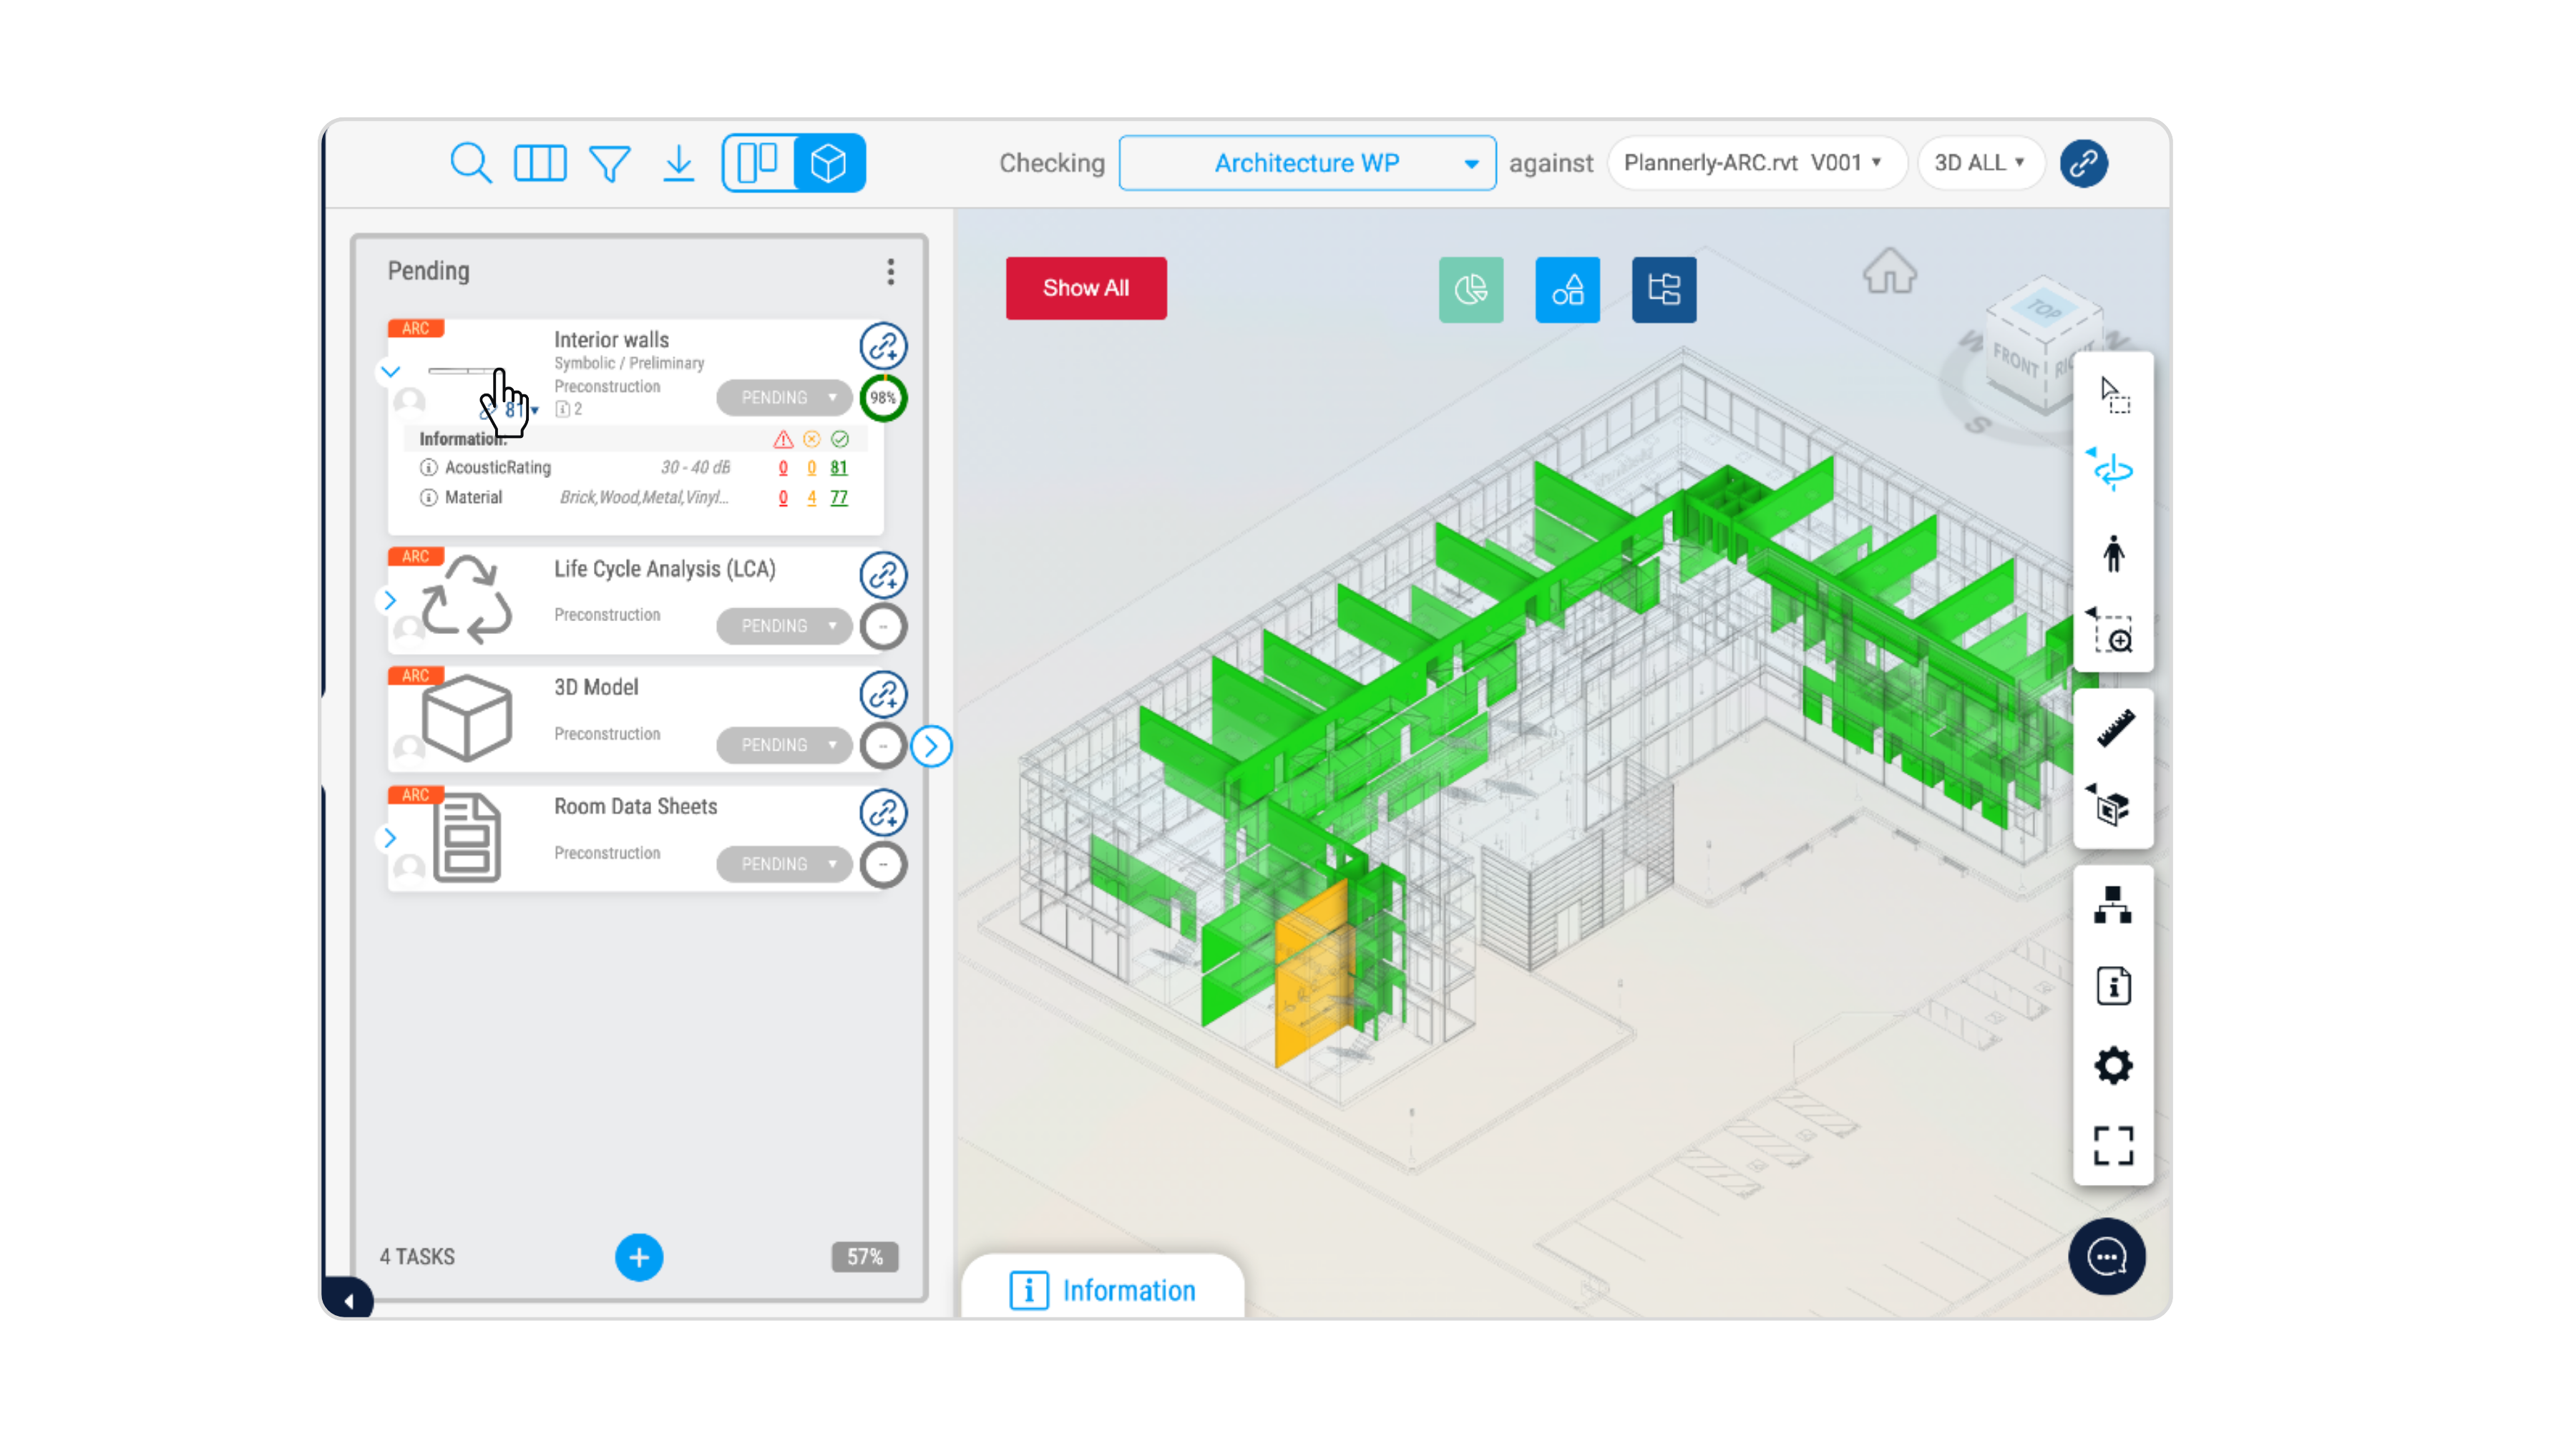
Assign requirements
Assign the relevant information requirements to each task in the Operation column.
For each task, select the information required to support the operation and maintenance of that asset.
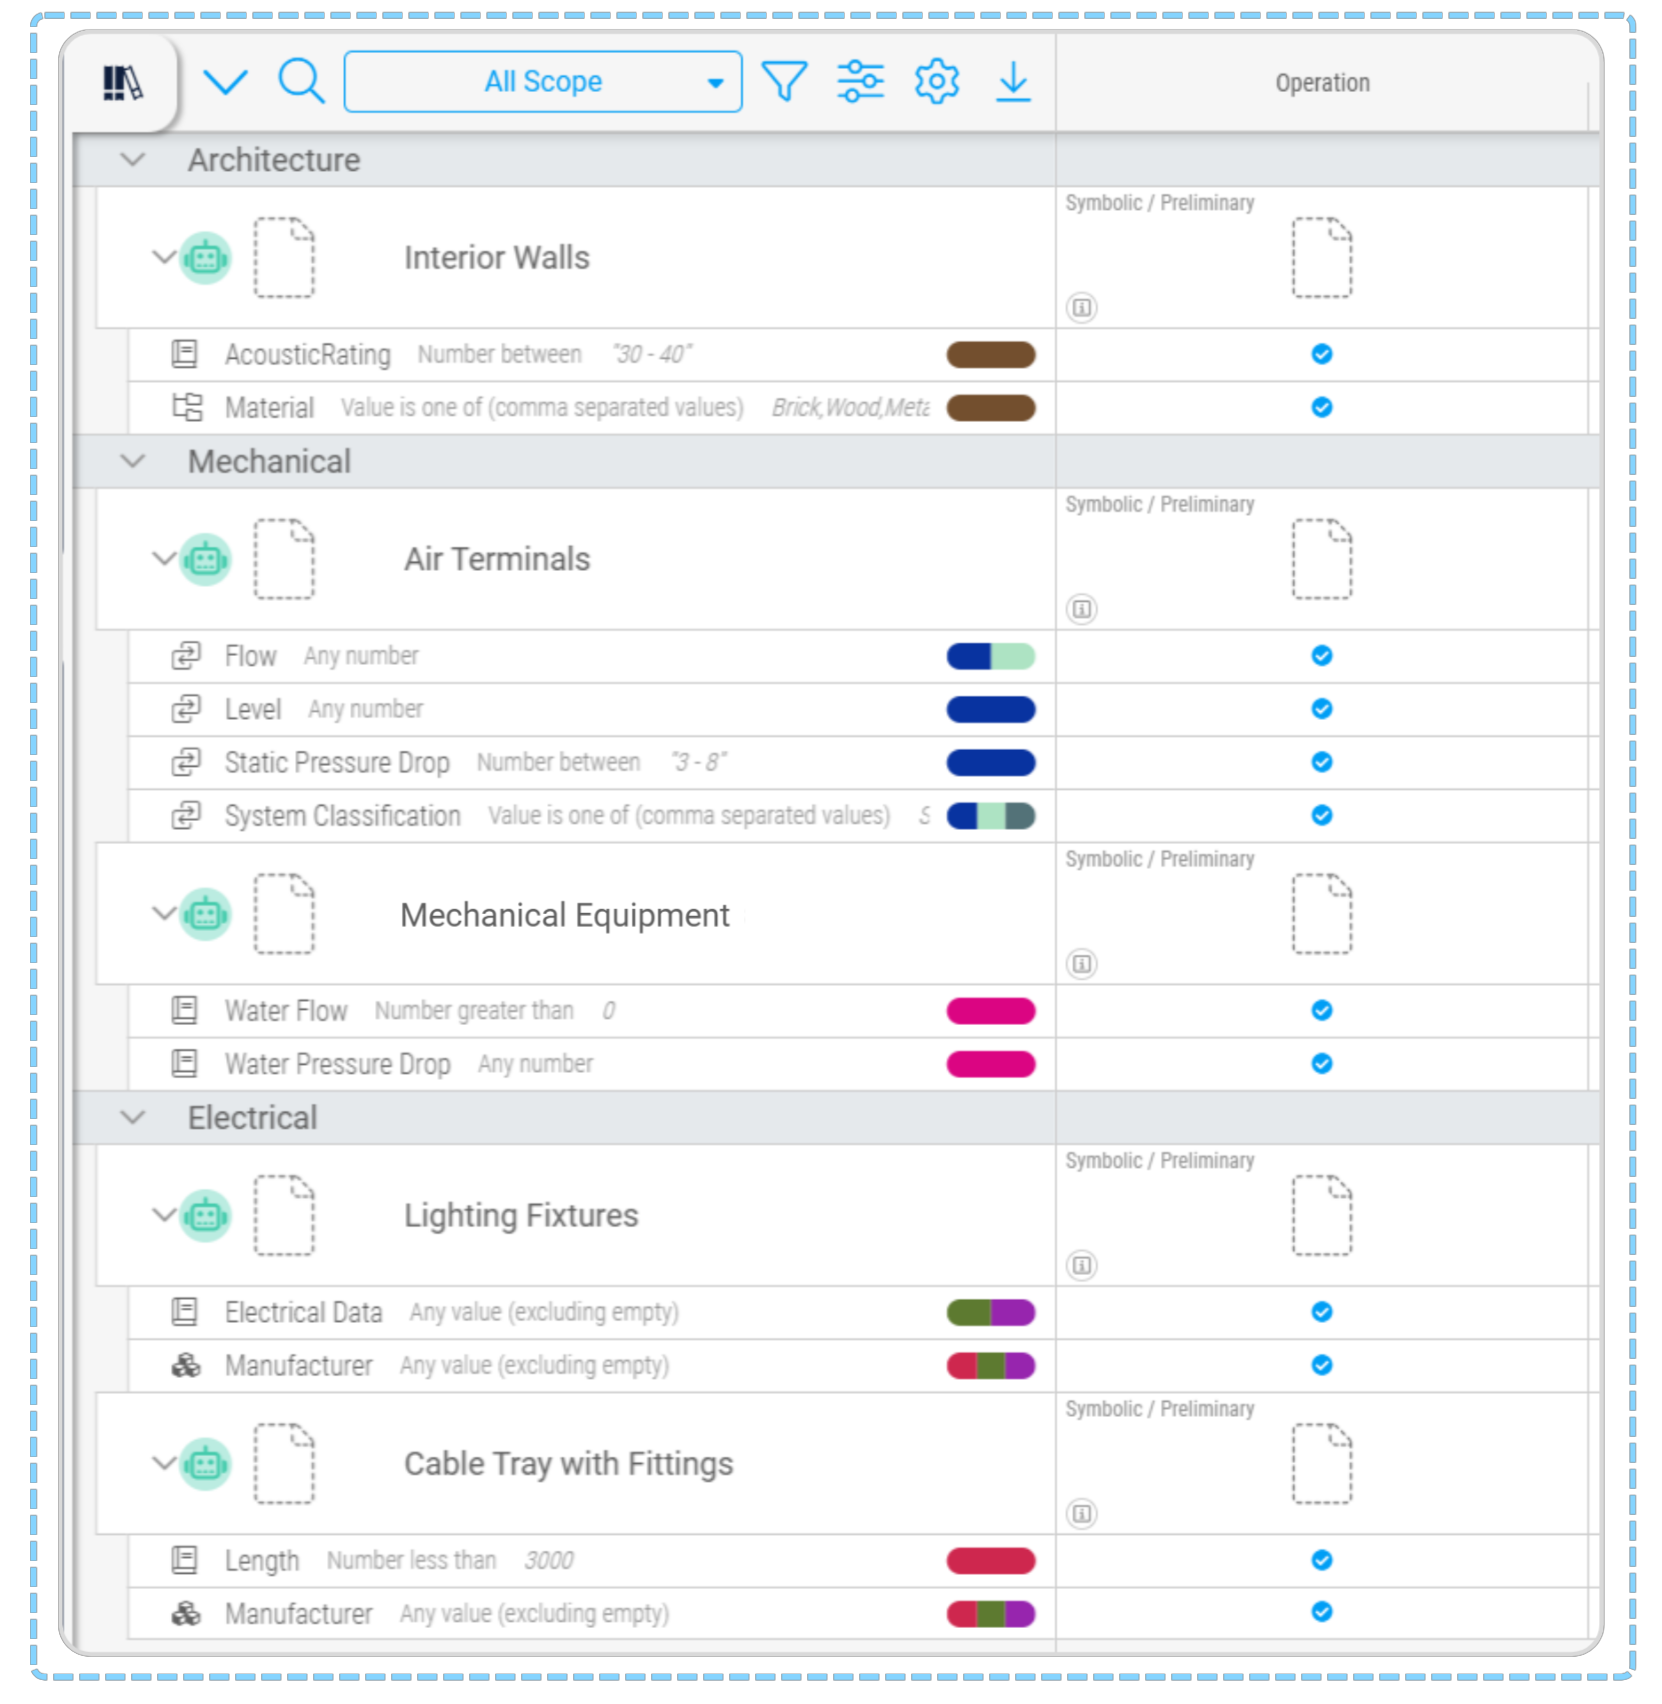
Assign the following:
- Interior Walls - AcousticRating, Material
- Air Terminals - Flow, Level, Static Pressure Drop, System Classification
- Mechanical Equipment - Water Flow, Water Pressure Drop
- Lighting Fixtures - Electrical Data, Manufacturer
- Cable Tray with Fittings - Length, Manufacturer
Each task should show only the information requirements that are relevant to that asset at the operational stage.
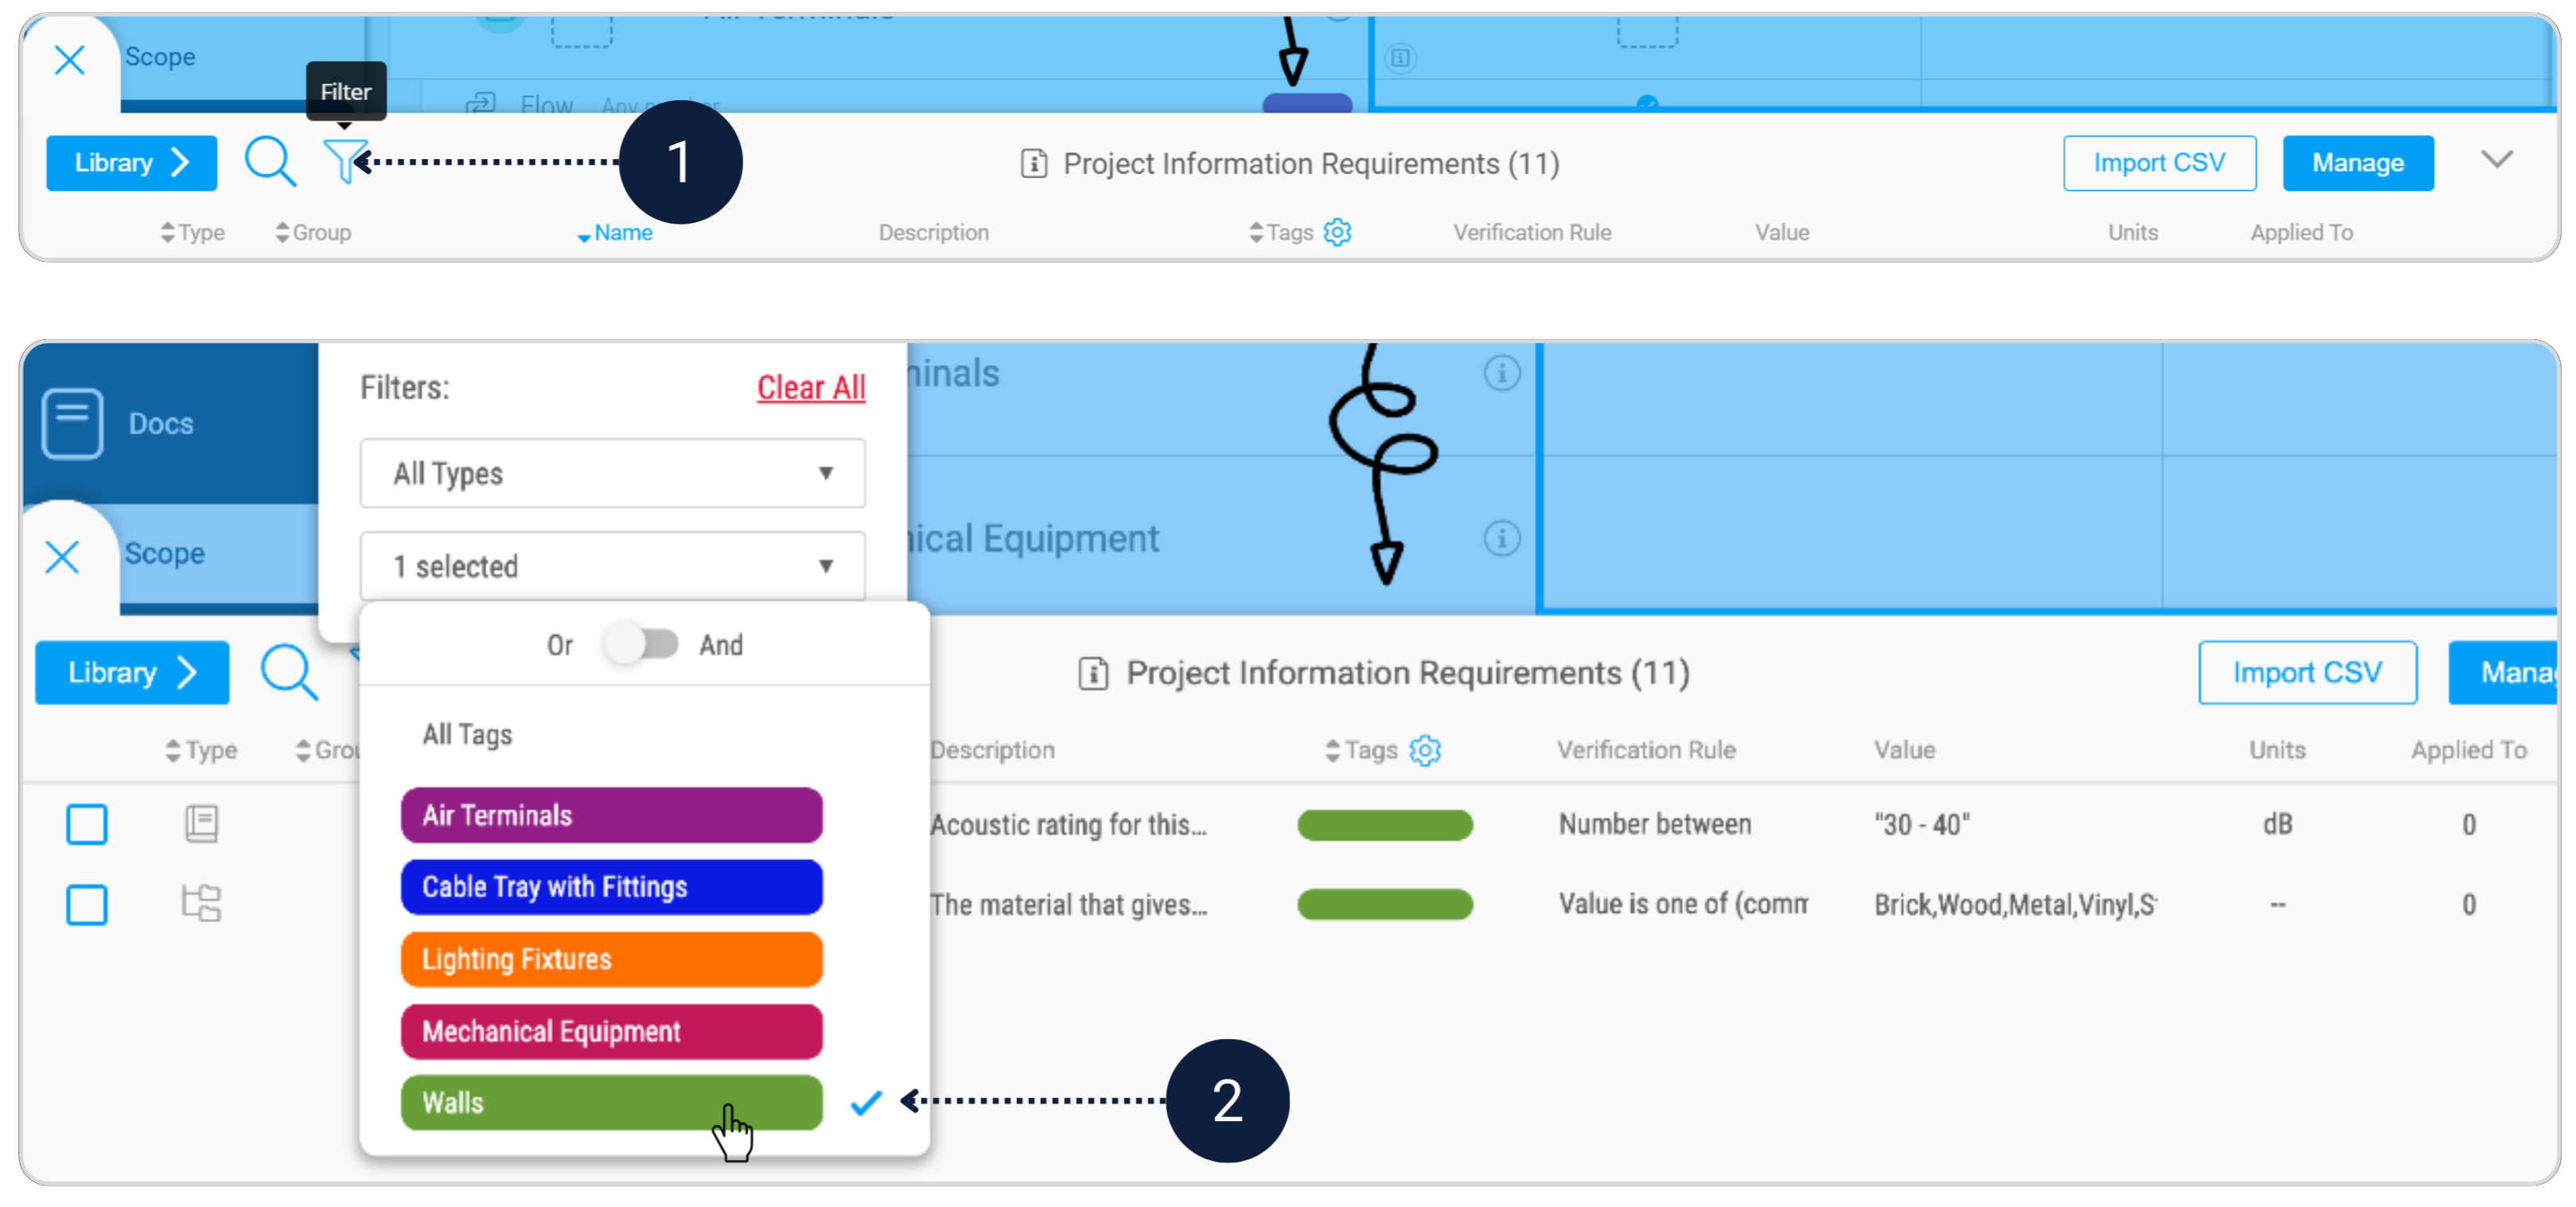
You can use the Filter-by-Tag option to isolate the correct Information Requirements and select all to assign:
Finalise the EIR document
The information requirements for each asset have now been defined and structured in Scope.
Complete the remaining sections in this template to finalise the EIR, as this document will form part of the tender/contract information.
Want to learn more about defining information requirements?
Learn more about creating the detailed responsibility matrix
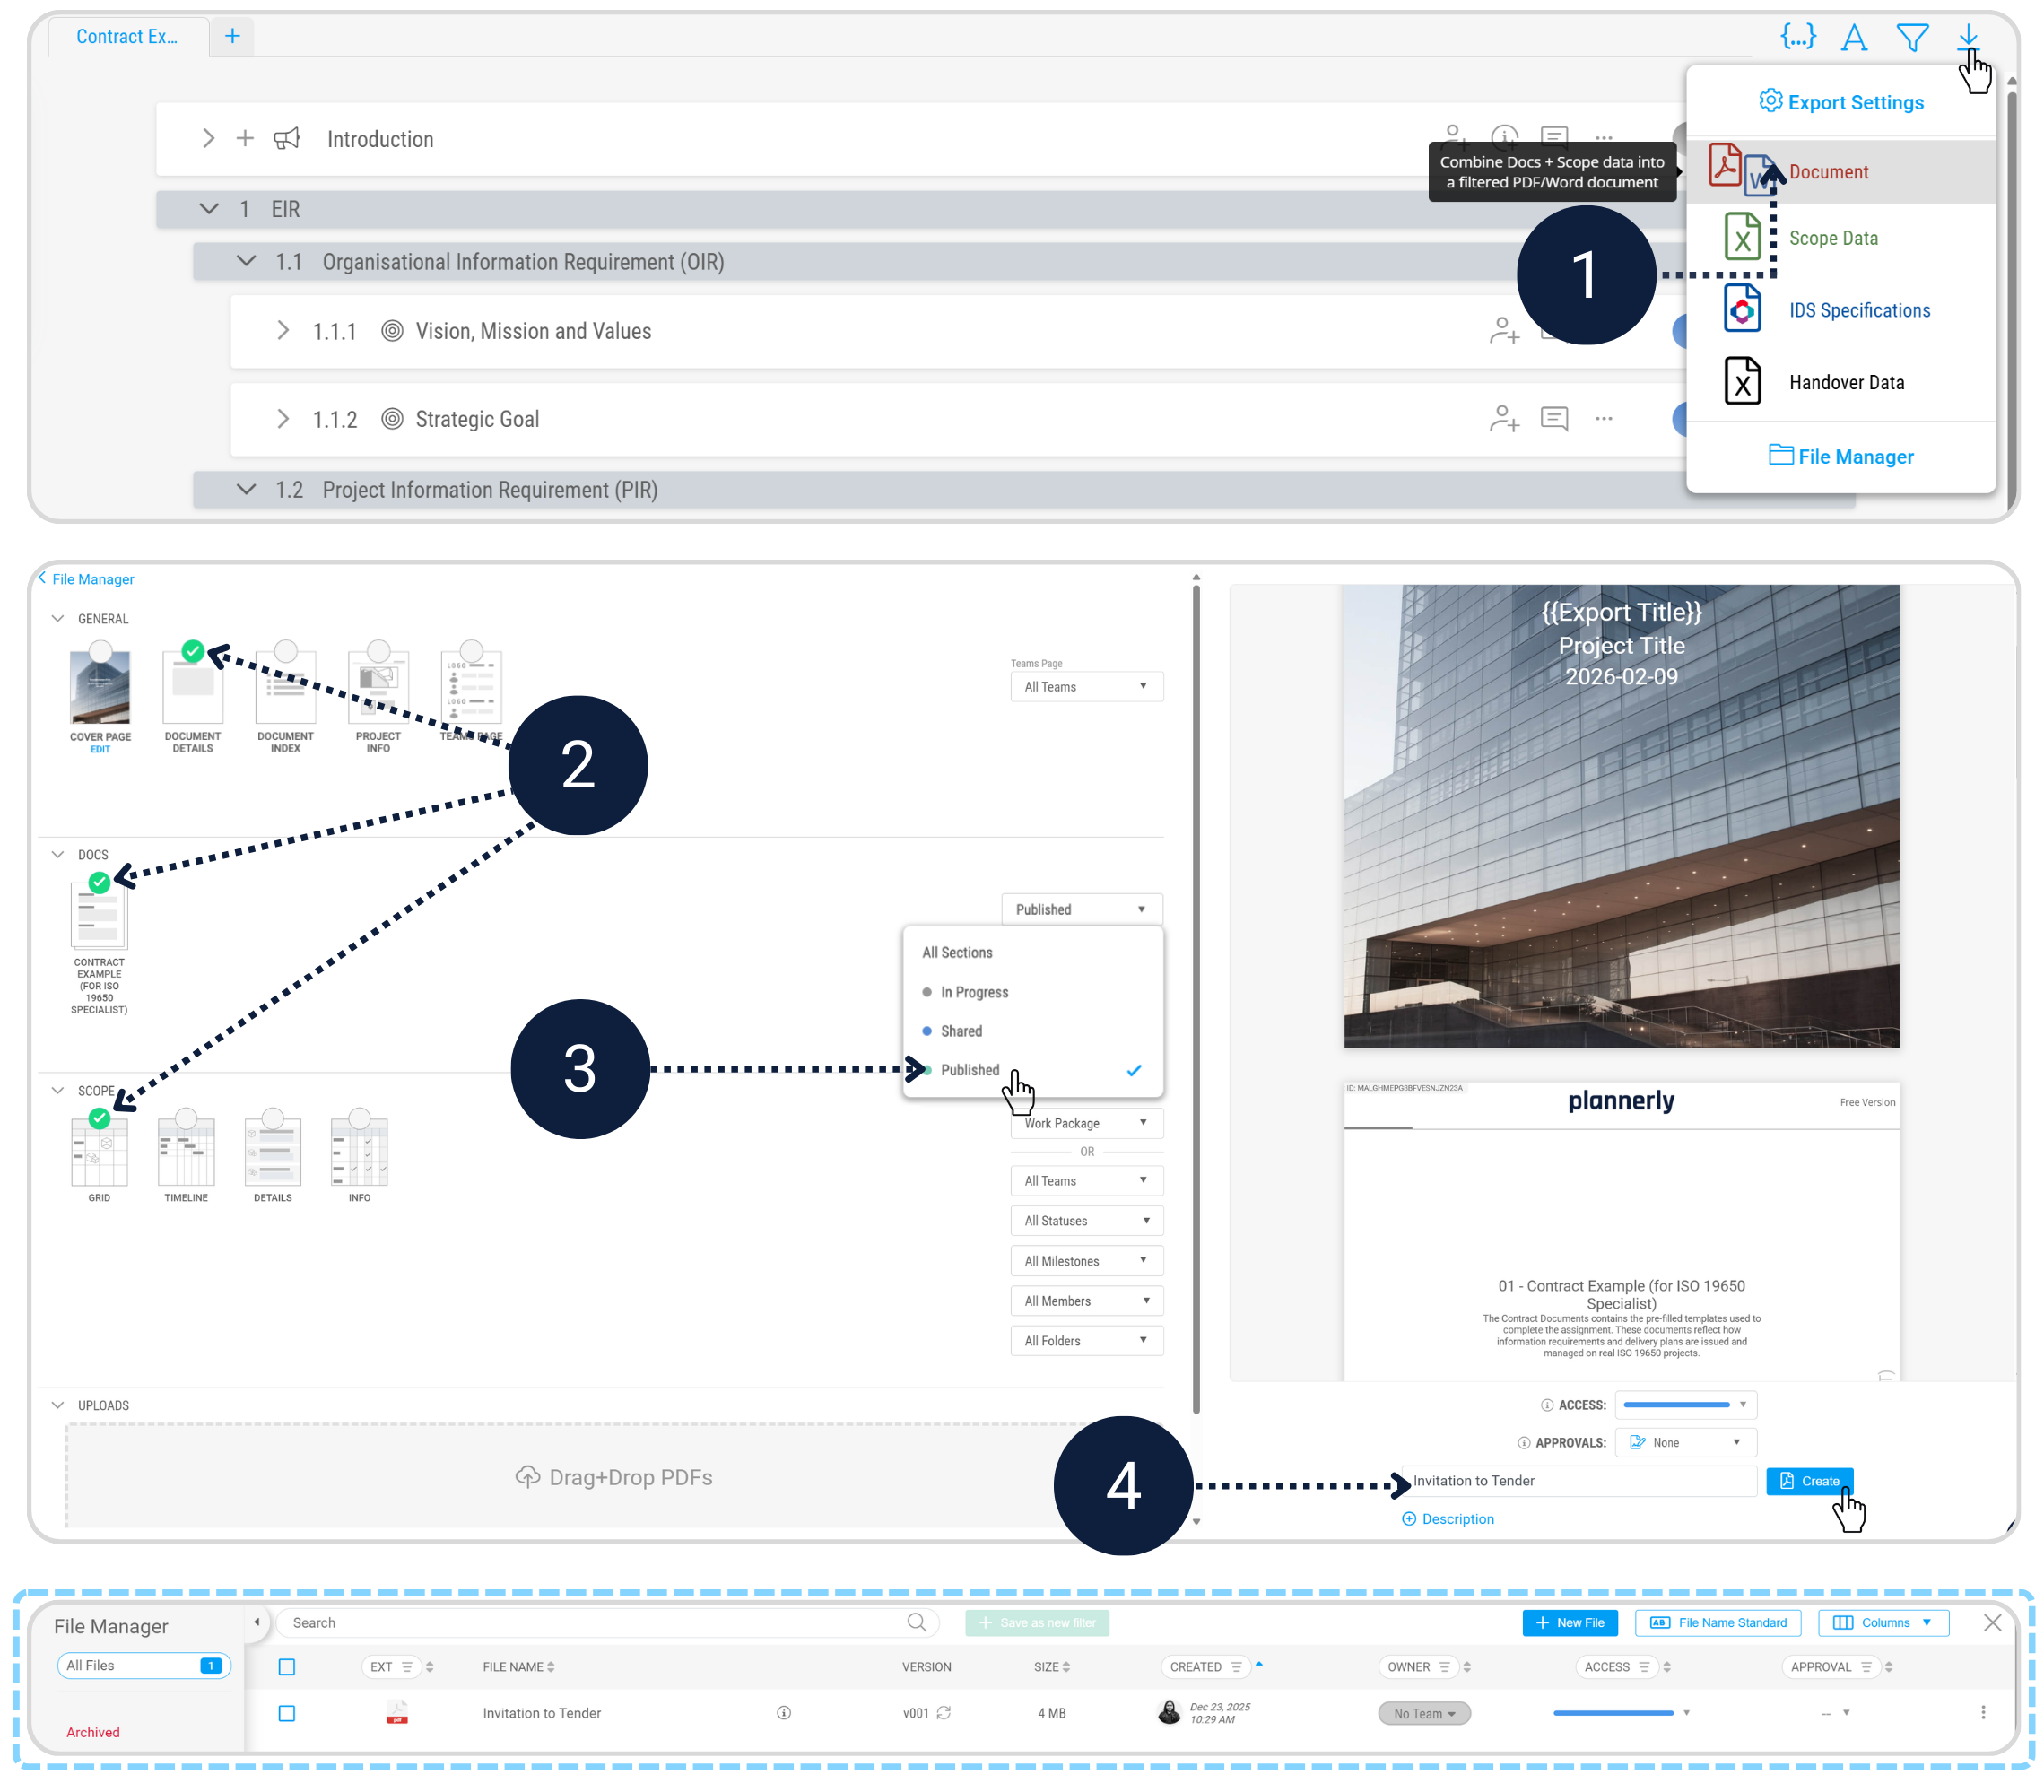
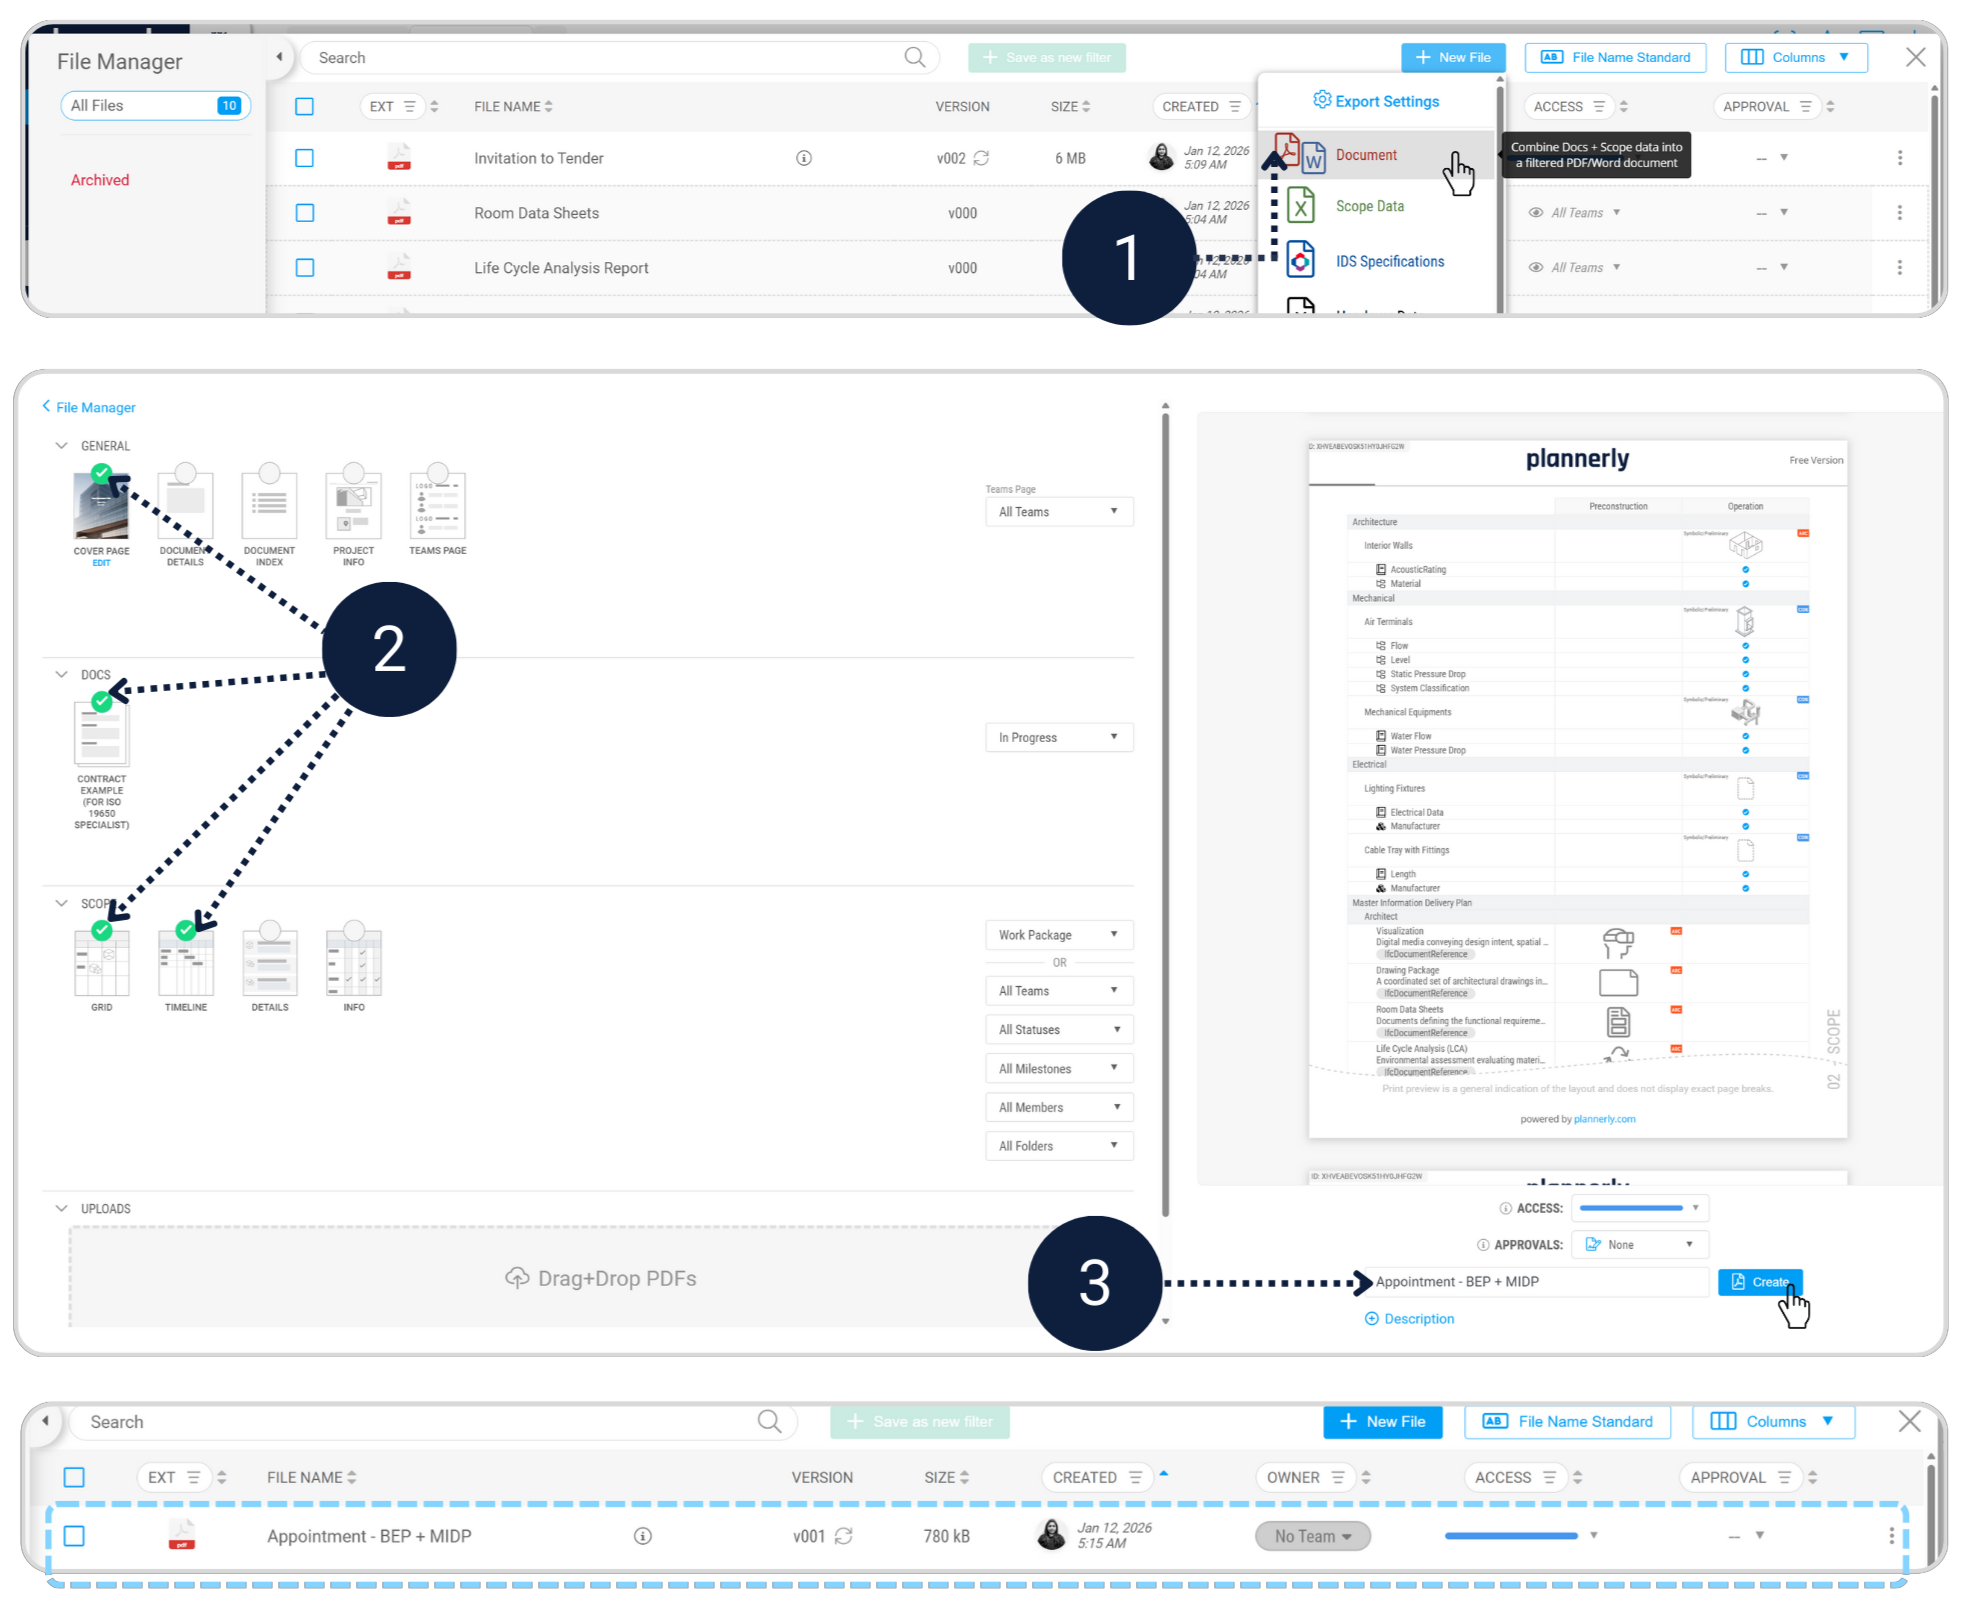
Step 1.3 - Prepare the EIR final deliverables Docs File Manager Tender Export
Required checklist
- Set all tender-relevant EIR sections to Published.
- Export and upload the Invitation to Tender document in the File Manager.
Prepare the EIR for export
All Appointed Parties shall read, understand and agree to the requirements of the EIR as it is cascaded down through the whole project supply chain.
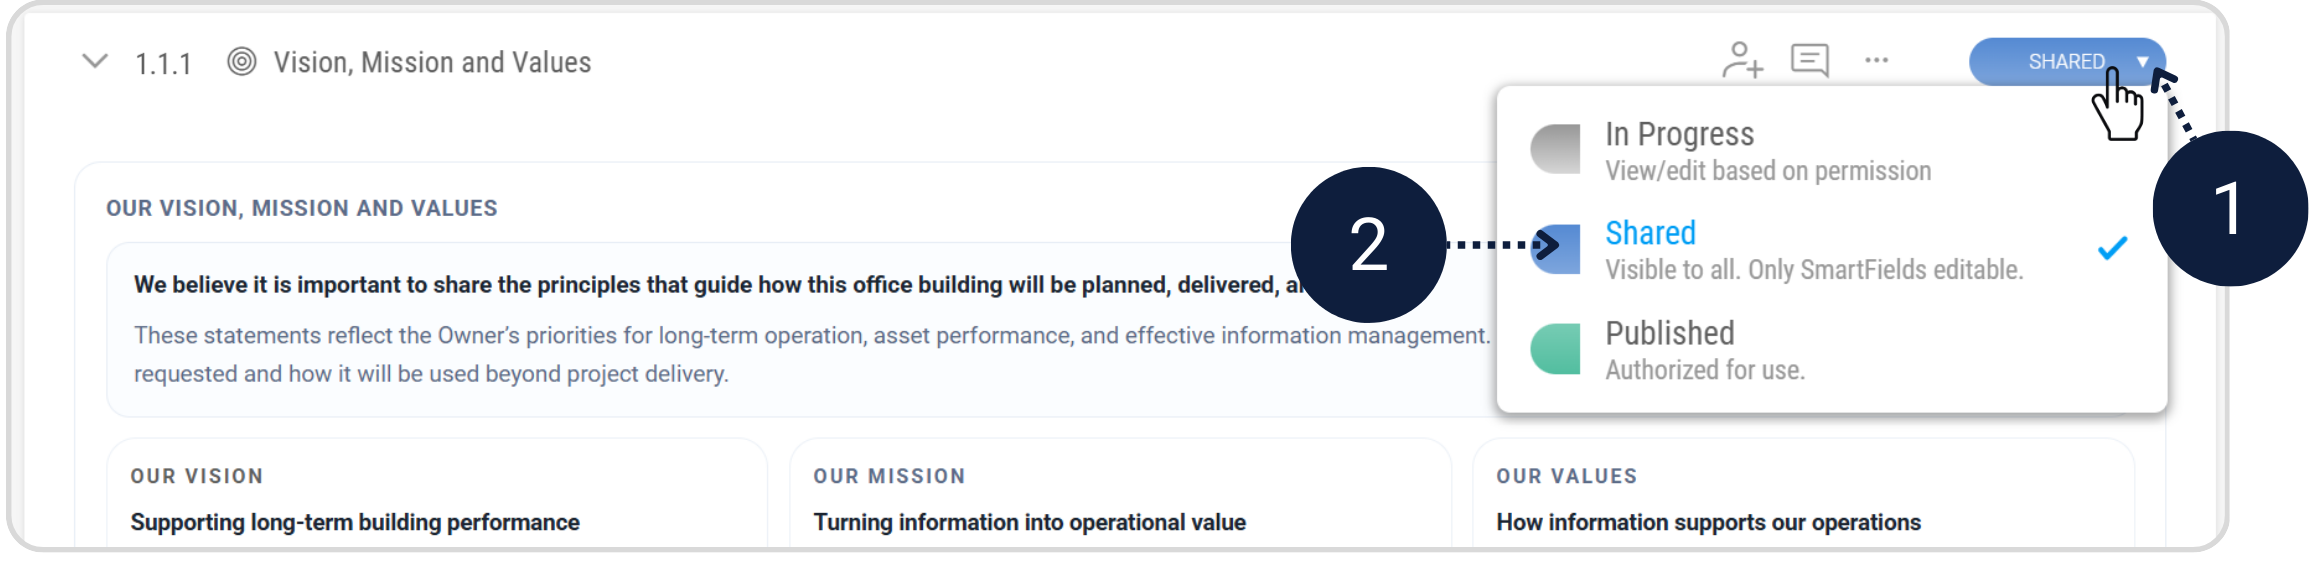
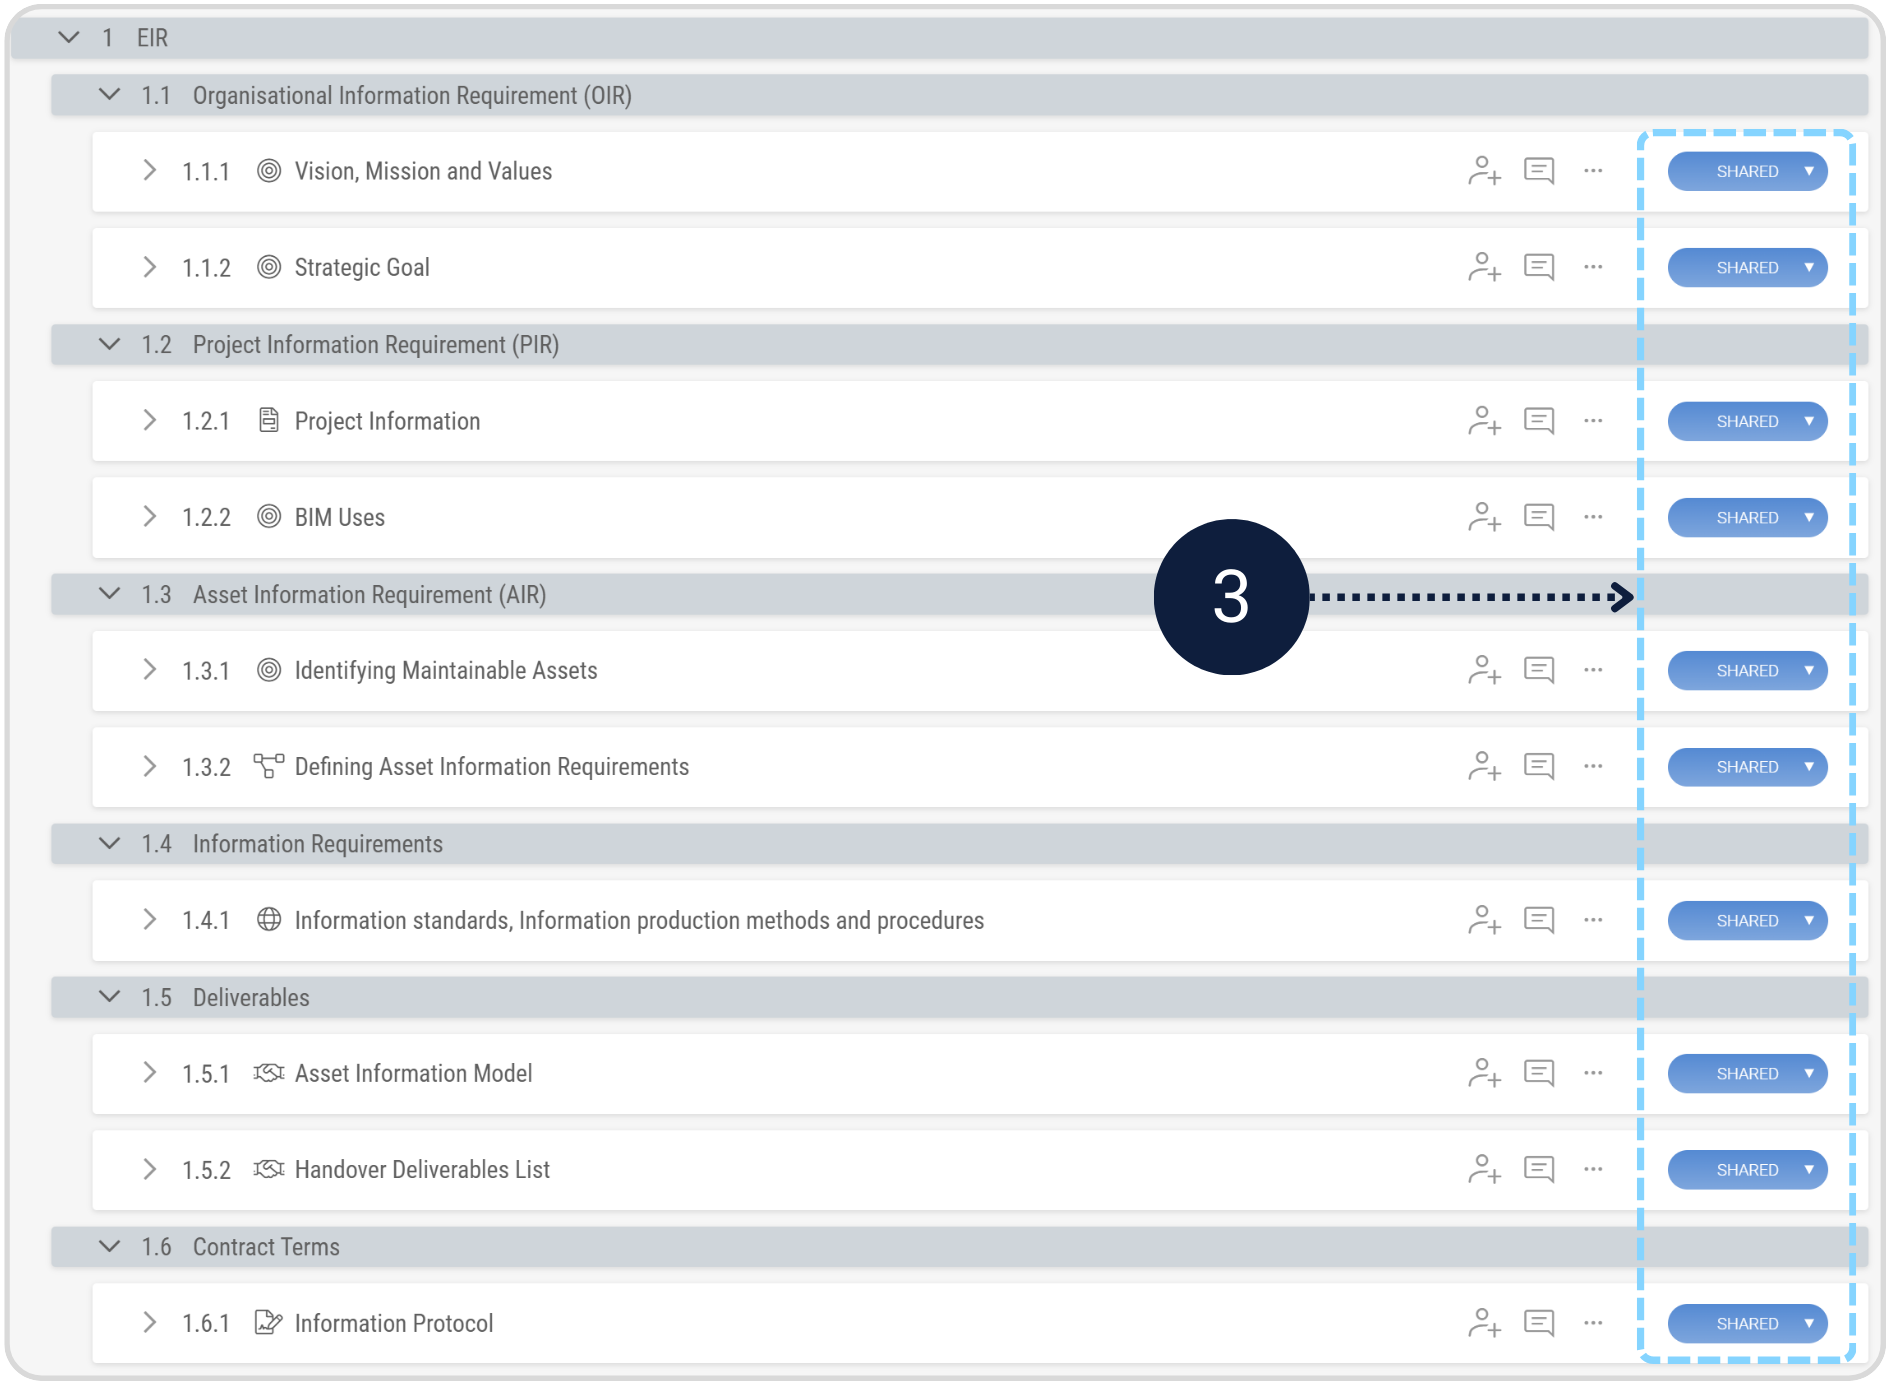
Before exporting the Invitation to Tender document, review the EIR structure and confirm which sections are to be included in the tender package.
Update the status of all relevant sections from In Progress to Published.
When exporting the Tender document, we can use the Section Status to filter only the Published content to be included in the PDF.

Create Invitation to Tender Document
Export your completed EIR + AIR Scope as a single PDF document.
Assignment 2 - BEP + MIDP BEP MIDP TIDP
Turn requirements into a delivery plan the team can follow.
You are now stepping into the role of the Lead Appointed Party. In this task, you’ll translate the Owner’s EIR into a coordinated plan that makes delivery clear - what gets delivered, who delivers it, and when. You’ll also set up Work Packages so models can be verified against the agreed requirements later. The BIM Execution Plan (BEP) explains how the project will deliver information, while the Master Information Delivery Plan (MIDP) defines who delivers what, and when. On real projects, these plans often fail because they are written in isolation or simply copied from previous jobs. Here, you will build them directly from the EIR you already created - so they are connected, realistic, and verifiable. Requirements without a delivery plan are just empty promises. The BEP and MIDP are where intent becomes commitment - linking what’s needed to who delivers it, when, and how it will be verified. These steps build directly on Assignment 1. If your EIR is unclear or incomplete, you will feel it immediately here.
Assignment 2 - Video Walkthrough
Follow along as we complete every step of Assignment 2 live inside Plannerly. You will see exactly how to create the BEP, set up the MIDP with milestones and deliverables, and configure Work Packages so models can be verified against agreed requirements. Every click, every decision, right alongside you.
ISO 19650 Specialist Assignment 2 - BEP + MIDP
What you will do
Step 2.1 - Complete the BEP in Docs Docs BEP
What the BEP is really for
A BIM Execution Plan (BEP) is not a “BIM document” you write because someone asked for it. It is the team’s operating manual for how information will be produced, checked, shared, and accepted on this project.
In ISO 19650 terms, the BEP sits between the requirements (what the Appointing Party needs) and the delivery plan (what the delivery team will produce and when). If the EIR is the “what and why”, the BEP is the “how”.
- Who is doing what (roles, responsibilities, approvals)?
- How will information be created, named, shared, reviewed, and signed off?
- How will we prove the deliverables meet the EIR (verification and acceptance)?
This assignment makes it easier than a real project - the structure is already in place, the template content is already aligned to ISO 19650, and you only need to complete the SmartFields to capture the important decisions. The key skill you are practicing is not typing - it is choosing clear, workable processes that match the EIR.
Required checklist
- Project information management roles and responsibilities.
- Model and information delivery processes.
- Coordination, review, and approval workflows.
- Common Data Environment usage.
Completing the BEP
Access the pre-filled BIM Execution Plan (BEP) template provided in the Contract Documents. This document already contains guidance and structure aligned with ISO 19650.
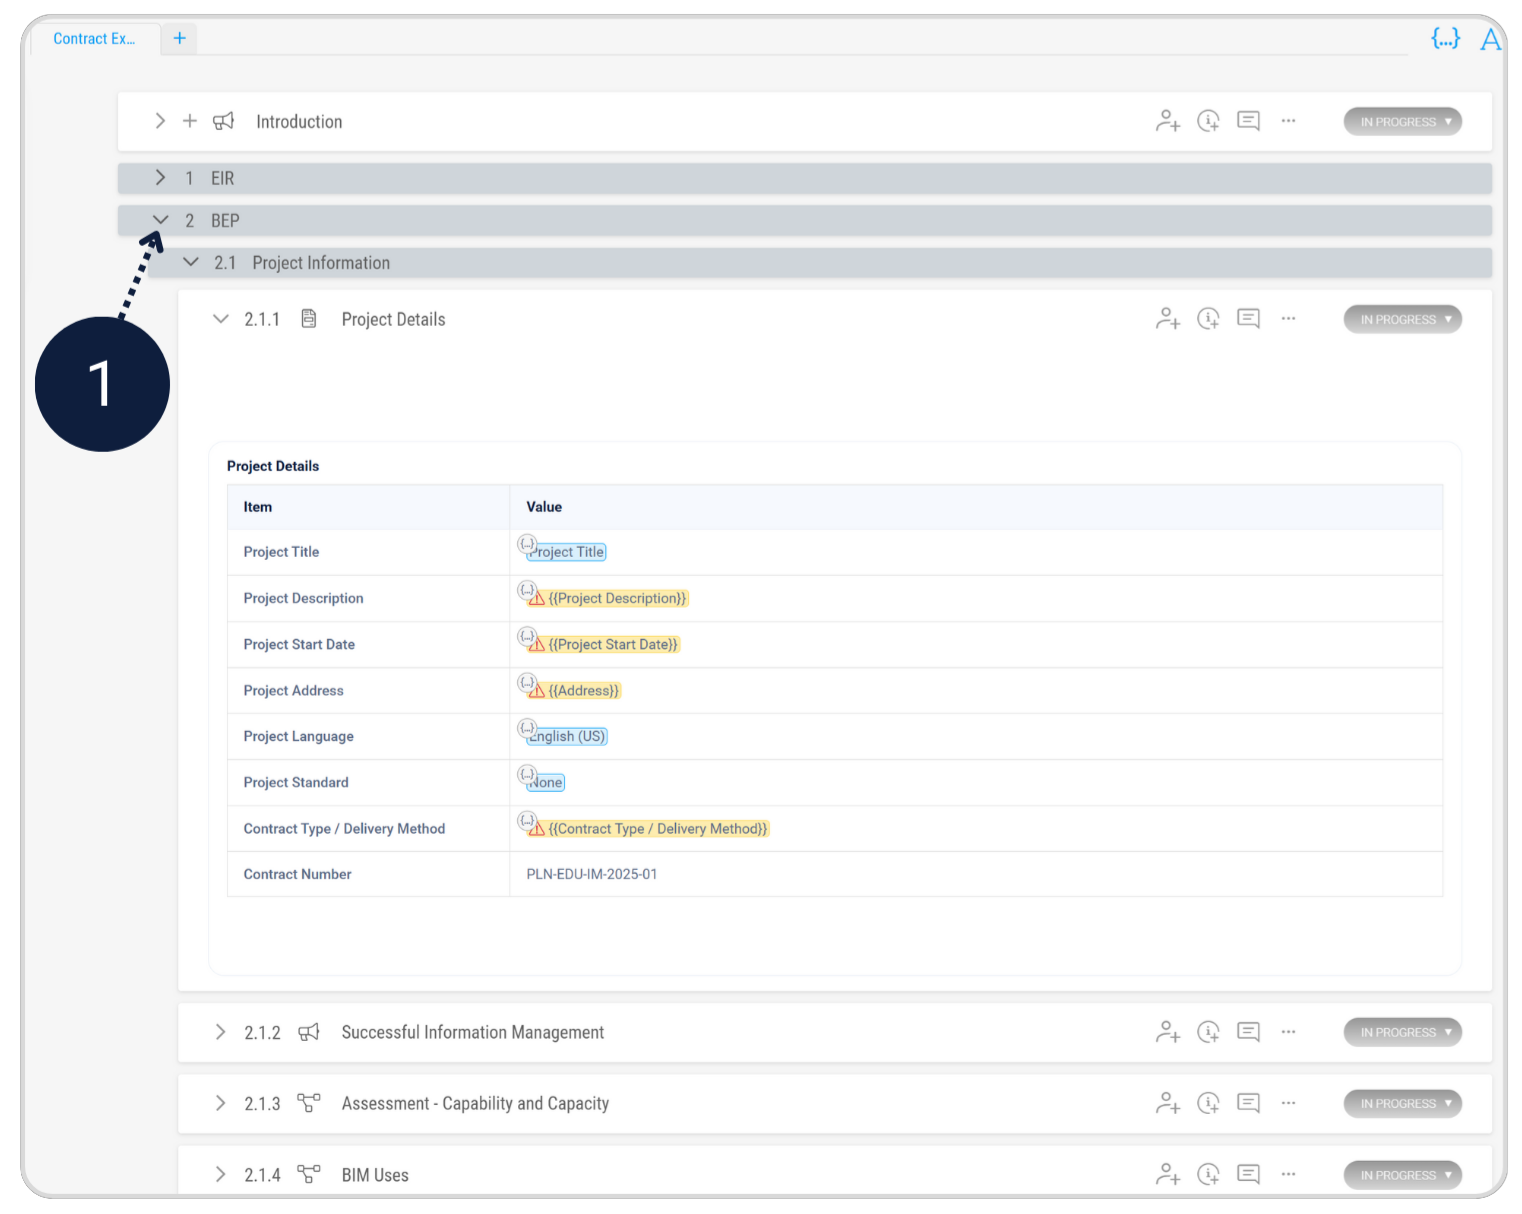
- Complete the highlighted SmartFields and follow the guidance embedded in each section.
- Keep the BEP aligned to the EIR - do not add processes that are not required by the EIR.
- Write processes so a real project team could follow them (clear owners, clear steps, clear outputs).
- If you are unsure, choose the simplest process that still protects quality (clarity beats complexity).
When you finish, you should be able to point to the BEP and say: “This is how we will deliver the information that matters, in a way that can be checked and accepted.”
Step 2.2 - Build the MIDP in Scope Scope MIDP
What the MIDP really is
The Master Information Delivery Plan (MIDP) organises what will be delivered, by whom, and when.
If the EIR defines what information is required, and the BEP defines how the team will work, the MIDP defines when each information container will actually be delivered and who is responsible for it.
- Tasks created in Scope become delivery commitments.
- Each task is assigned to an owner.
- Milestones define when deliverables are due.
- Dependencies define the logical sequence of work.
In this assignment, you will import a structured example MIDP from the Plannerly Library to speed things up. Your job is then to adjust it so it reflects a realistic and logical delivery sequence.
Required checklist
- Import the Example Project Scope MIDP from the Plannerly Templates Library.
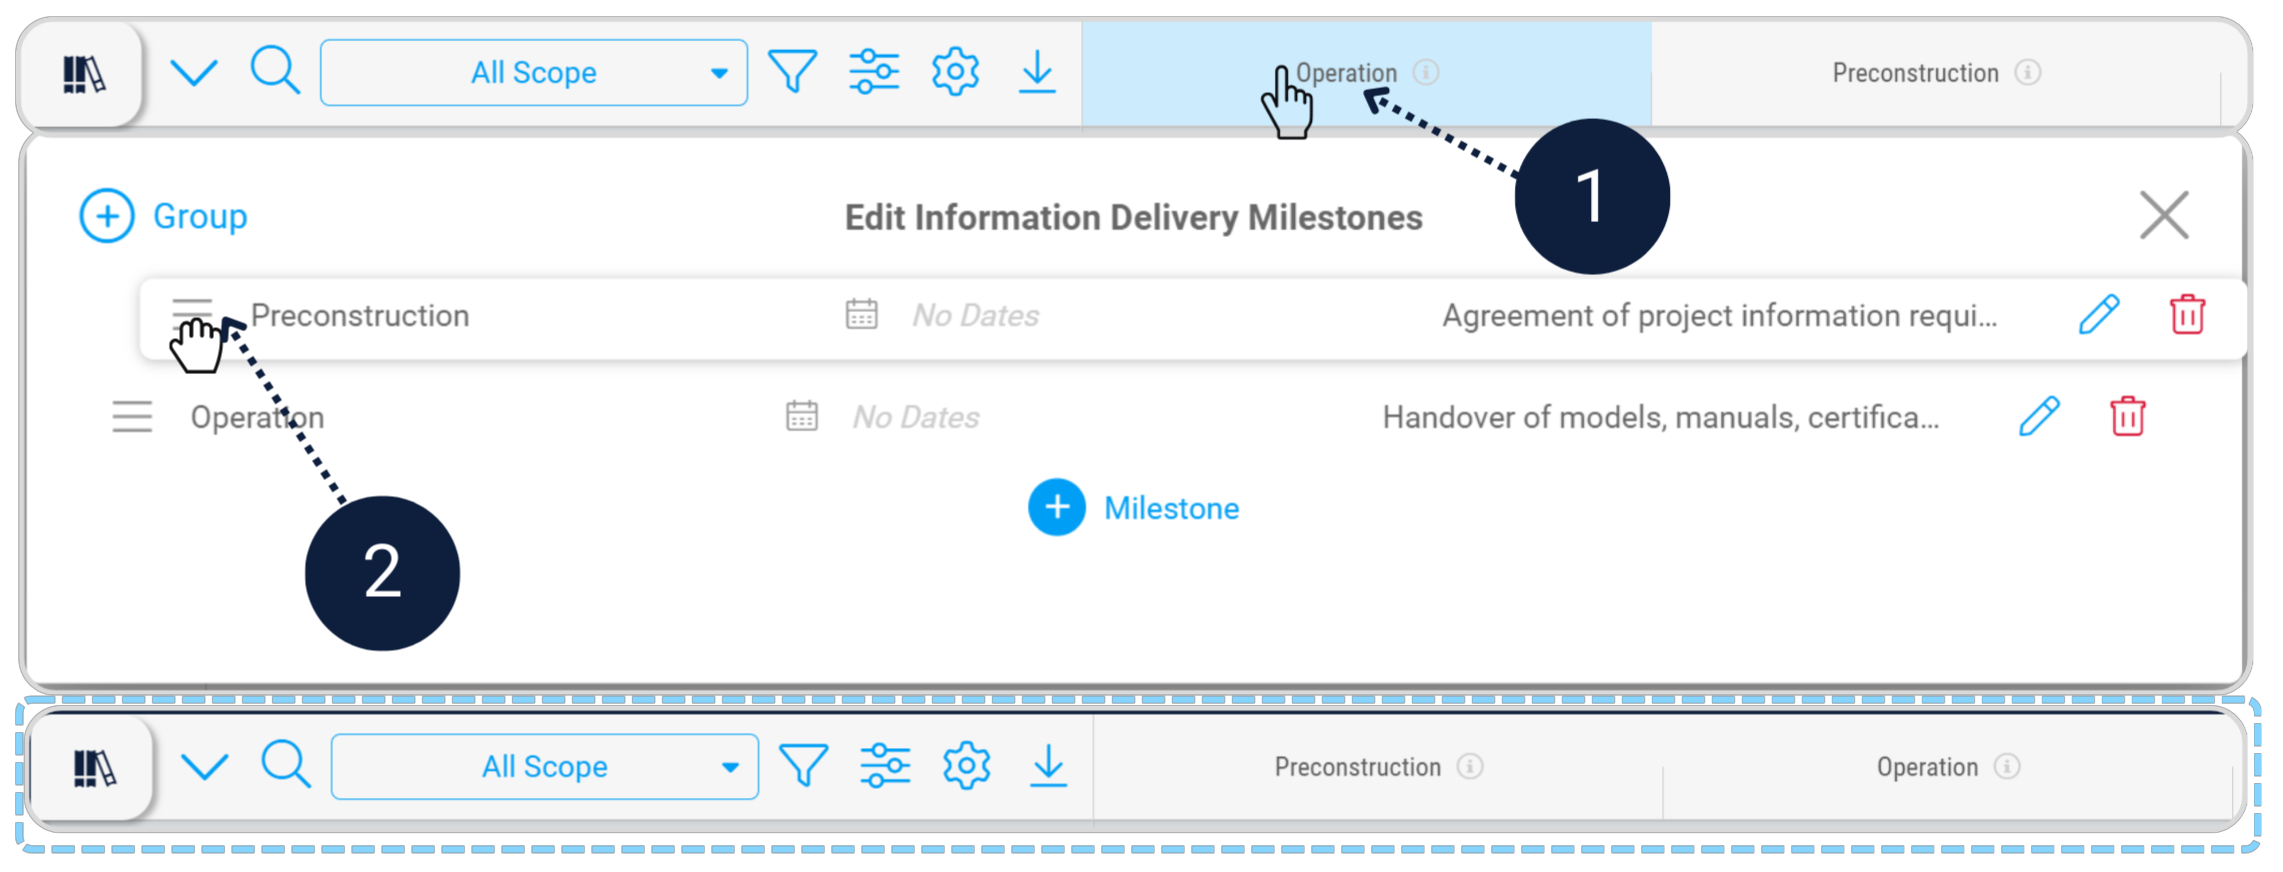
- Reorder milestones so Pre-Construction appears before Operation.
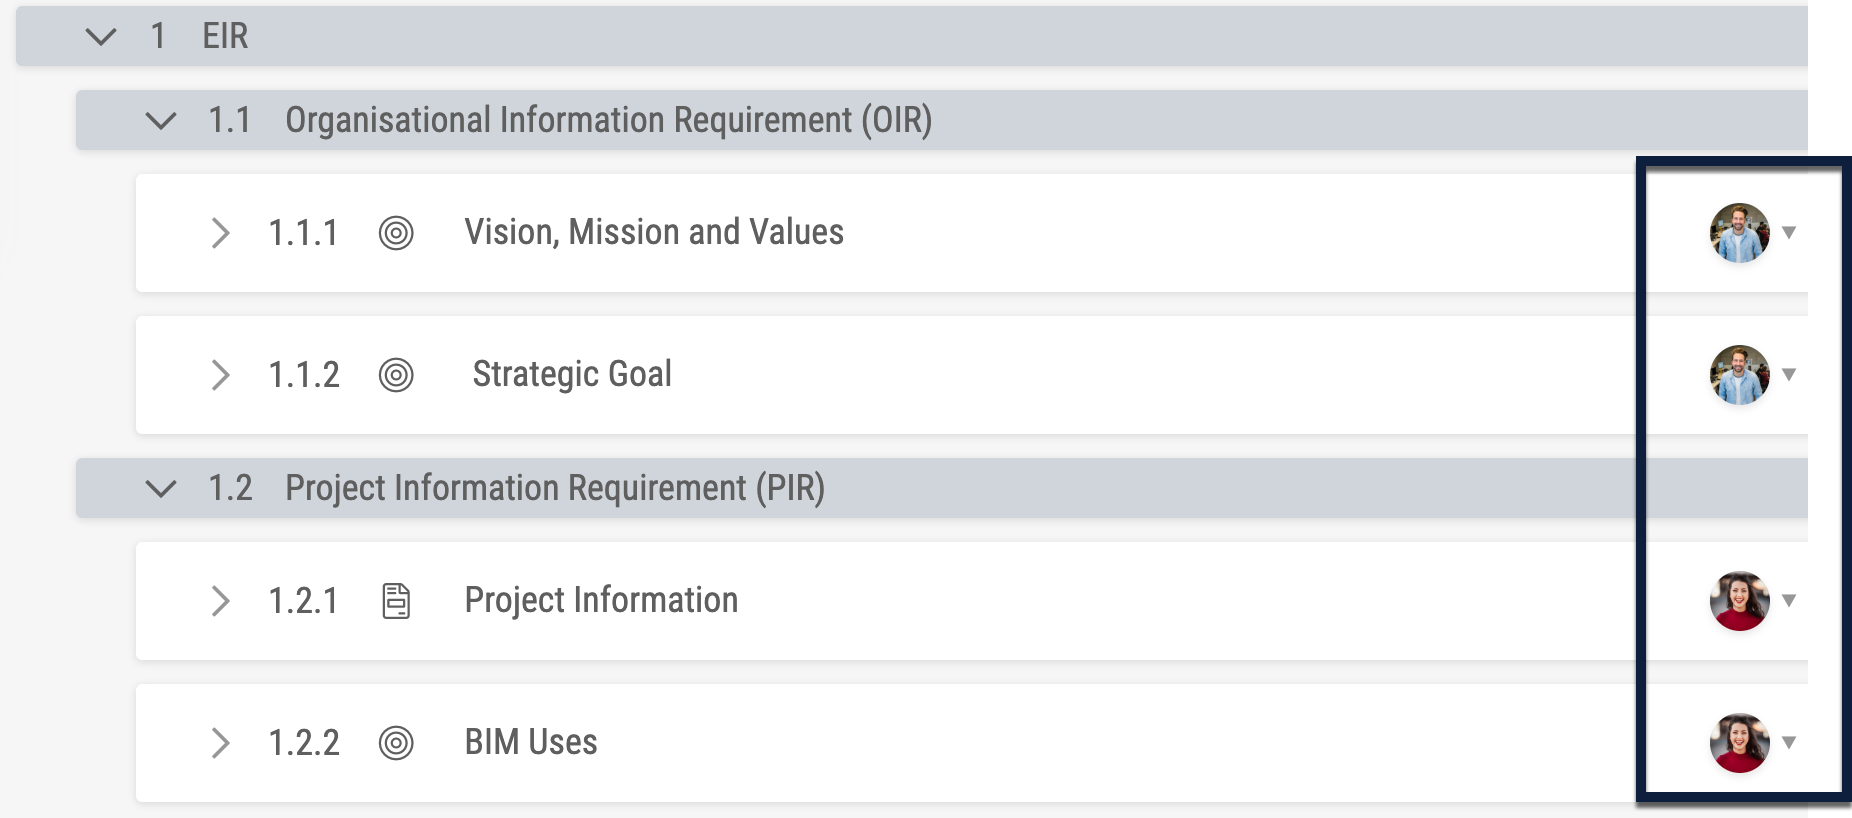
- Assign owners and confirm delivery dates.
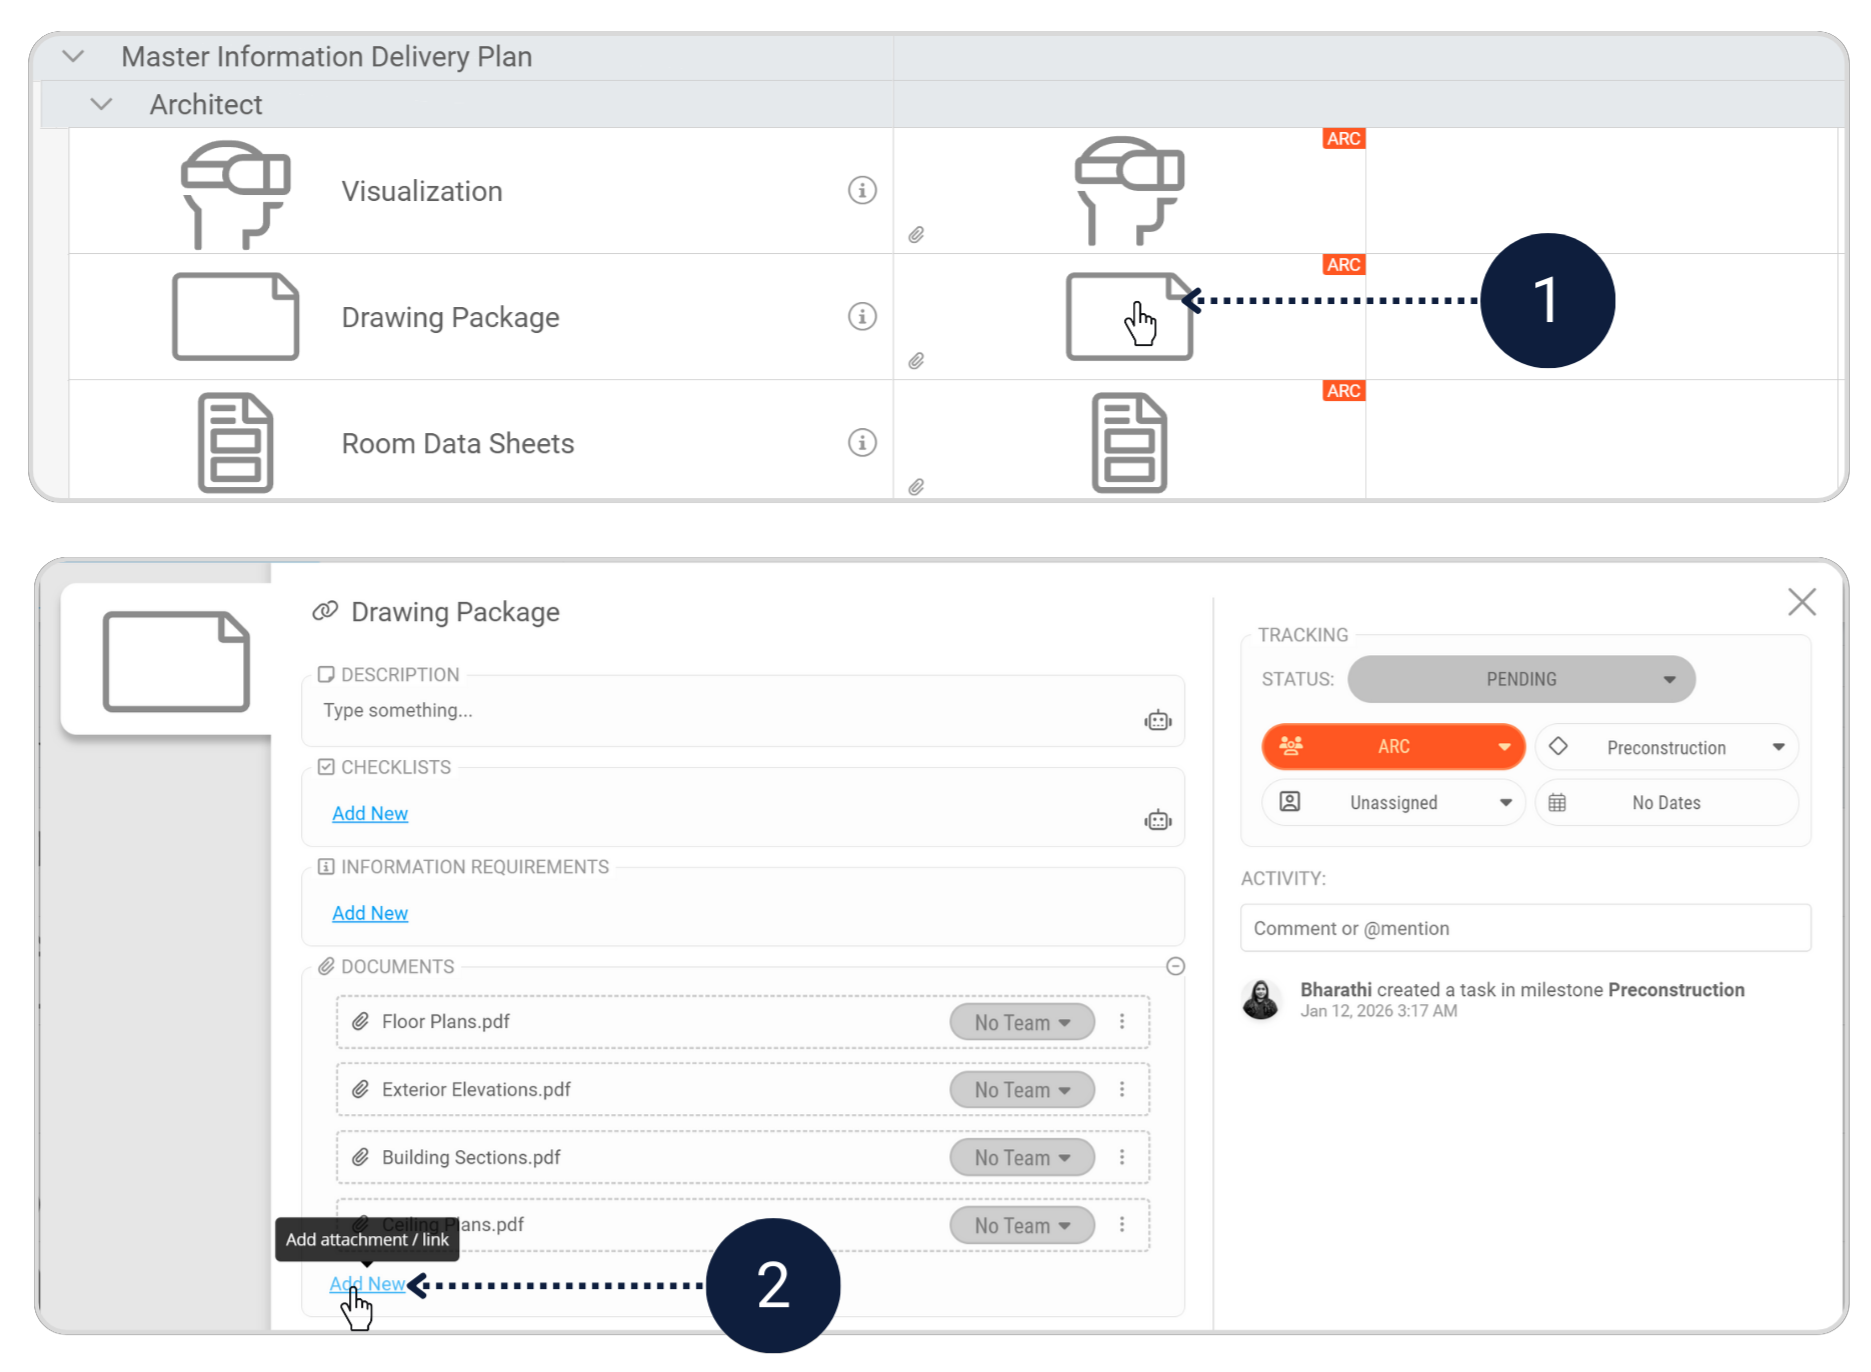
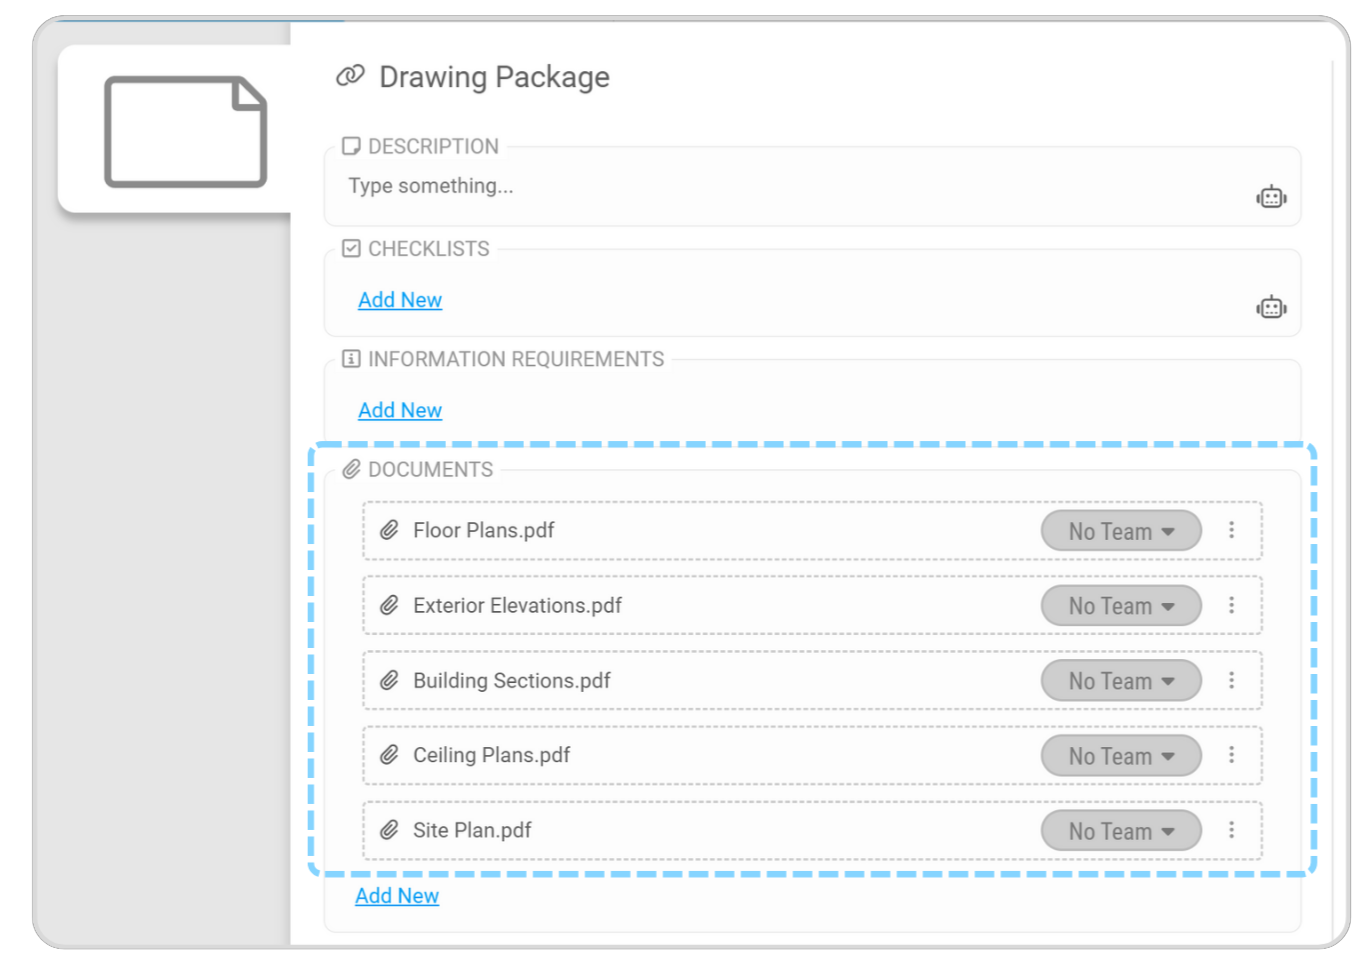
- Add one document placeholder: Site Plan.pdf to the Drawing Package.
- Add or review task dependencies in Timeline view.
Import the MIDP from the Plannerly Library:
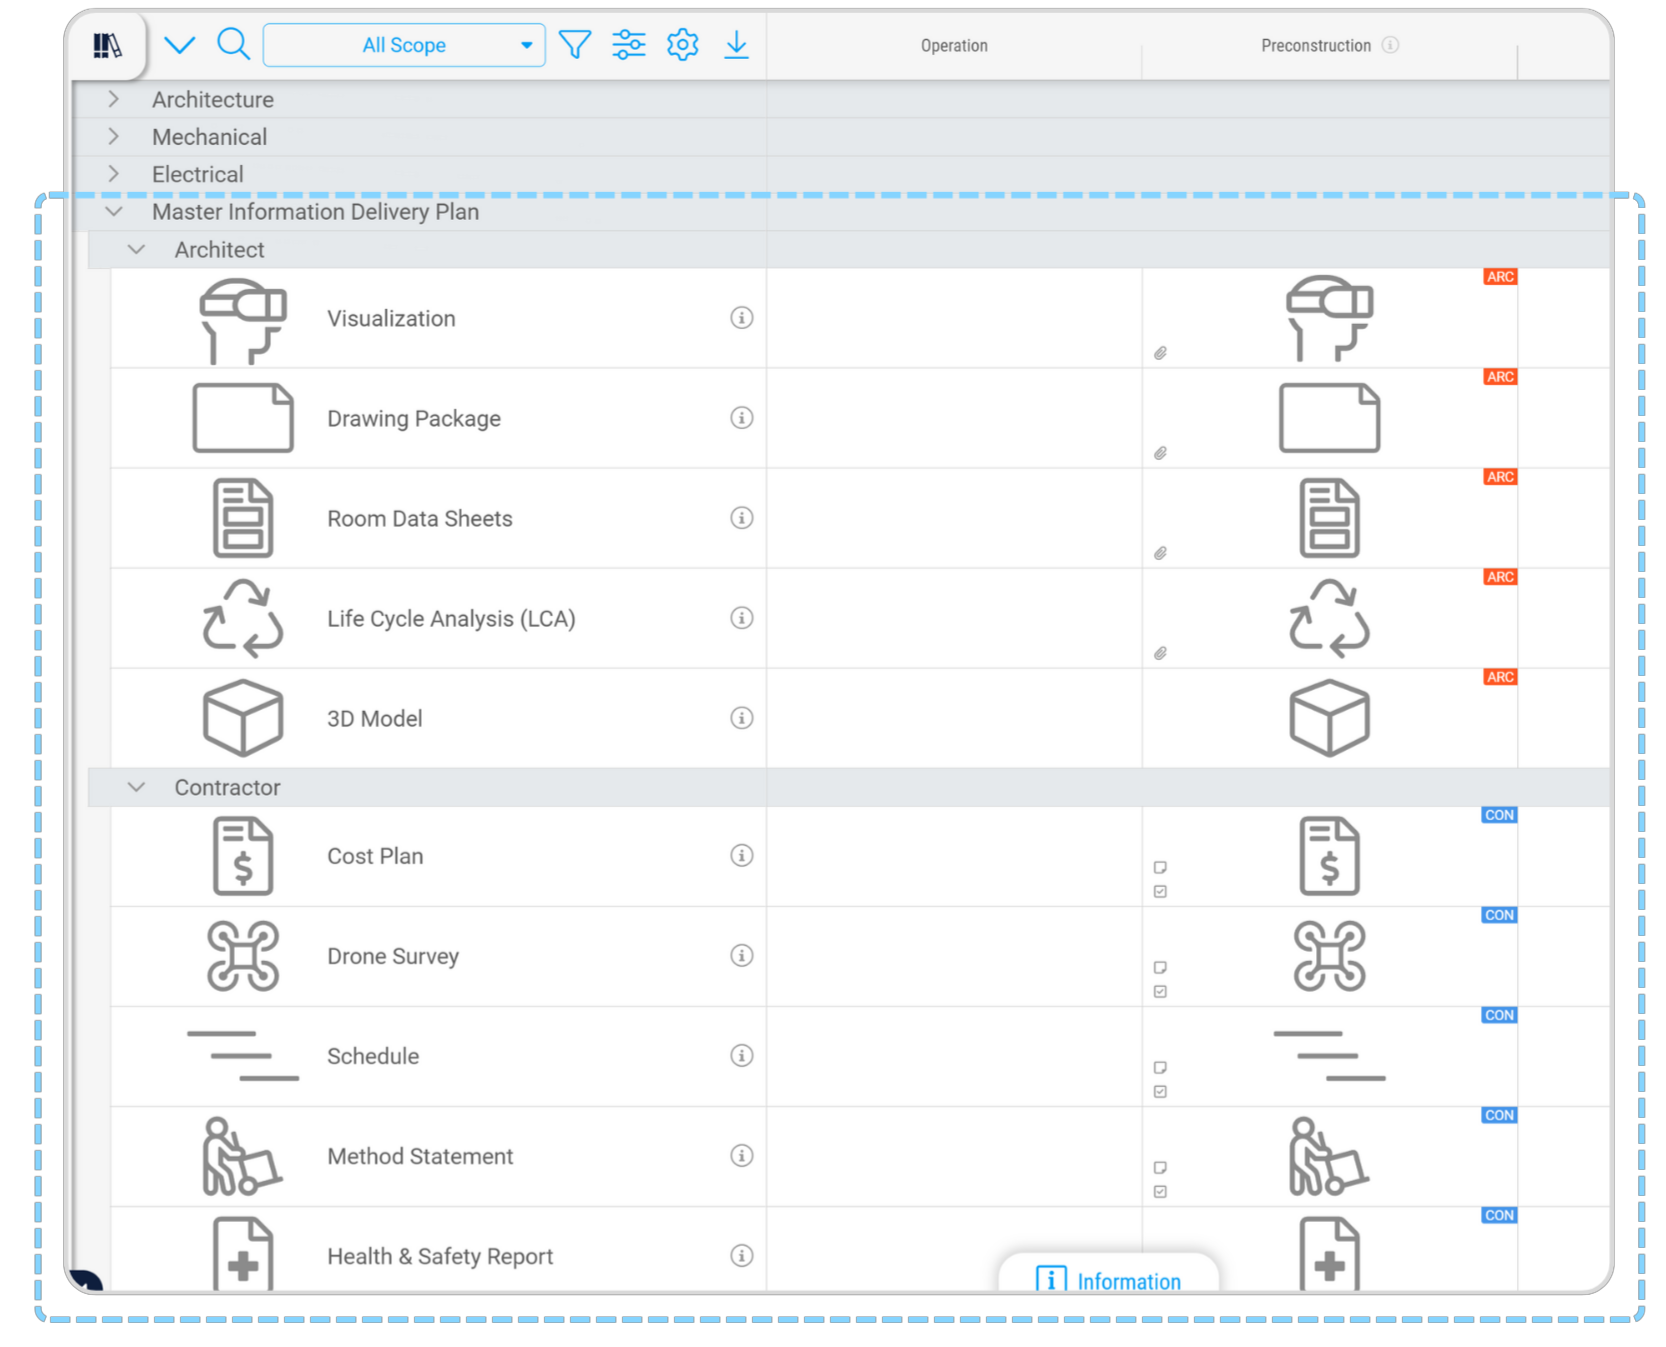
Scope > Library > Plannerly Templates > Example Project Scope > Master Information Delivery Plan > Add
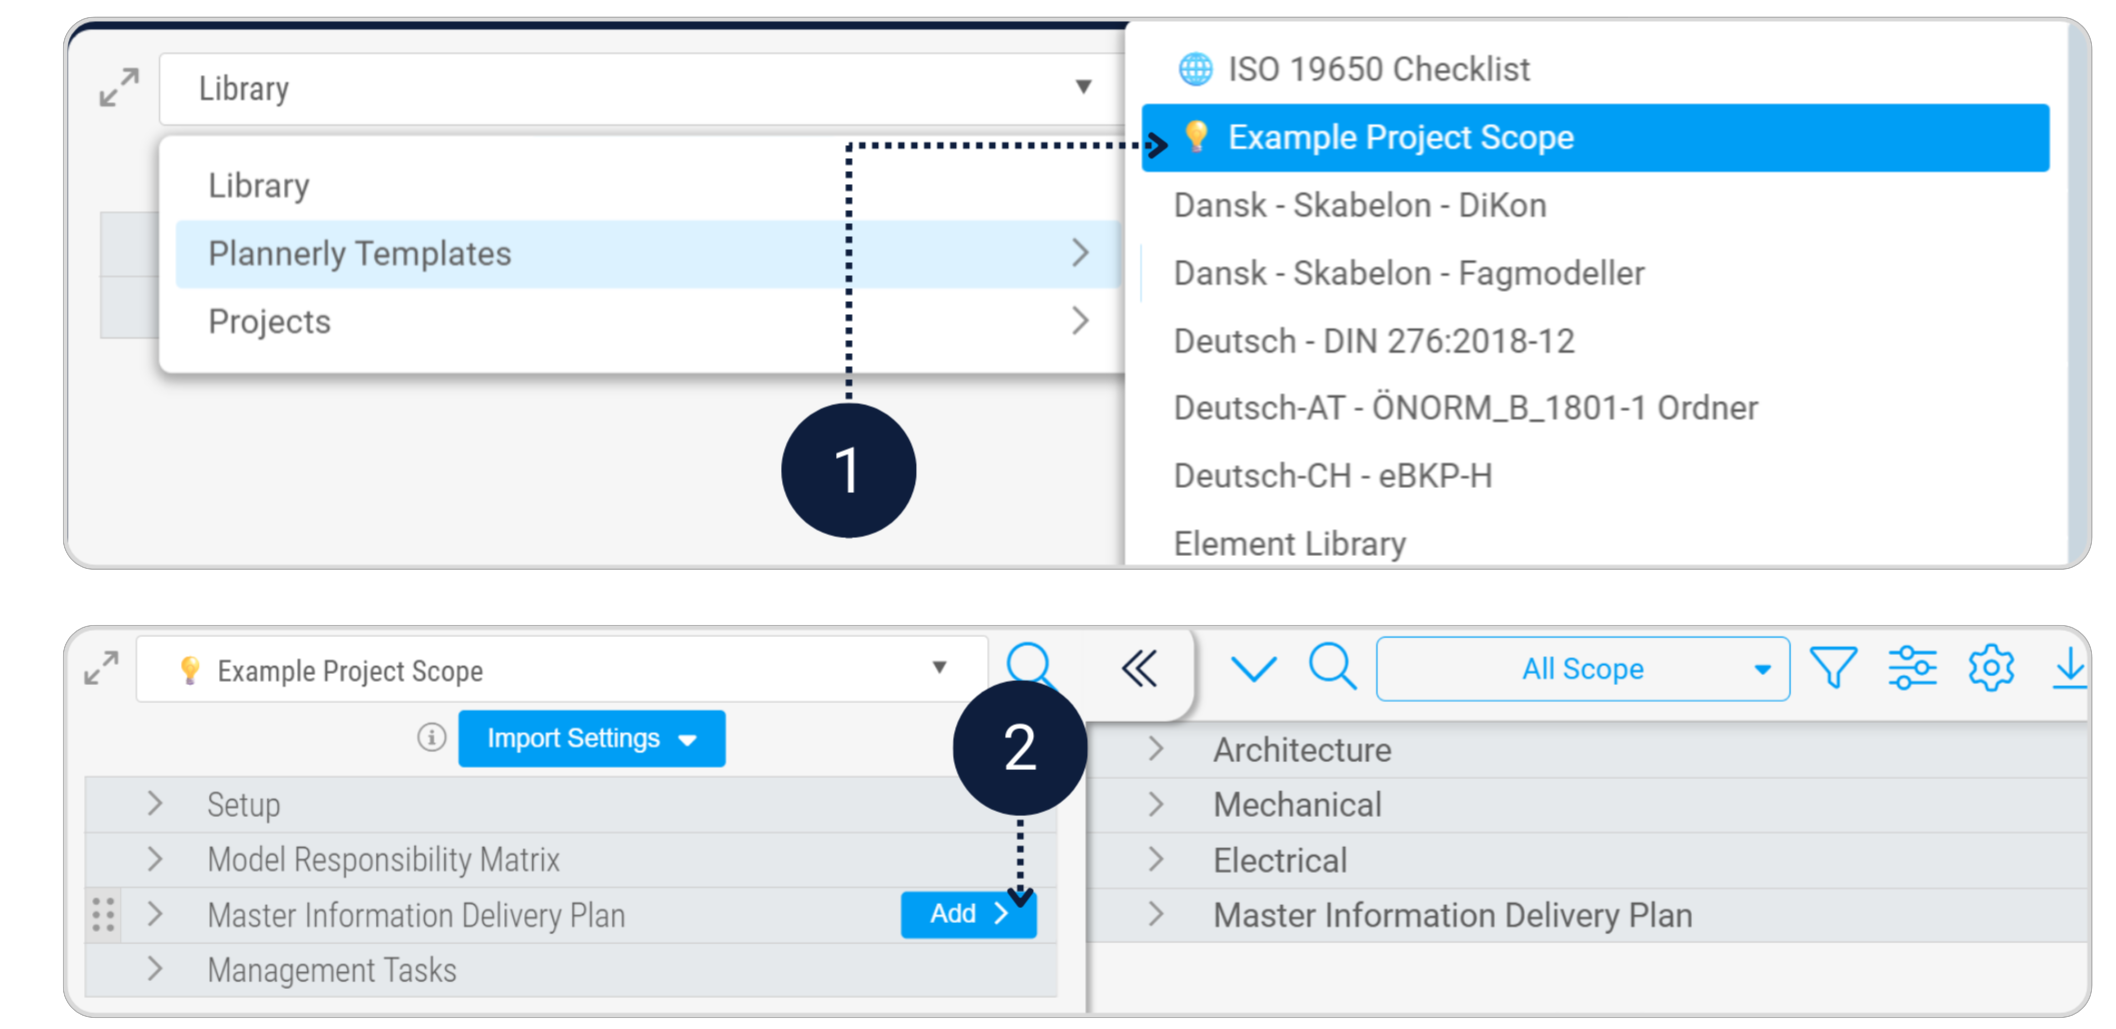
The dashed blue outline in the image below shows the imported content:
A document placeholder represents a required deliverable that has not yet been created.
It allows you to assign responsibility, define naming expectations, connect it to a task, and schedule it - before the file exists.
- The requirement becomes trackable.
- An owner is clearly assigned.
- Delivery dates are visible.
- Verification can be linked later.
This is a major upgrade from maintaining a checklist in Excel that must be manually reconciled against folders and emails. Here, the requirement lives inside the delivery plan itself.
In the Drawing Package task, add one additional non-geometric document placeholder: Site Plan.pdf
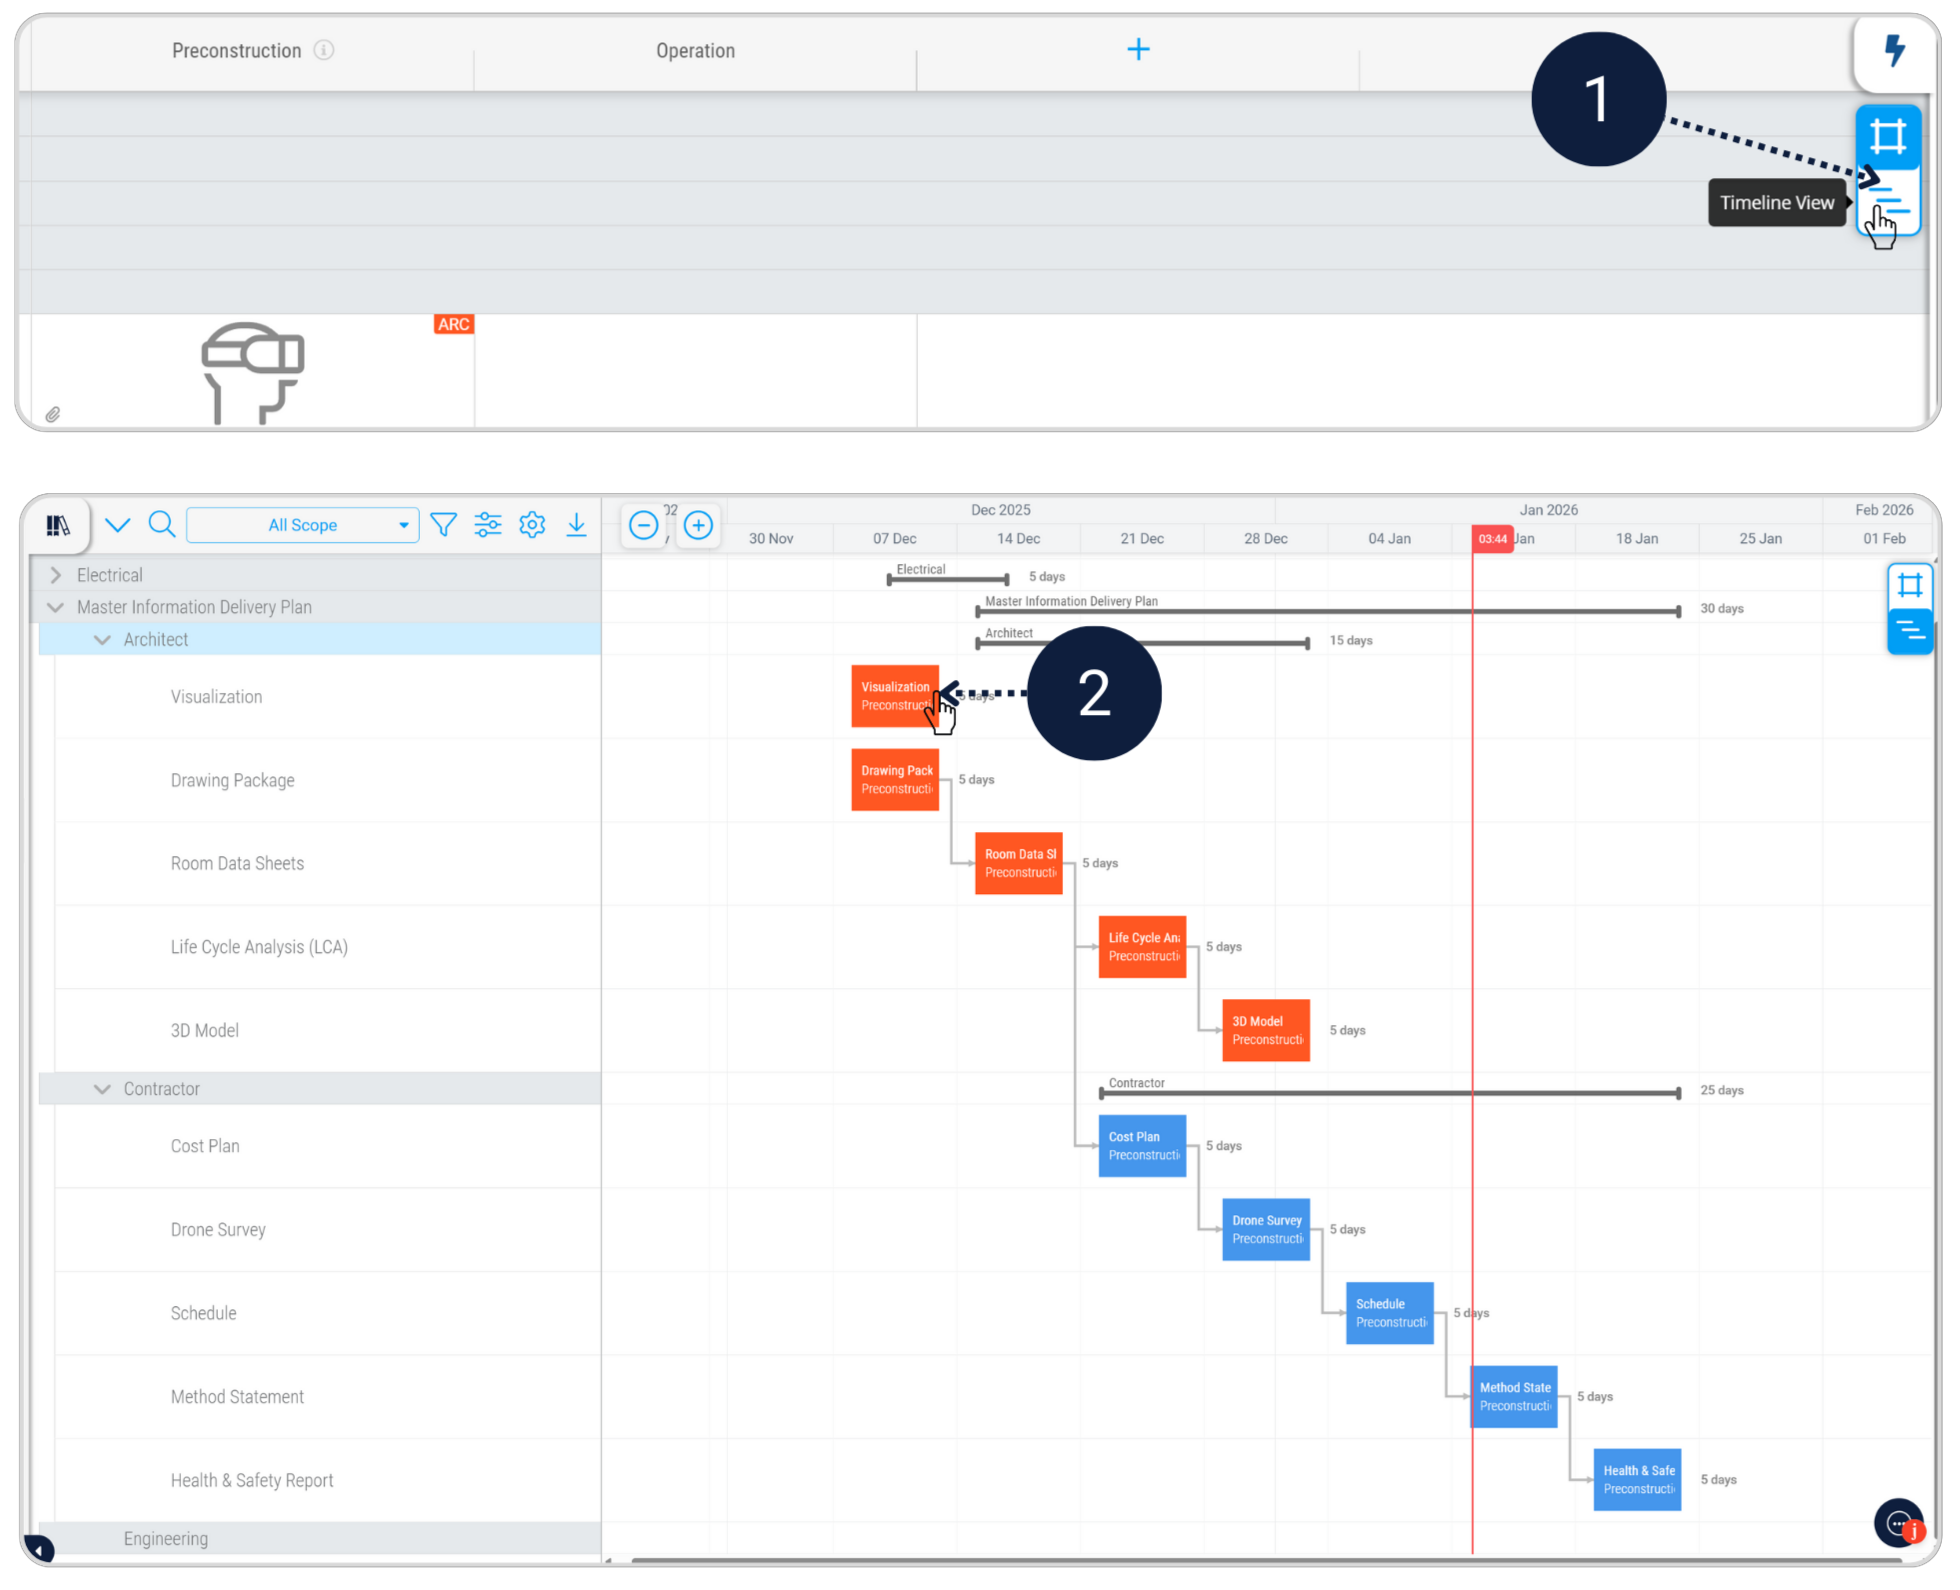
The imported MIDP already includes several dependencies. Now complete the sequence.
- Switch to Timeline view.
- Review existing dependencies.
- Adjust milestone dates if required.
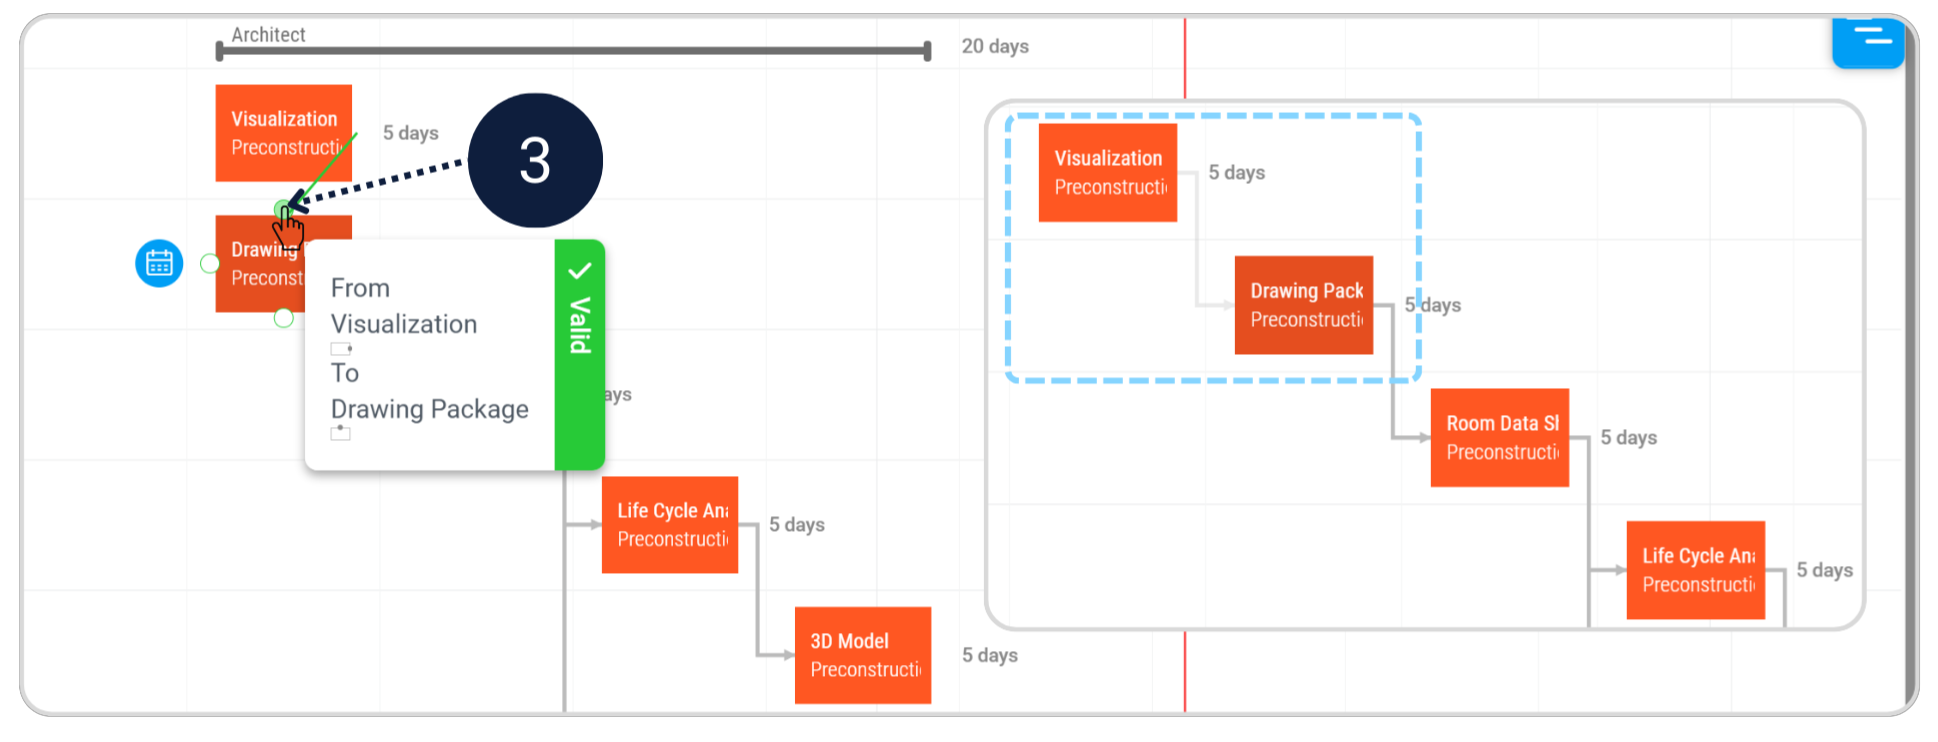
- Drag from the end node of one task to the start of another to create dependencies.
Example: Link Visualization → Drawing Package.
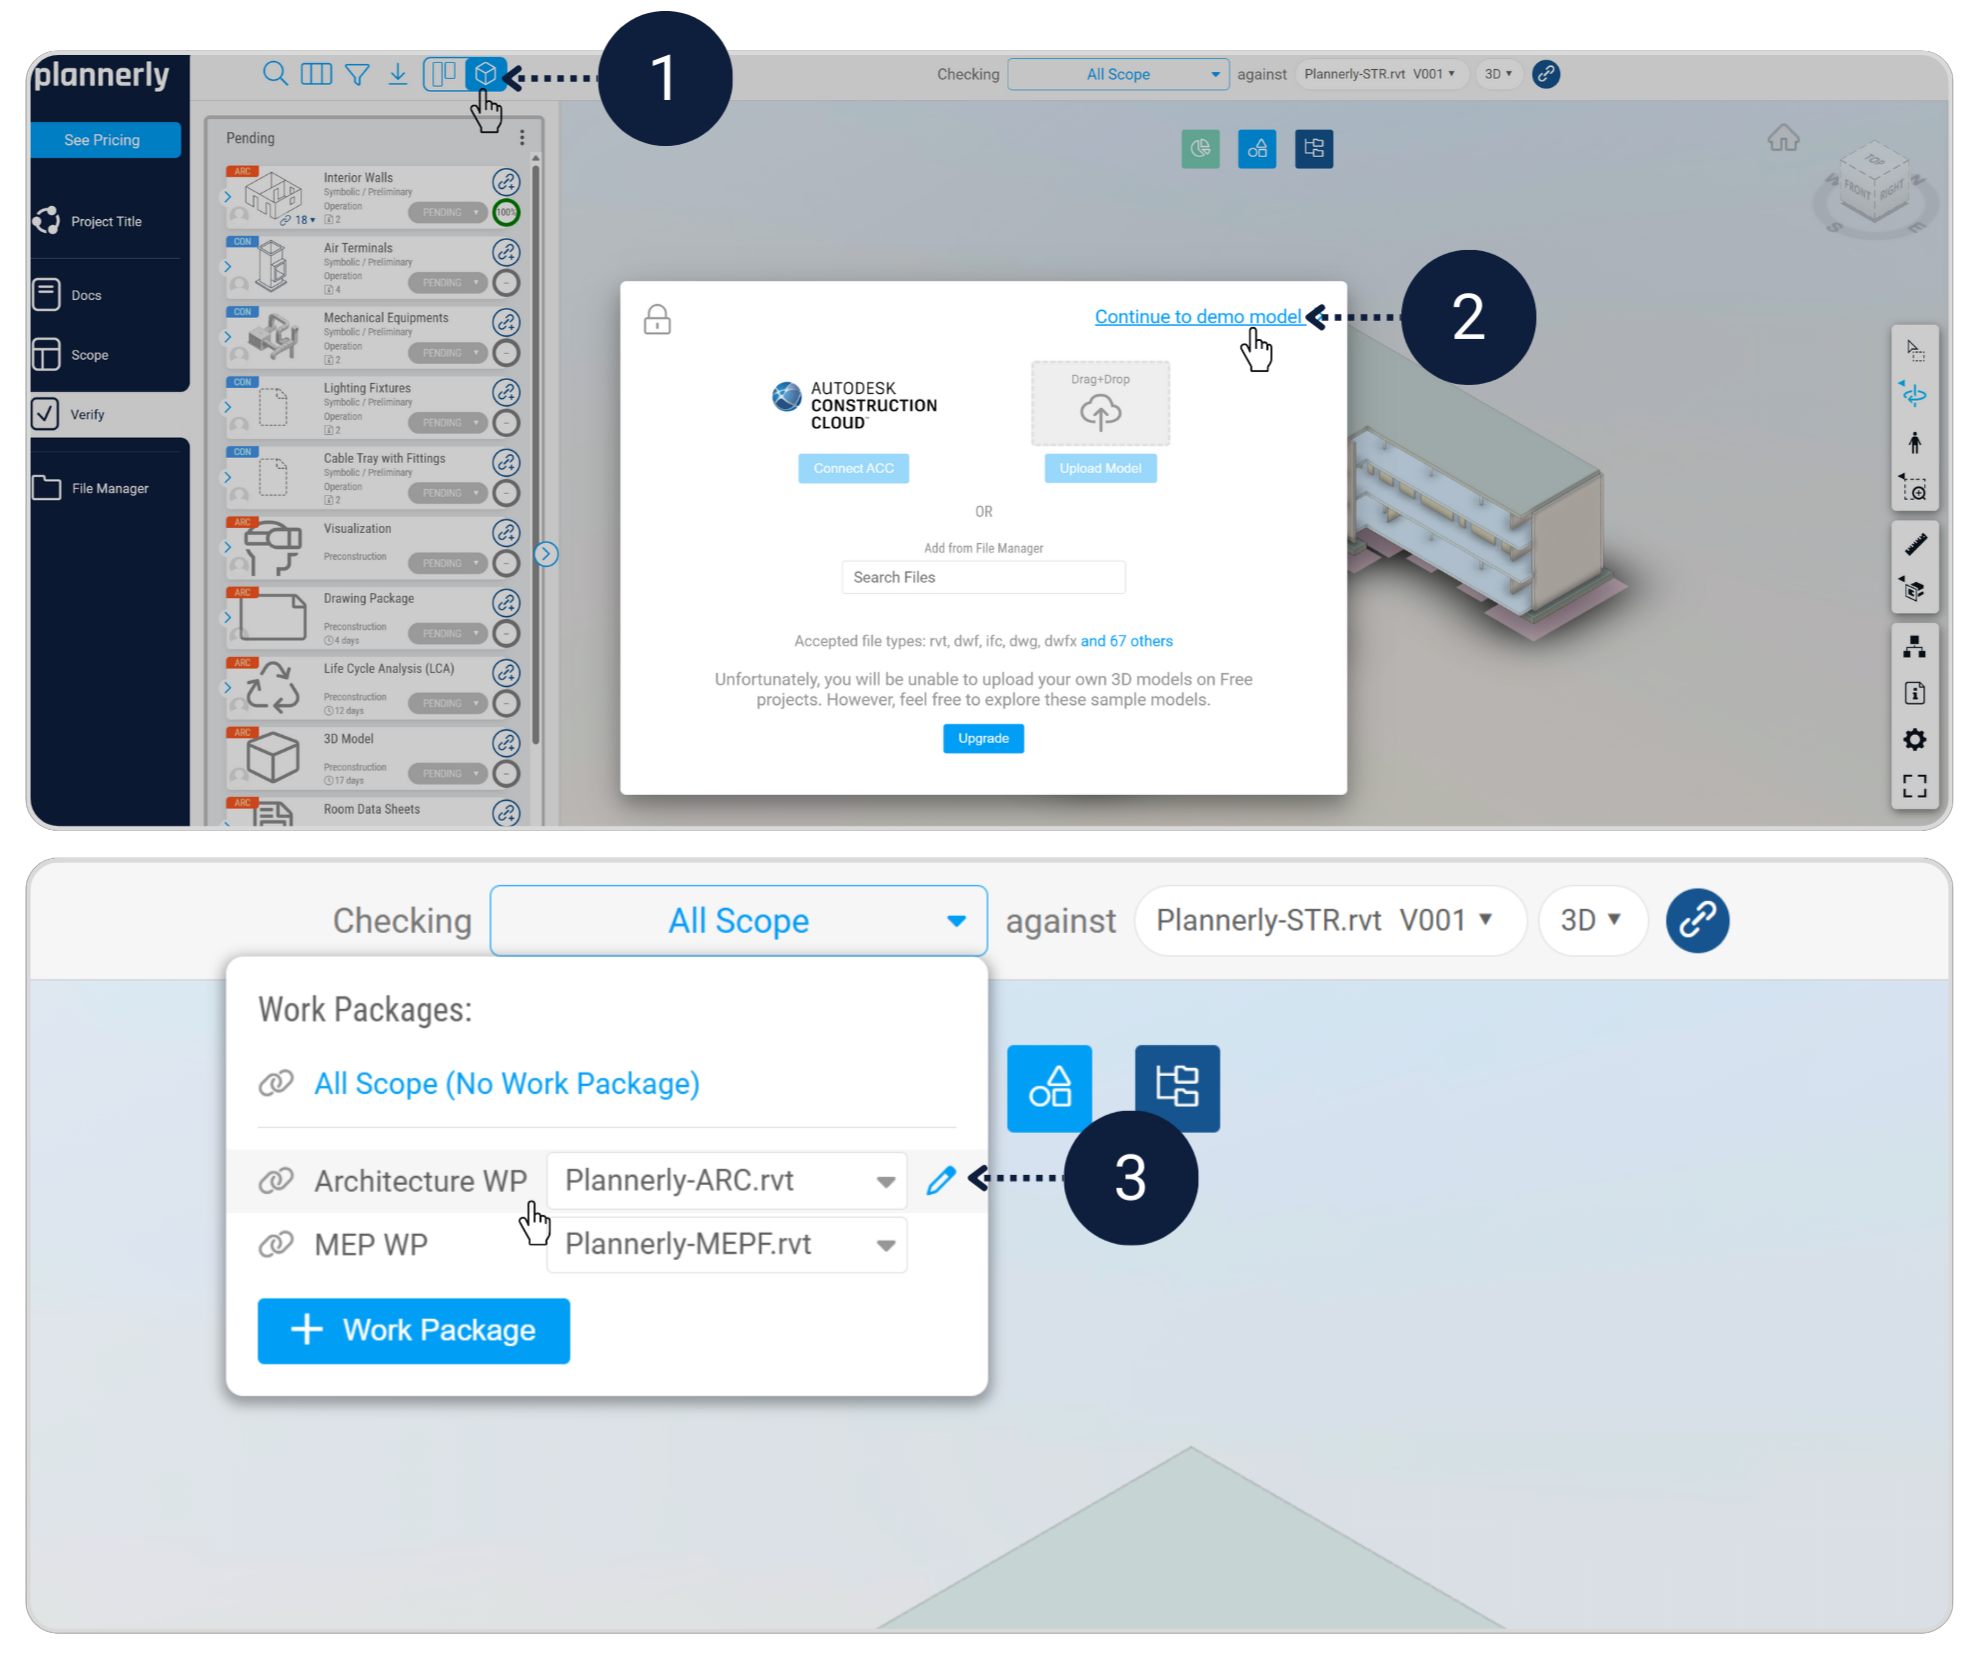
Step 2.3 - Create Work Packages, assign models, and export your deliverables Scope Verify File Manager
What Work Packages do
Work Packages group related deliverables and connect your Scope tasks to real models in Verify. This is what prepares the team to check whether the model meets the agreed information requirements.
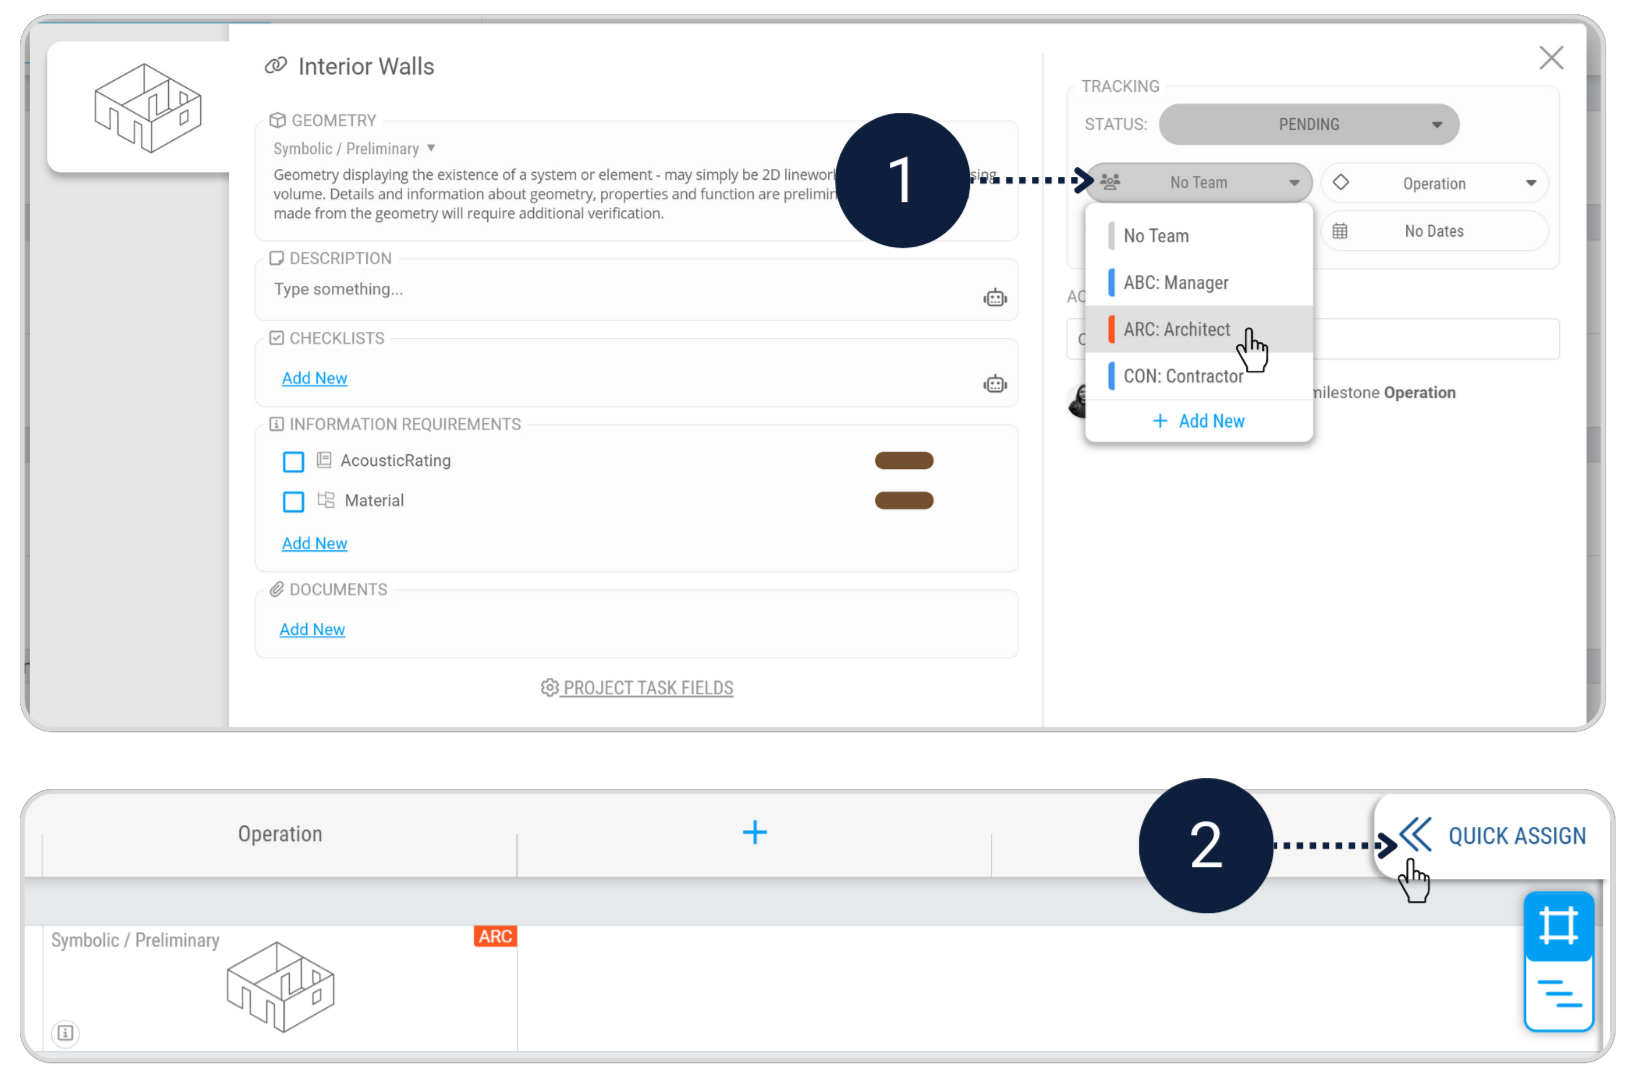
Make sure every task is assigned to a delivery team. The imported MIDP is already assigned to Architect and Contractor teams. For the tasks you created in Assignment 1, assign each task to the appropriate team (Architect or Contractor).
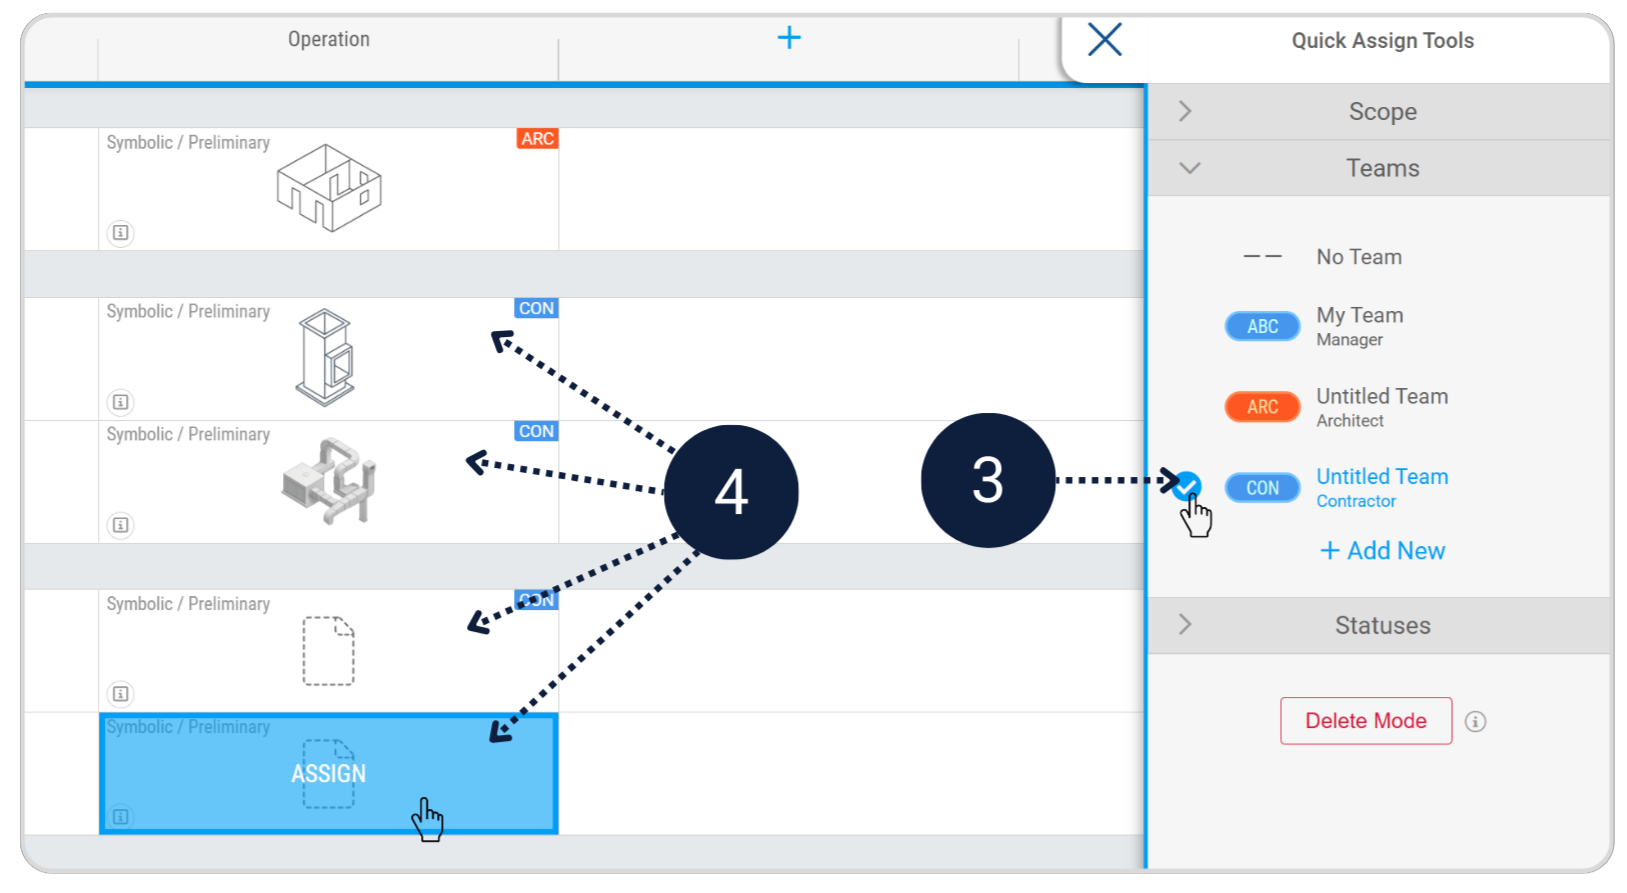
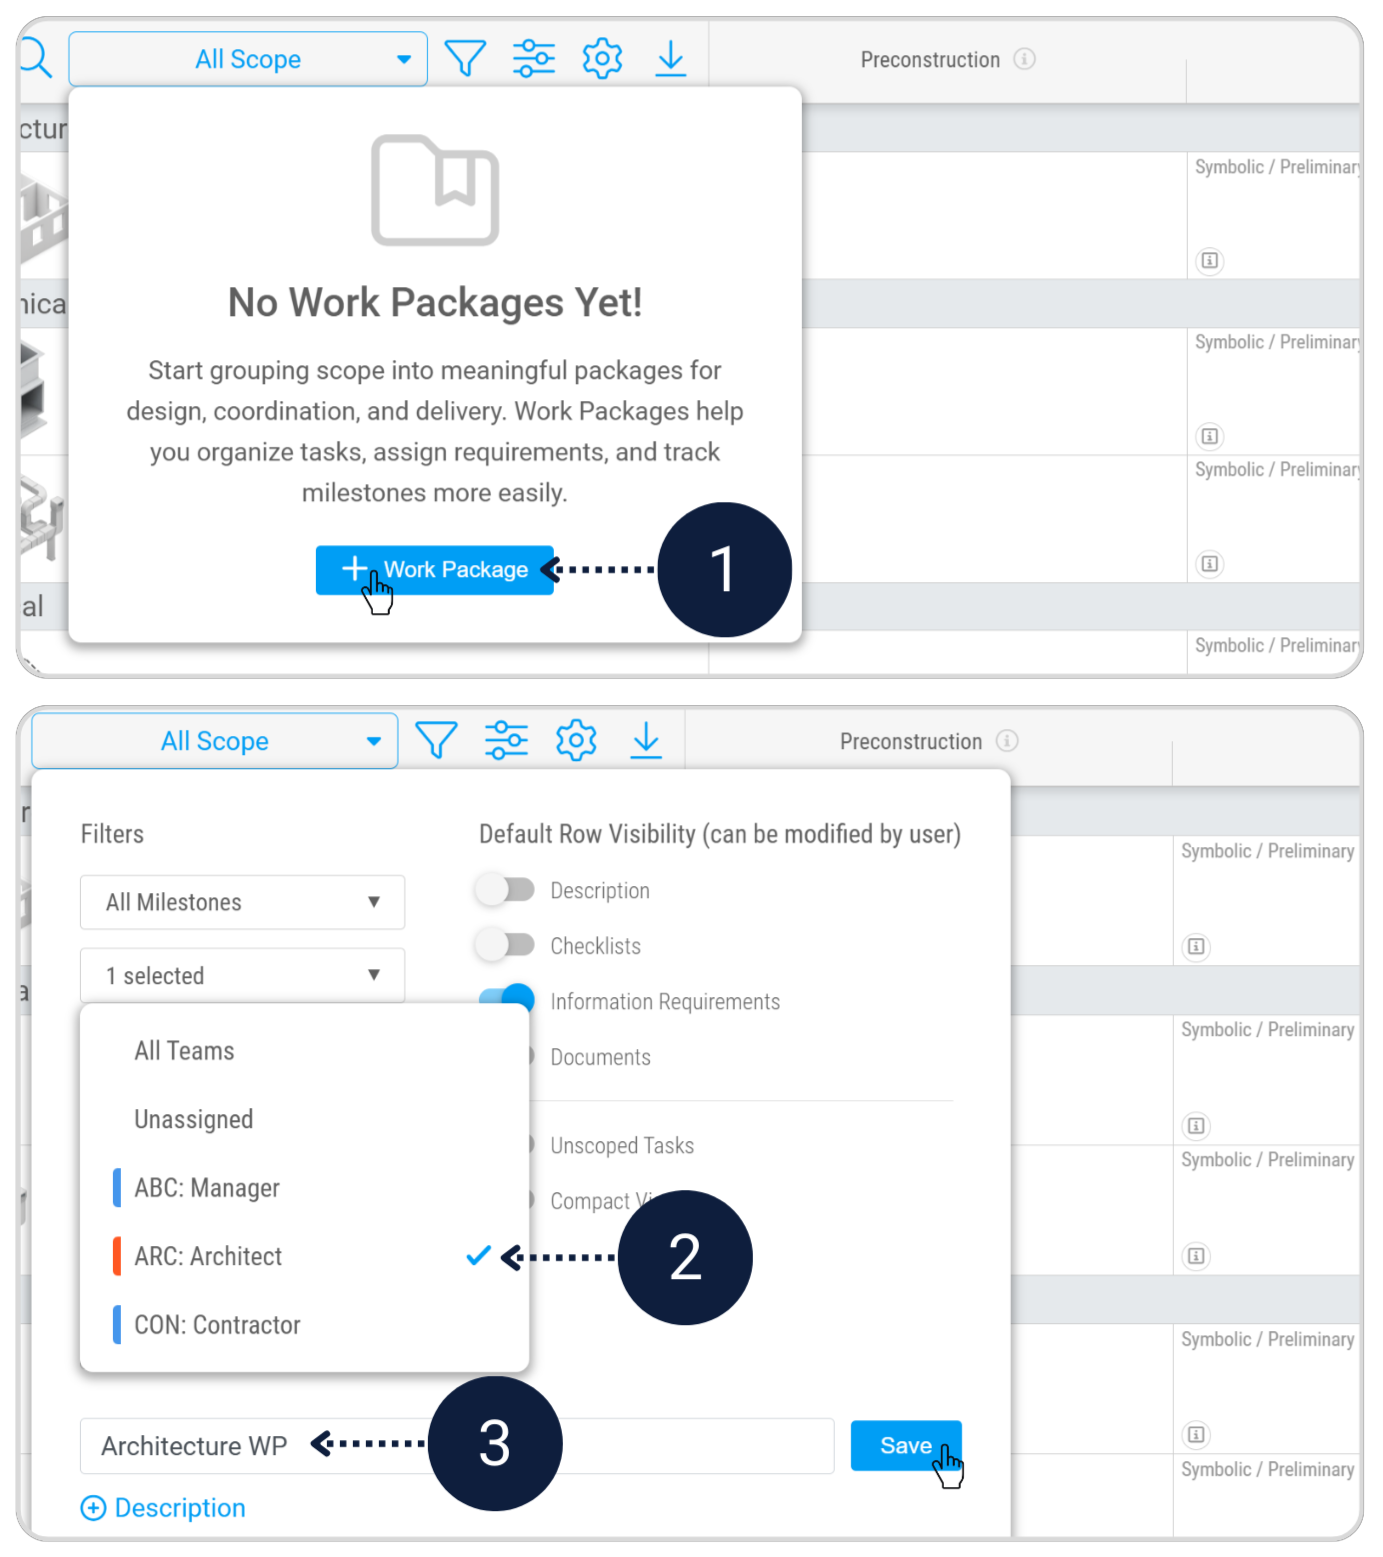
- Create a Work Package filtered to Architect team named Architecture WP.
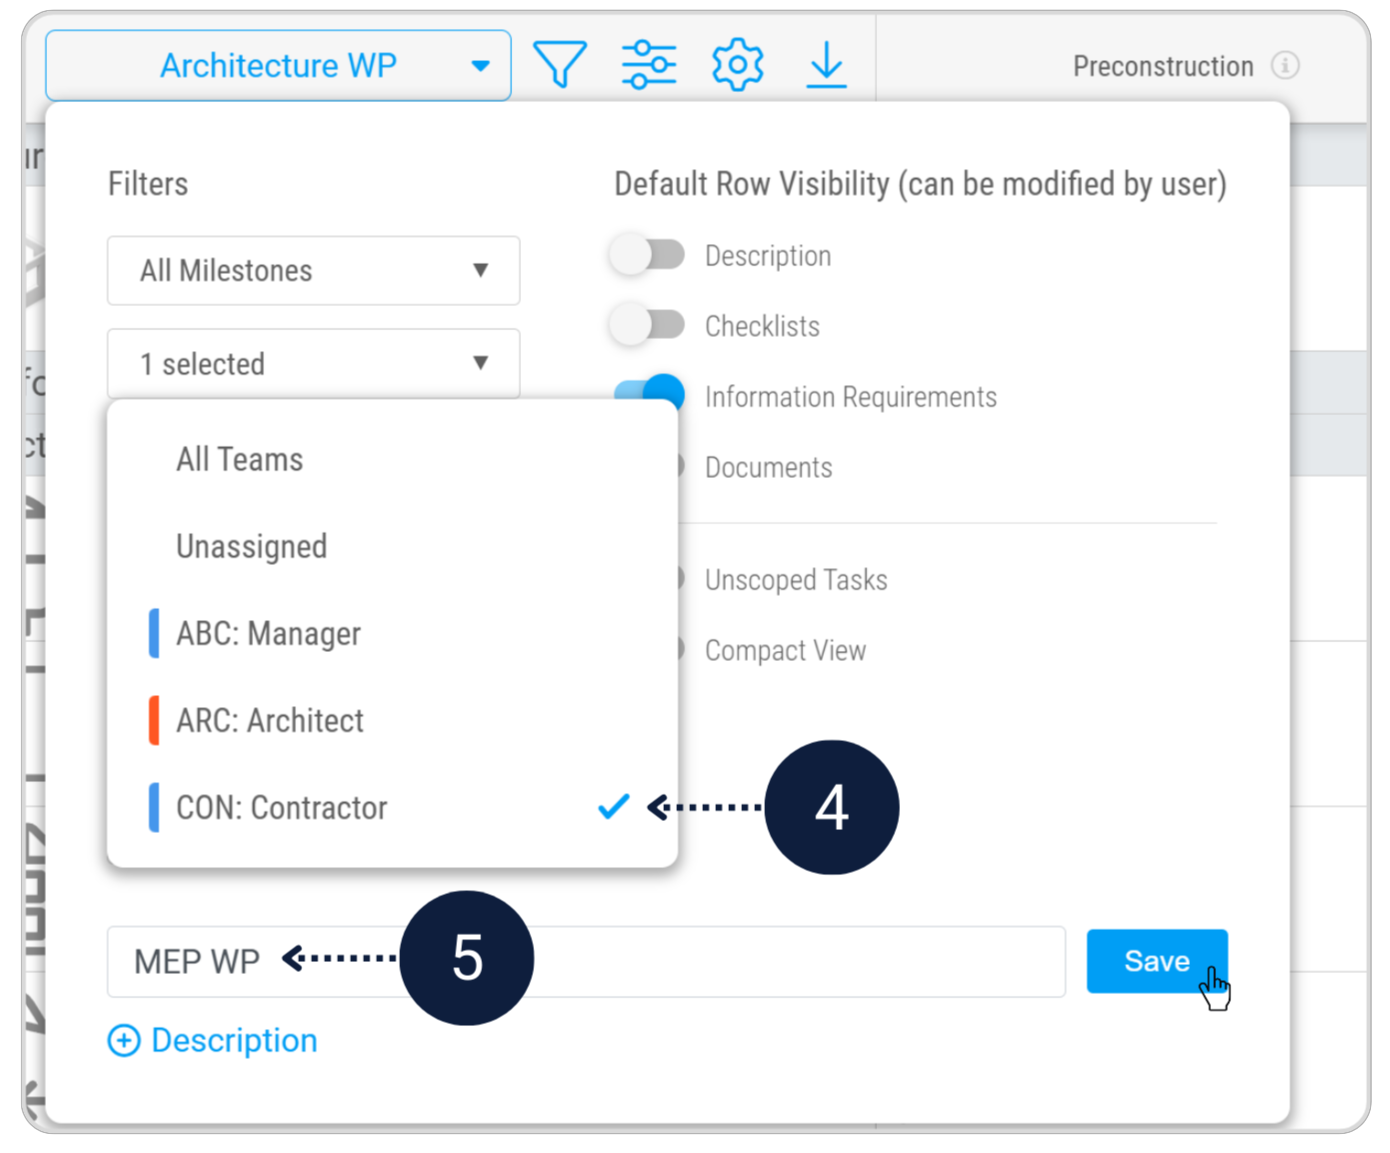
- Create a Work Package filtered to Contractor team named MEP WP.
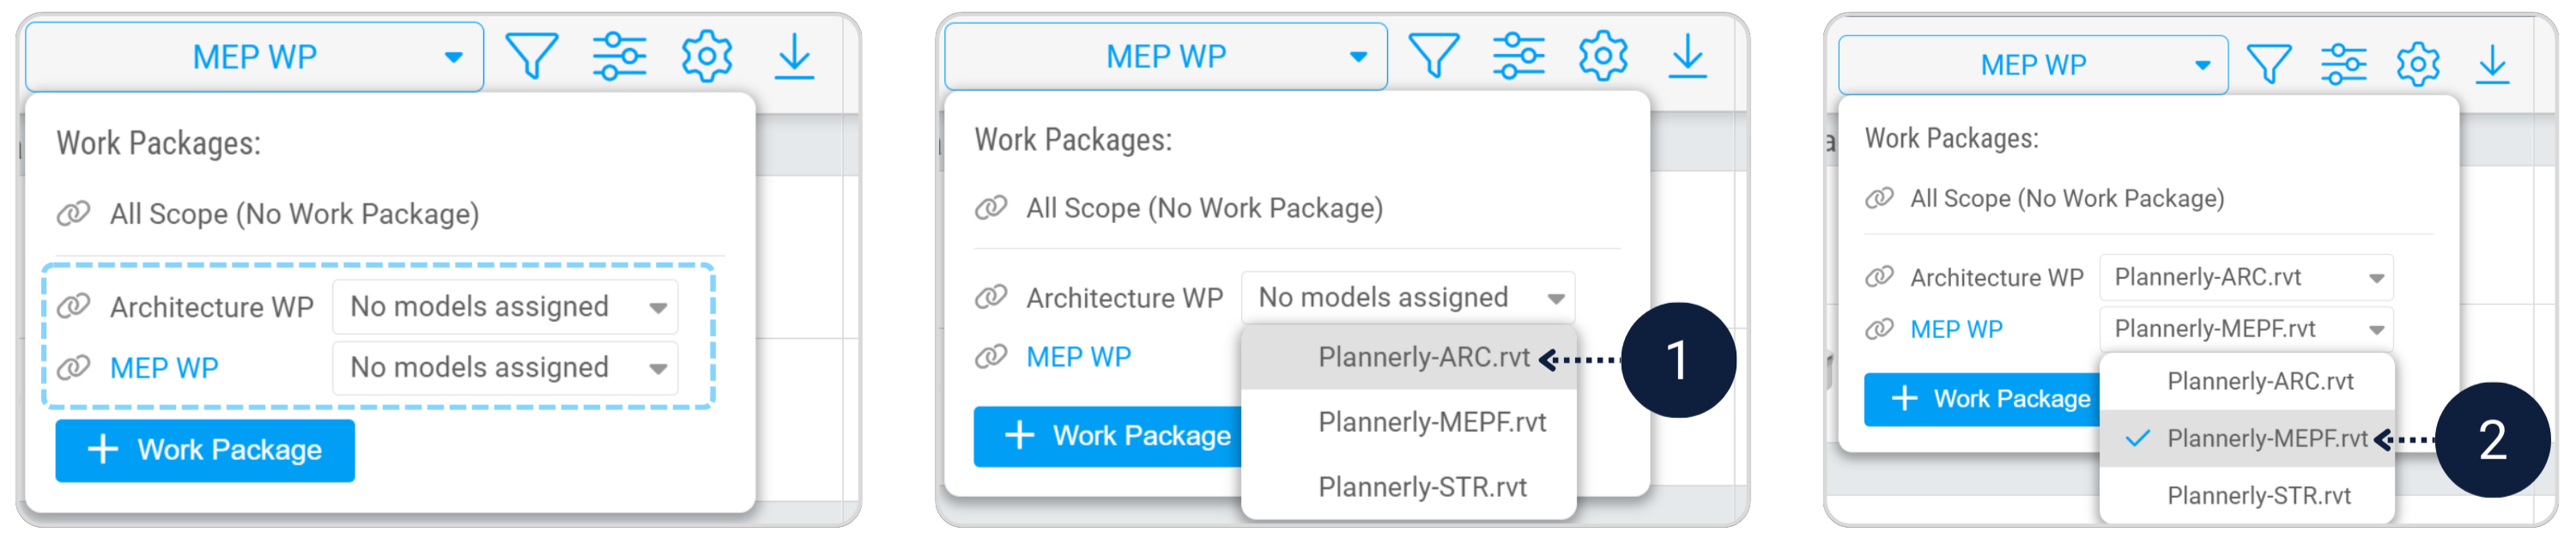
- Assign demo models: Architecture WP → Plannerly-Arc.rvt, MEP WP → Plannerly-MEPF.rvt.
- In All Scope, add a new Work Package filtered to the Architect team and name it Architecture WP.
- Add a second Work Package filtered to the Contractor team and name it MEP WP.
Save each work package.
Assign the correct model to each Work Package:
- Architecture WP → Assign Plannerly-Arc.rvt (demo model)
- MEP WP → Assign Plannerly-MEPF.rvt (demo model)
Before moving on, confirm that the BEP and MIDP are aligned, complete, and ready to be agreed.
Agreement baseline check
- BEP completed and reviewed.
- MIDP fully populated with owners and dates.
- No orphan requirements.
- Plans ready to be shared with the delivery team.
Final deliverable checklist
- The BEP is completed and reflects the EIR and project delivery approach.
- The MIDP is imported, milestones are ordered clearly, and Site Plan.pdf is added as a document placeholder.
- Architecture WP and MEP WP exist and are linked to their correct demo models.
- You exported your completed BEP document - including the MIDP with timeline - in File Manager.
Export your completed BEP document, including the MIDP with Timeline in File Manager as a single document.
Assignment 3 - Model Verification IDS Verification Information Requirements
Deliver with confidence - verify what you’ve promised.
This task is about trust. You’ll prove that what was agreed and contracted in the EIR, BEP, and MIDP is exactly what’s being delivered - before anything reaches the client. This is where the workflow becomes objective - the plan becomes the test. On real projects, verification often turns into opinion because requirements are vague or scattered. Here, you are using a structured set of requirements and a defined delivery plan - so checking compliance becomes repeatable and explainable.
What you will do
Step 3.1 - Quality assurance (verify the models) Baseline Verify Models Sync
Module - Verify
Before issuing anything externally, Appointed Parties must confirm that the model content matches the agreed scope and information requirements. This is your internal safety net.
Confirm you have a clear baseline:
- The EIR is complete and shared where required.
- The BEP + MIDP are complete and agreed (baseline).
- Your Scope tasks and information requirements are structured for the milestone you are verifying.
Tip: If you are missing clarity here, fix it now. Verification should confirm decisions - not create new ones.
Required checklist
- Verify the Architecture Work Package
- Verify the MEP Work Package
- Review the verification results and Export IDS
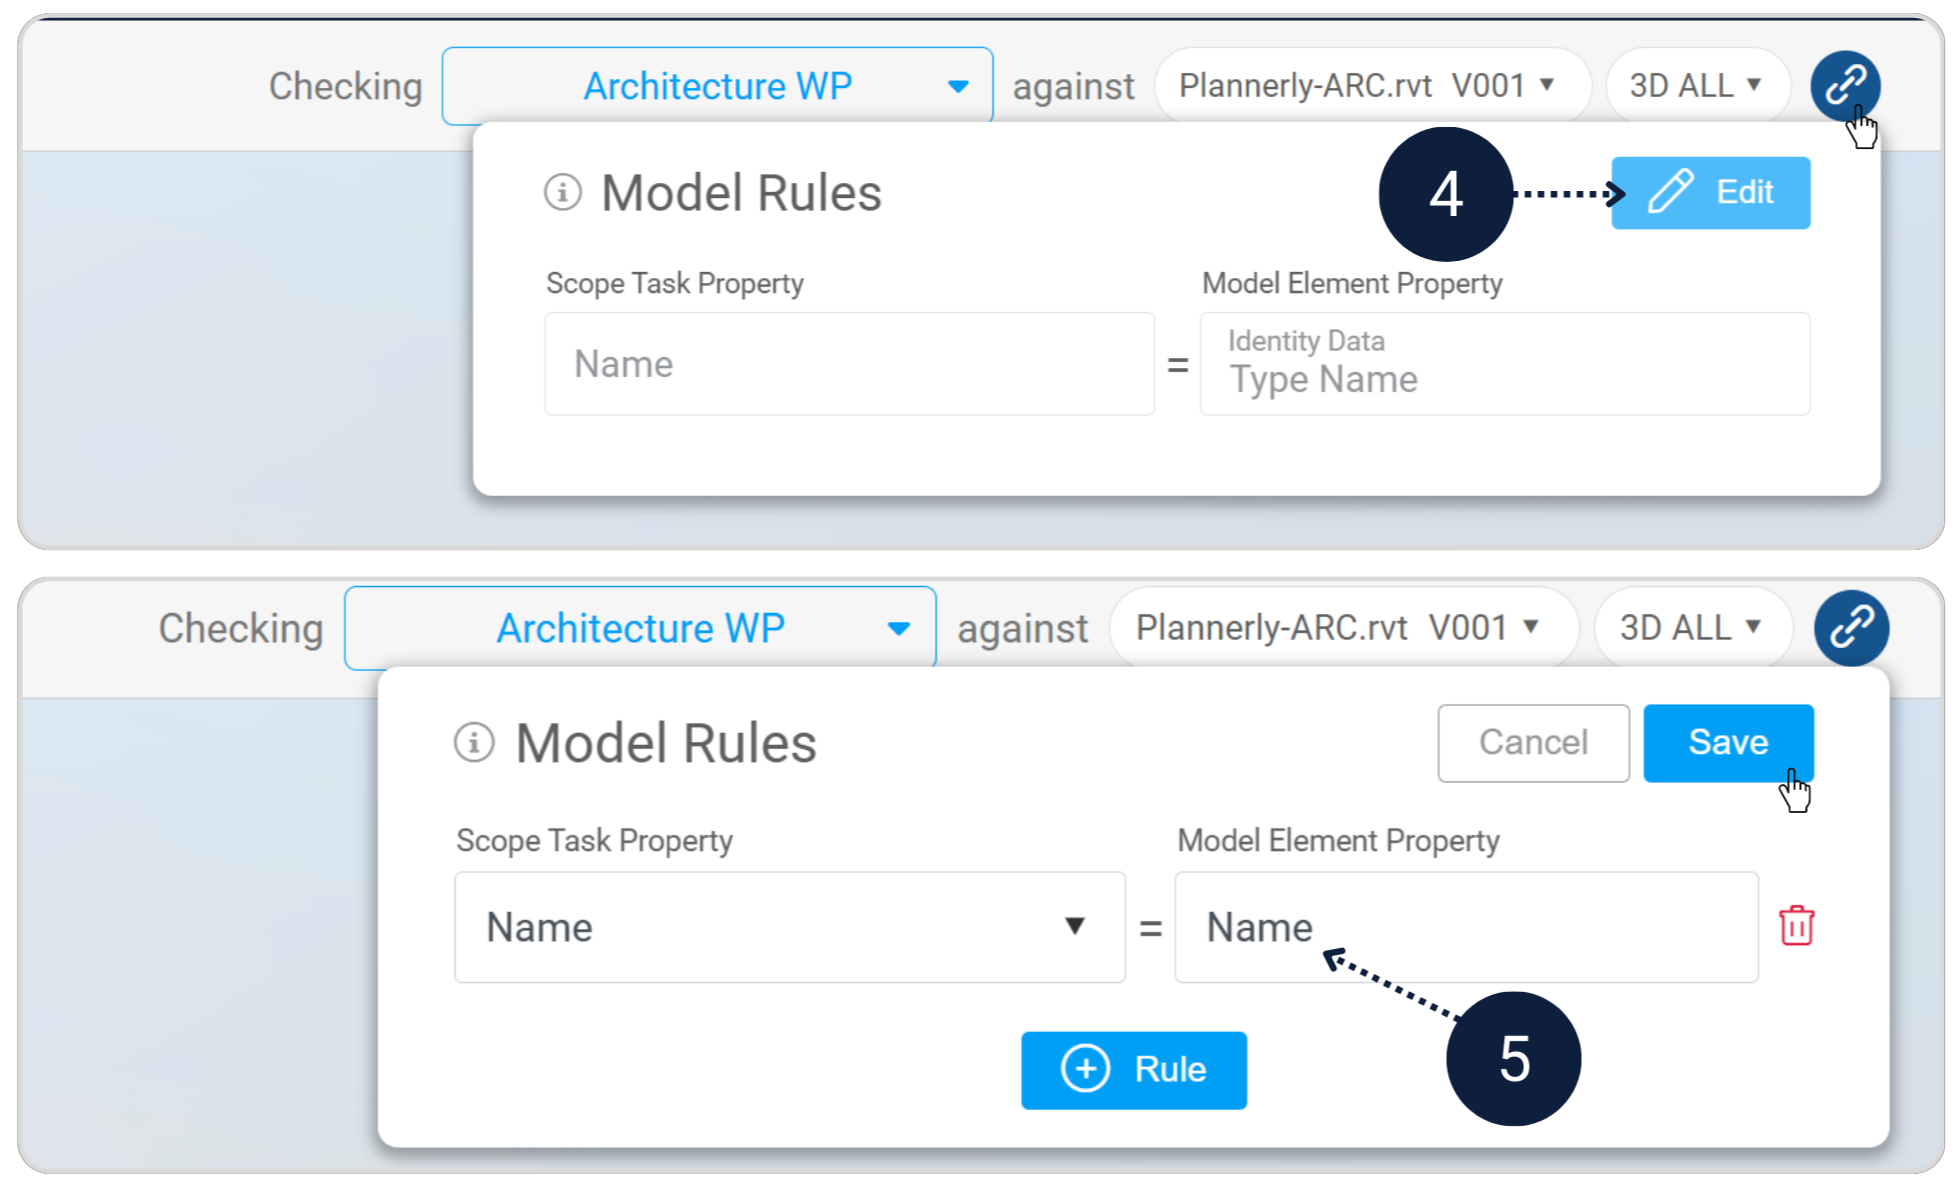
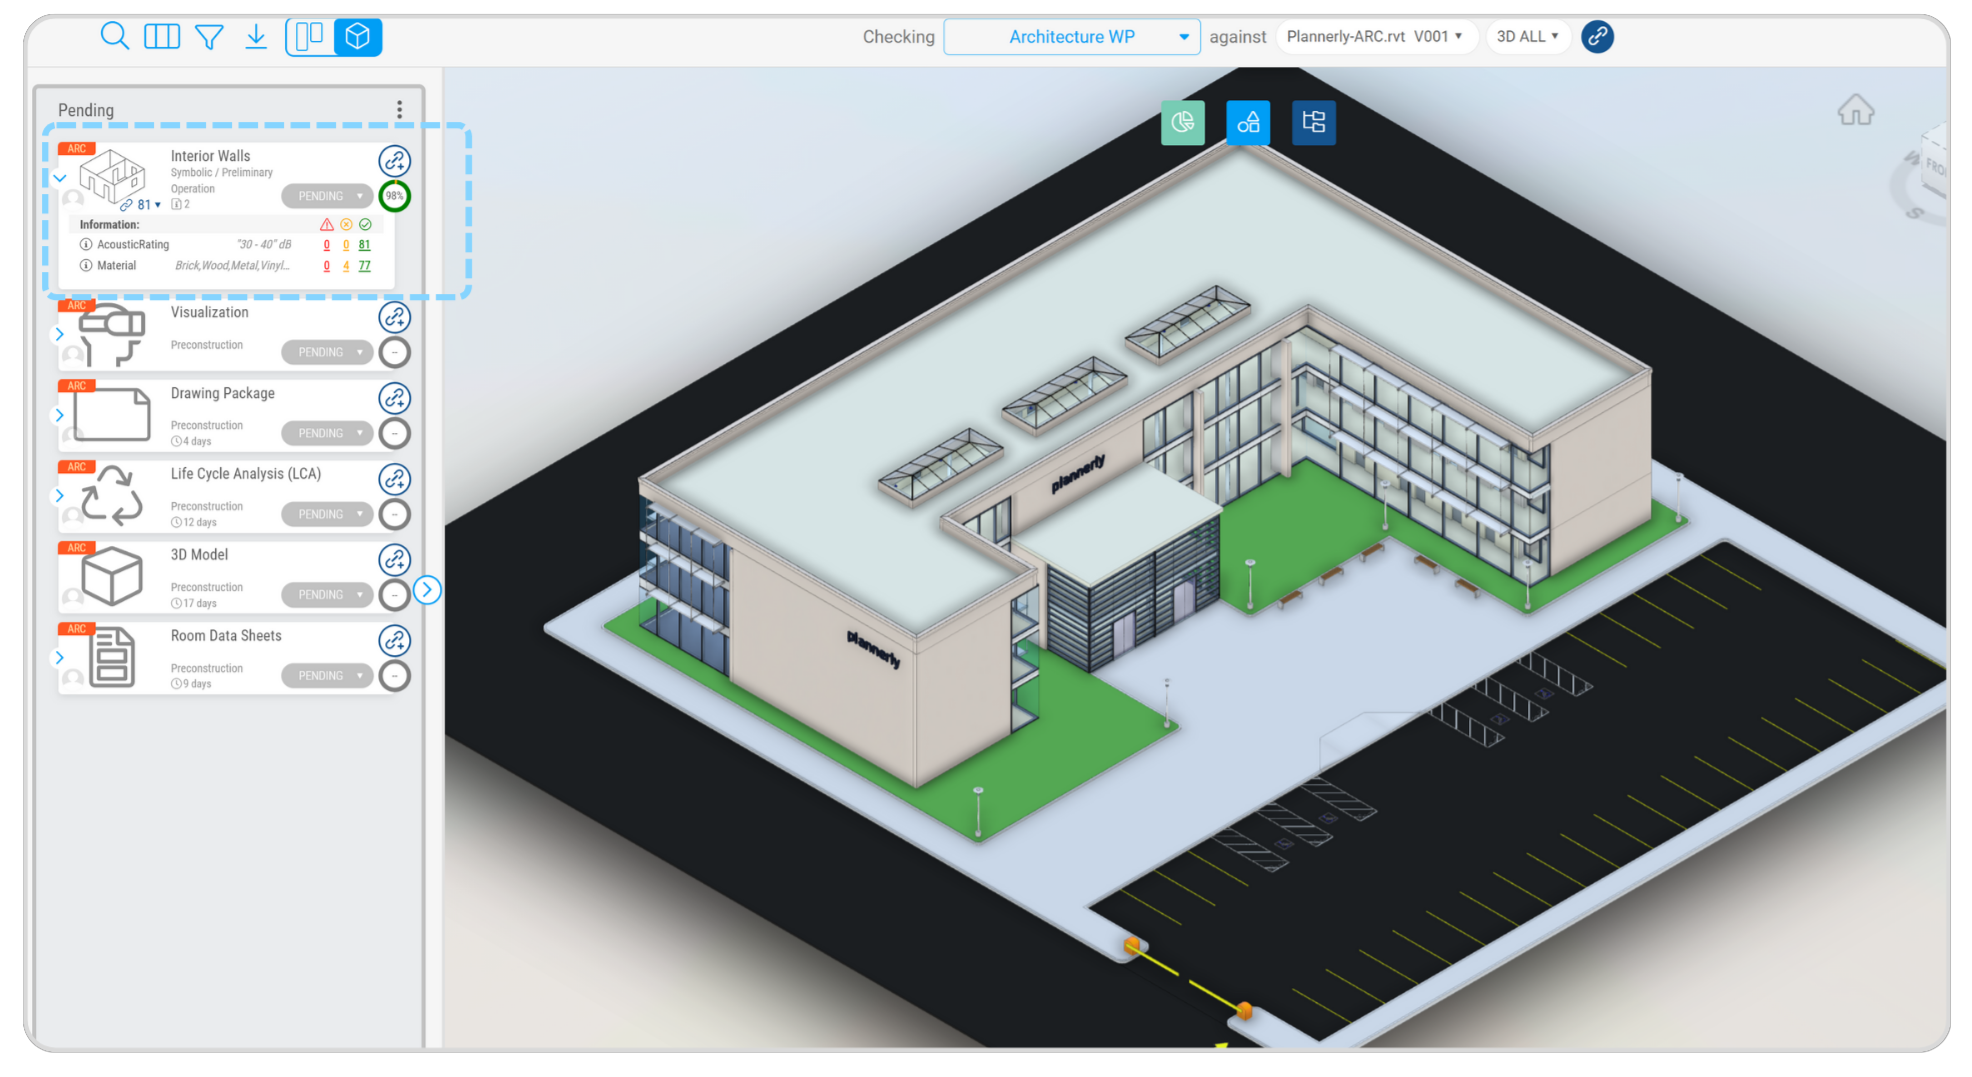
Verify Work packages
In the Verify module, open Model Viewer, continue with the demo model, and in All Scope select Architecture WP.
Set the Model Rule to Name = Name, then review the verification results.
Repeat the same steps for MEP WP, confirming the rule Name = Name and reviewing the results for compliance.

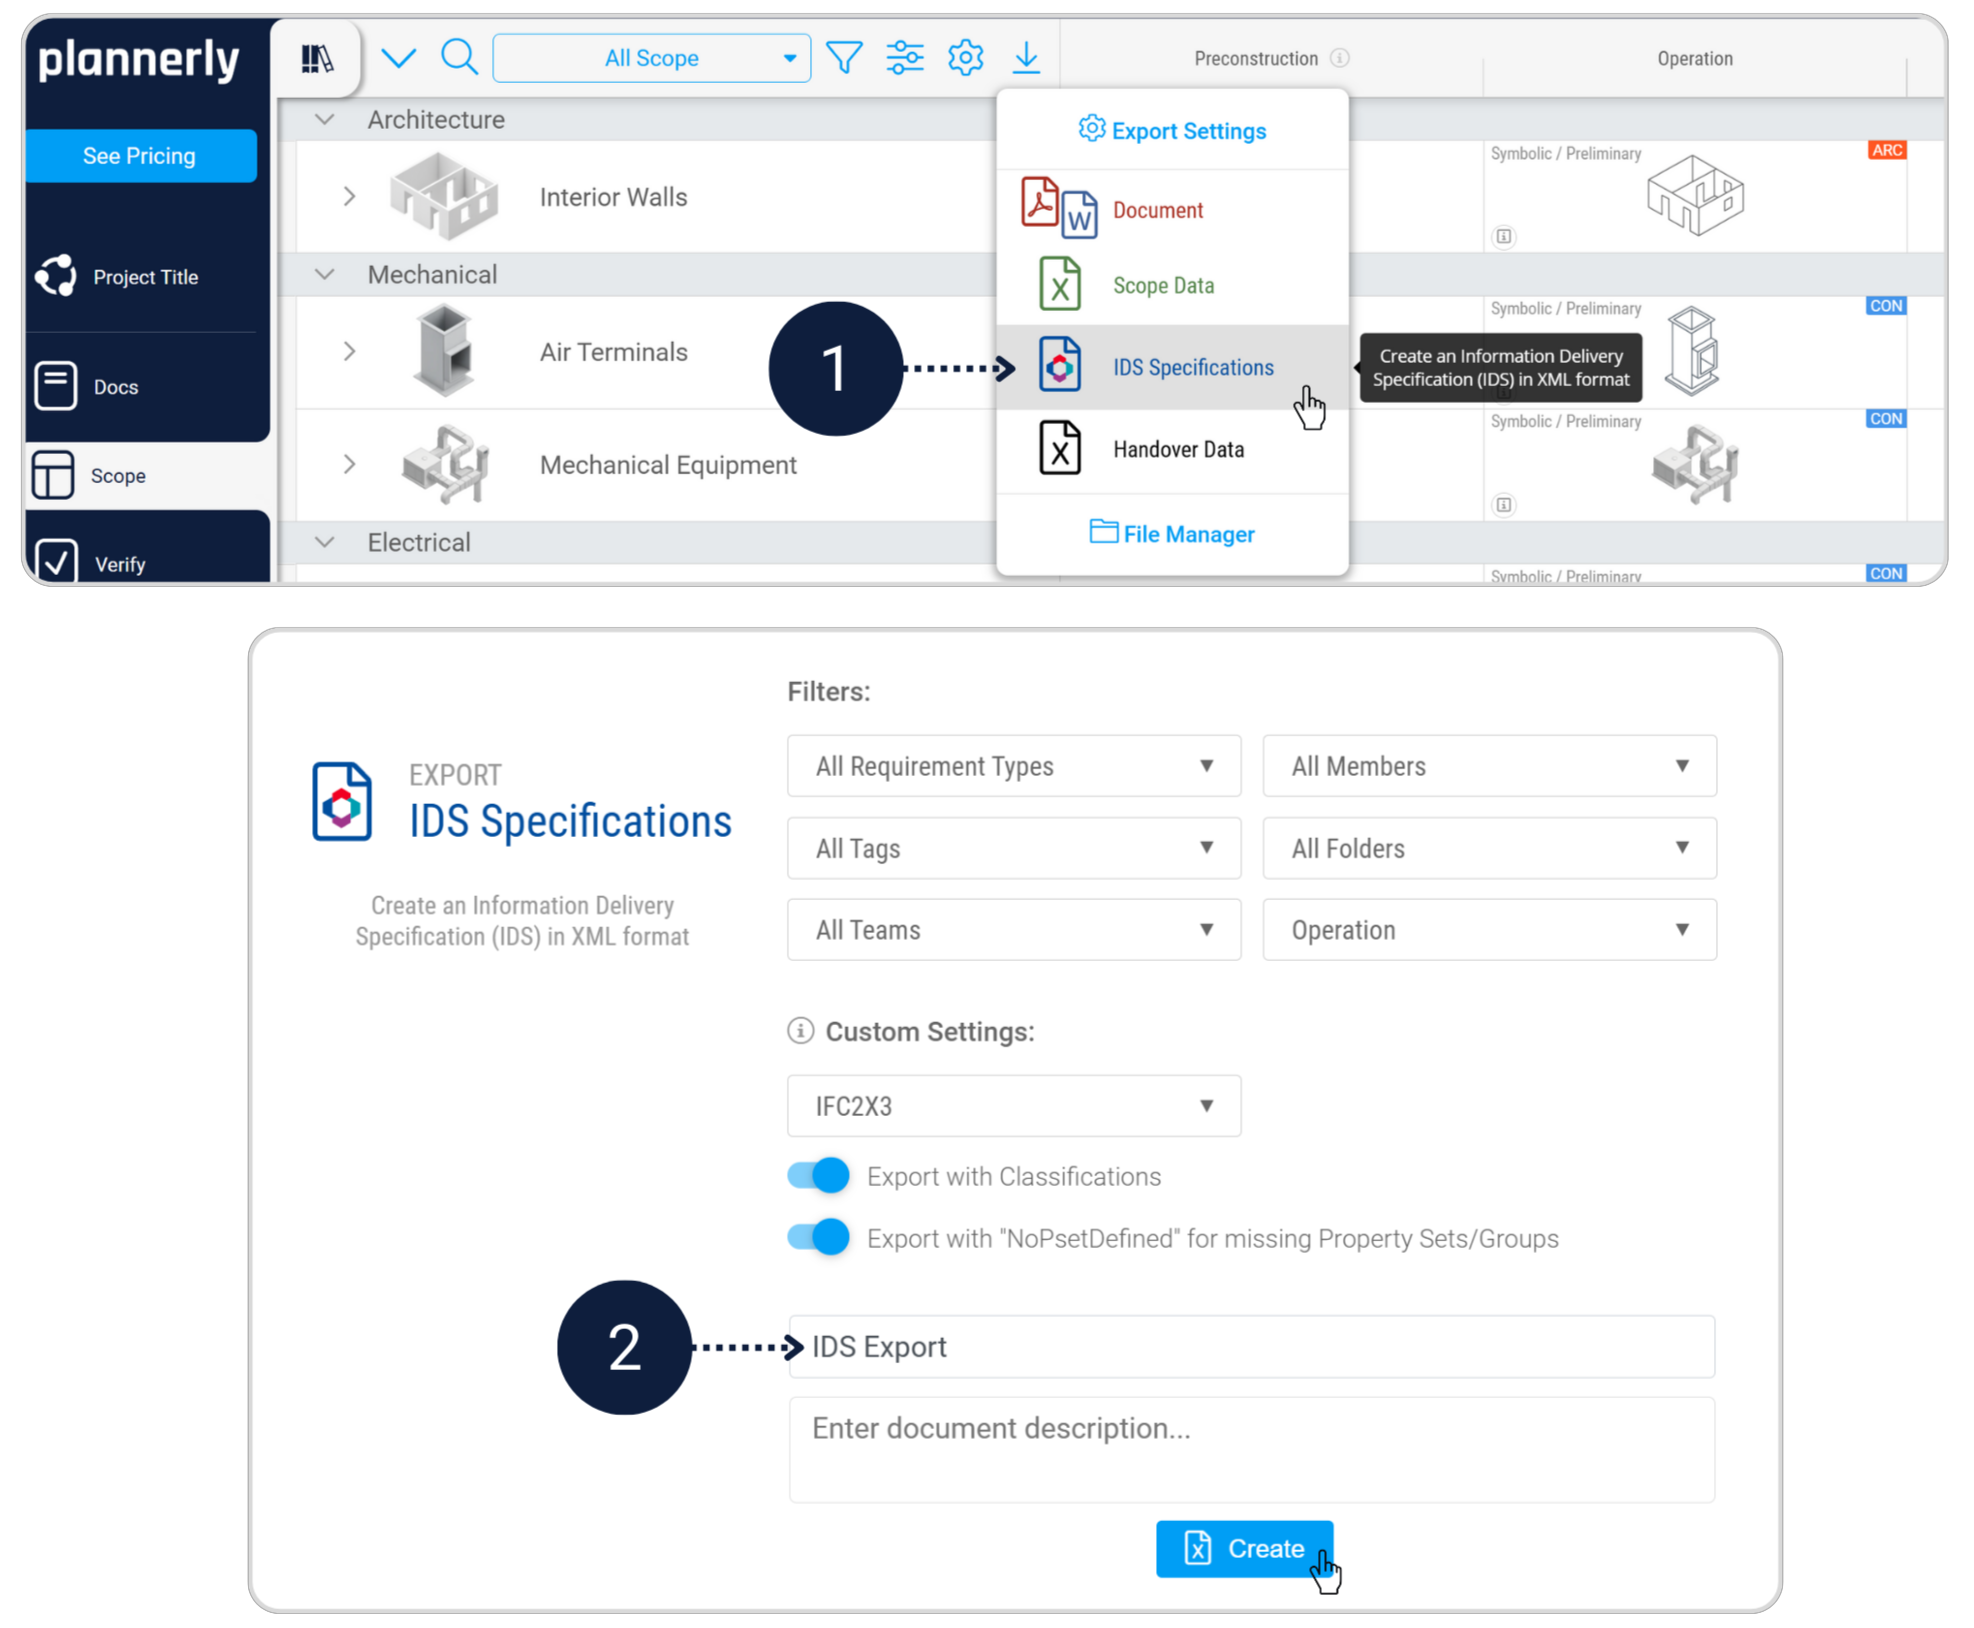
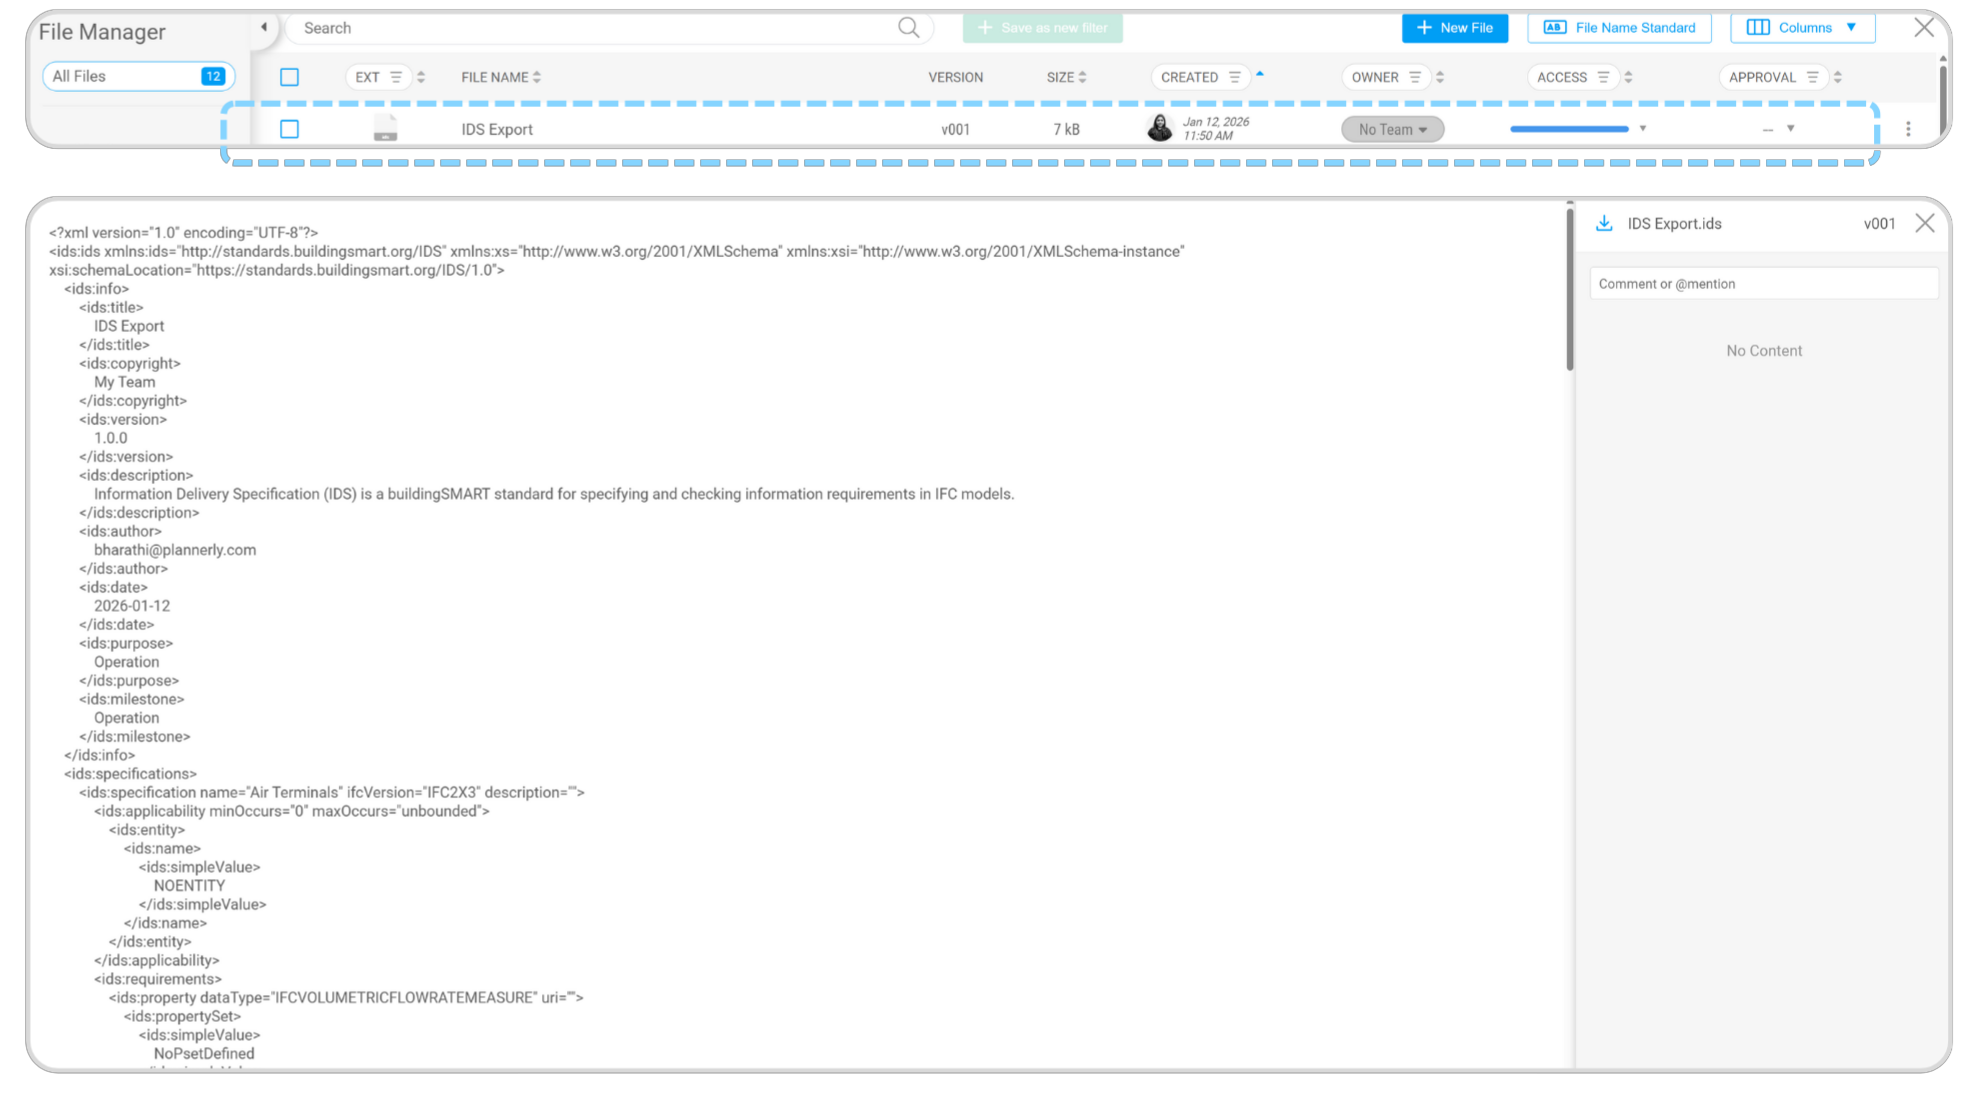
IDS Export
Exporting an IDS creates a machine-readable specification of the information requirements you have defined. This allows requirements to be reused, shared and supports openBIM workflows.
- Export the IDS Specification file for the verified scope.
- Save the exported IDS file for use in model checking and information exchange.
Step 3.2 - Upload and organise deliverables File Manager Verify
Module - File Manager + Verify
This step connects models and documents. Because placeholders were defined earlier, Plannerly can automatically structure the handover.
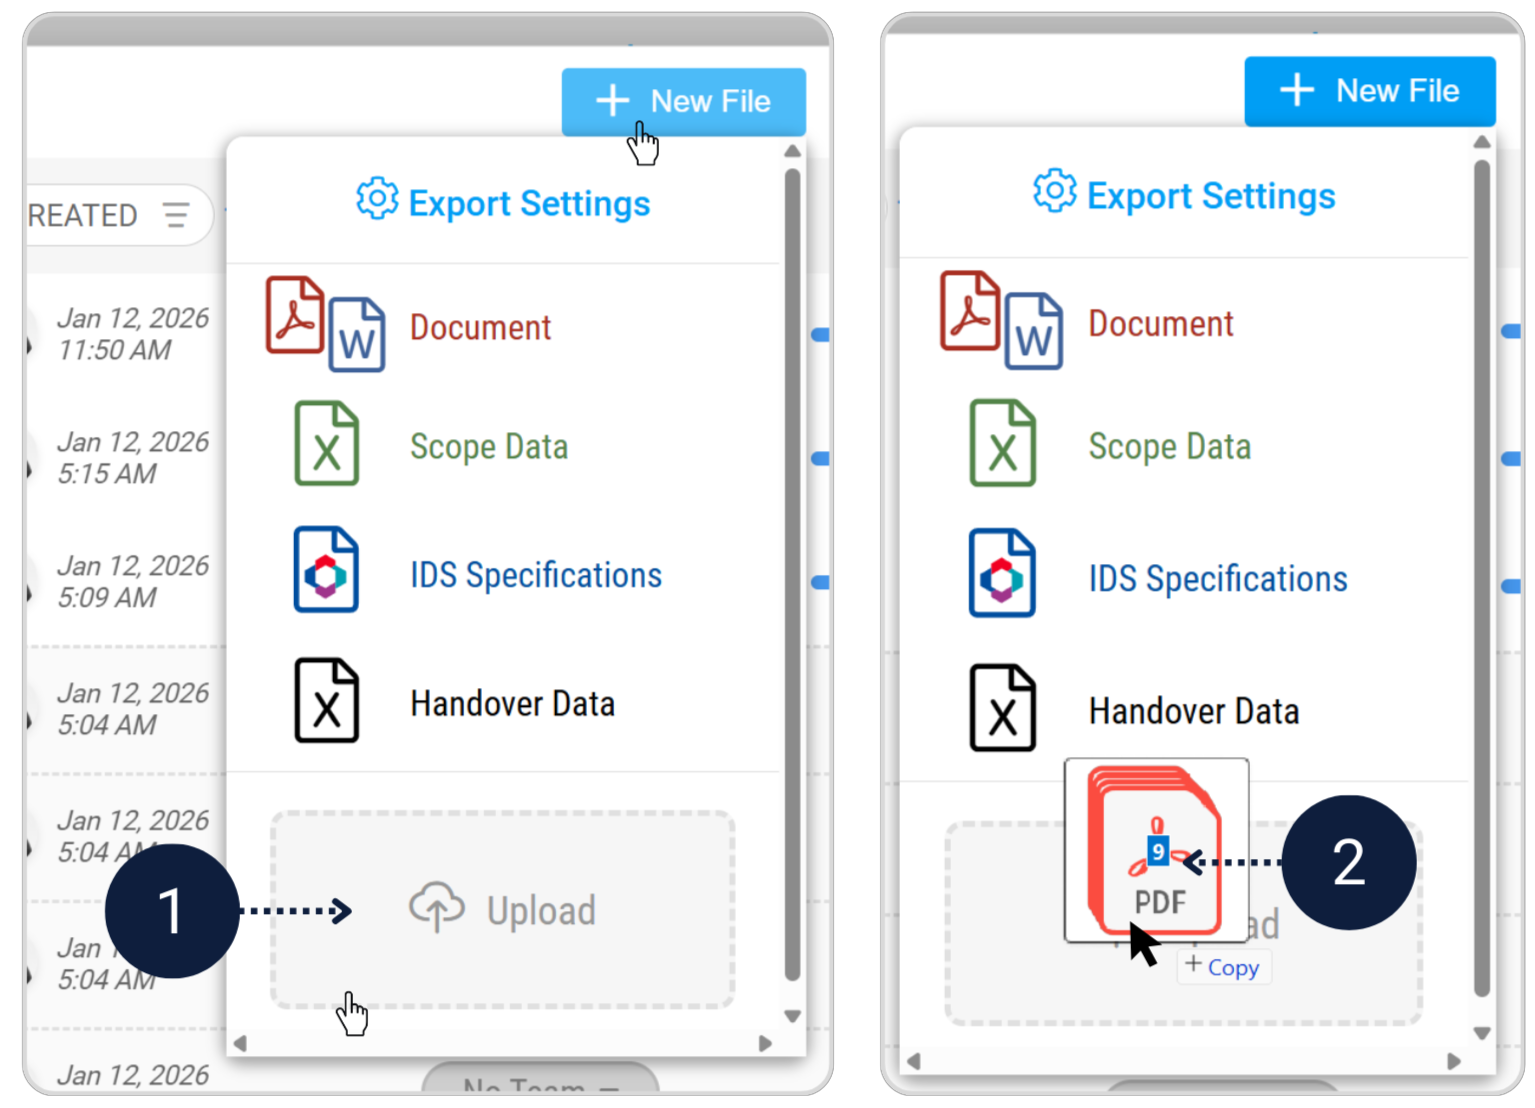
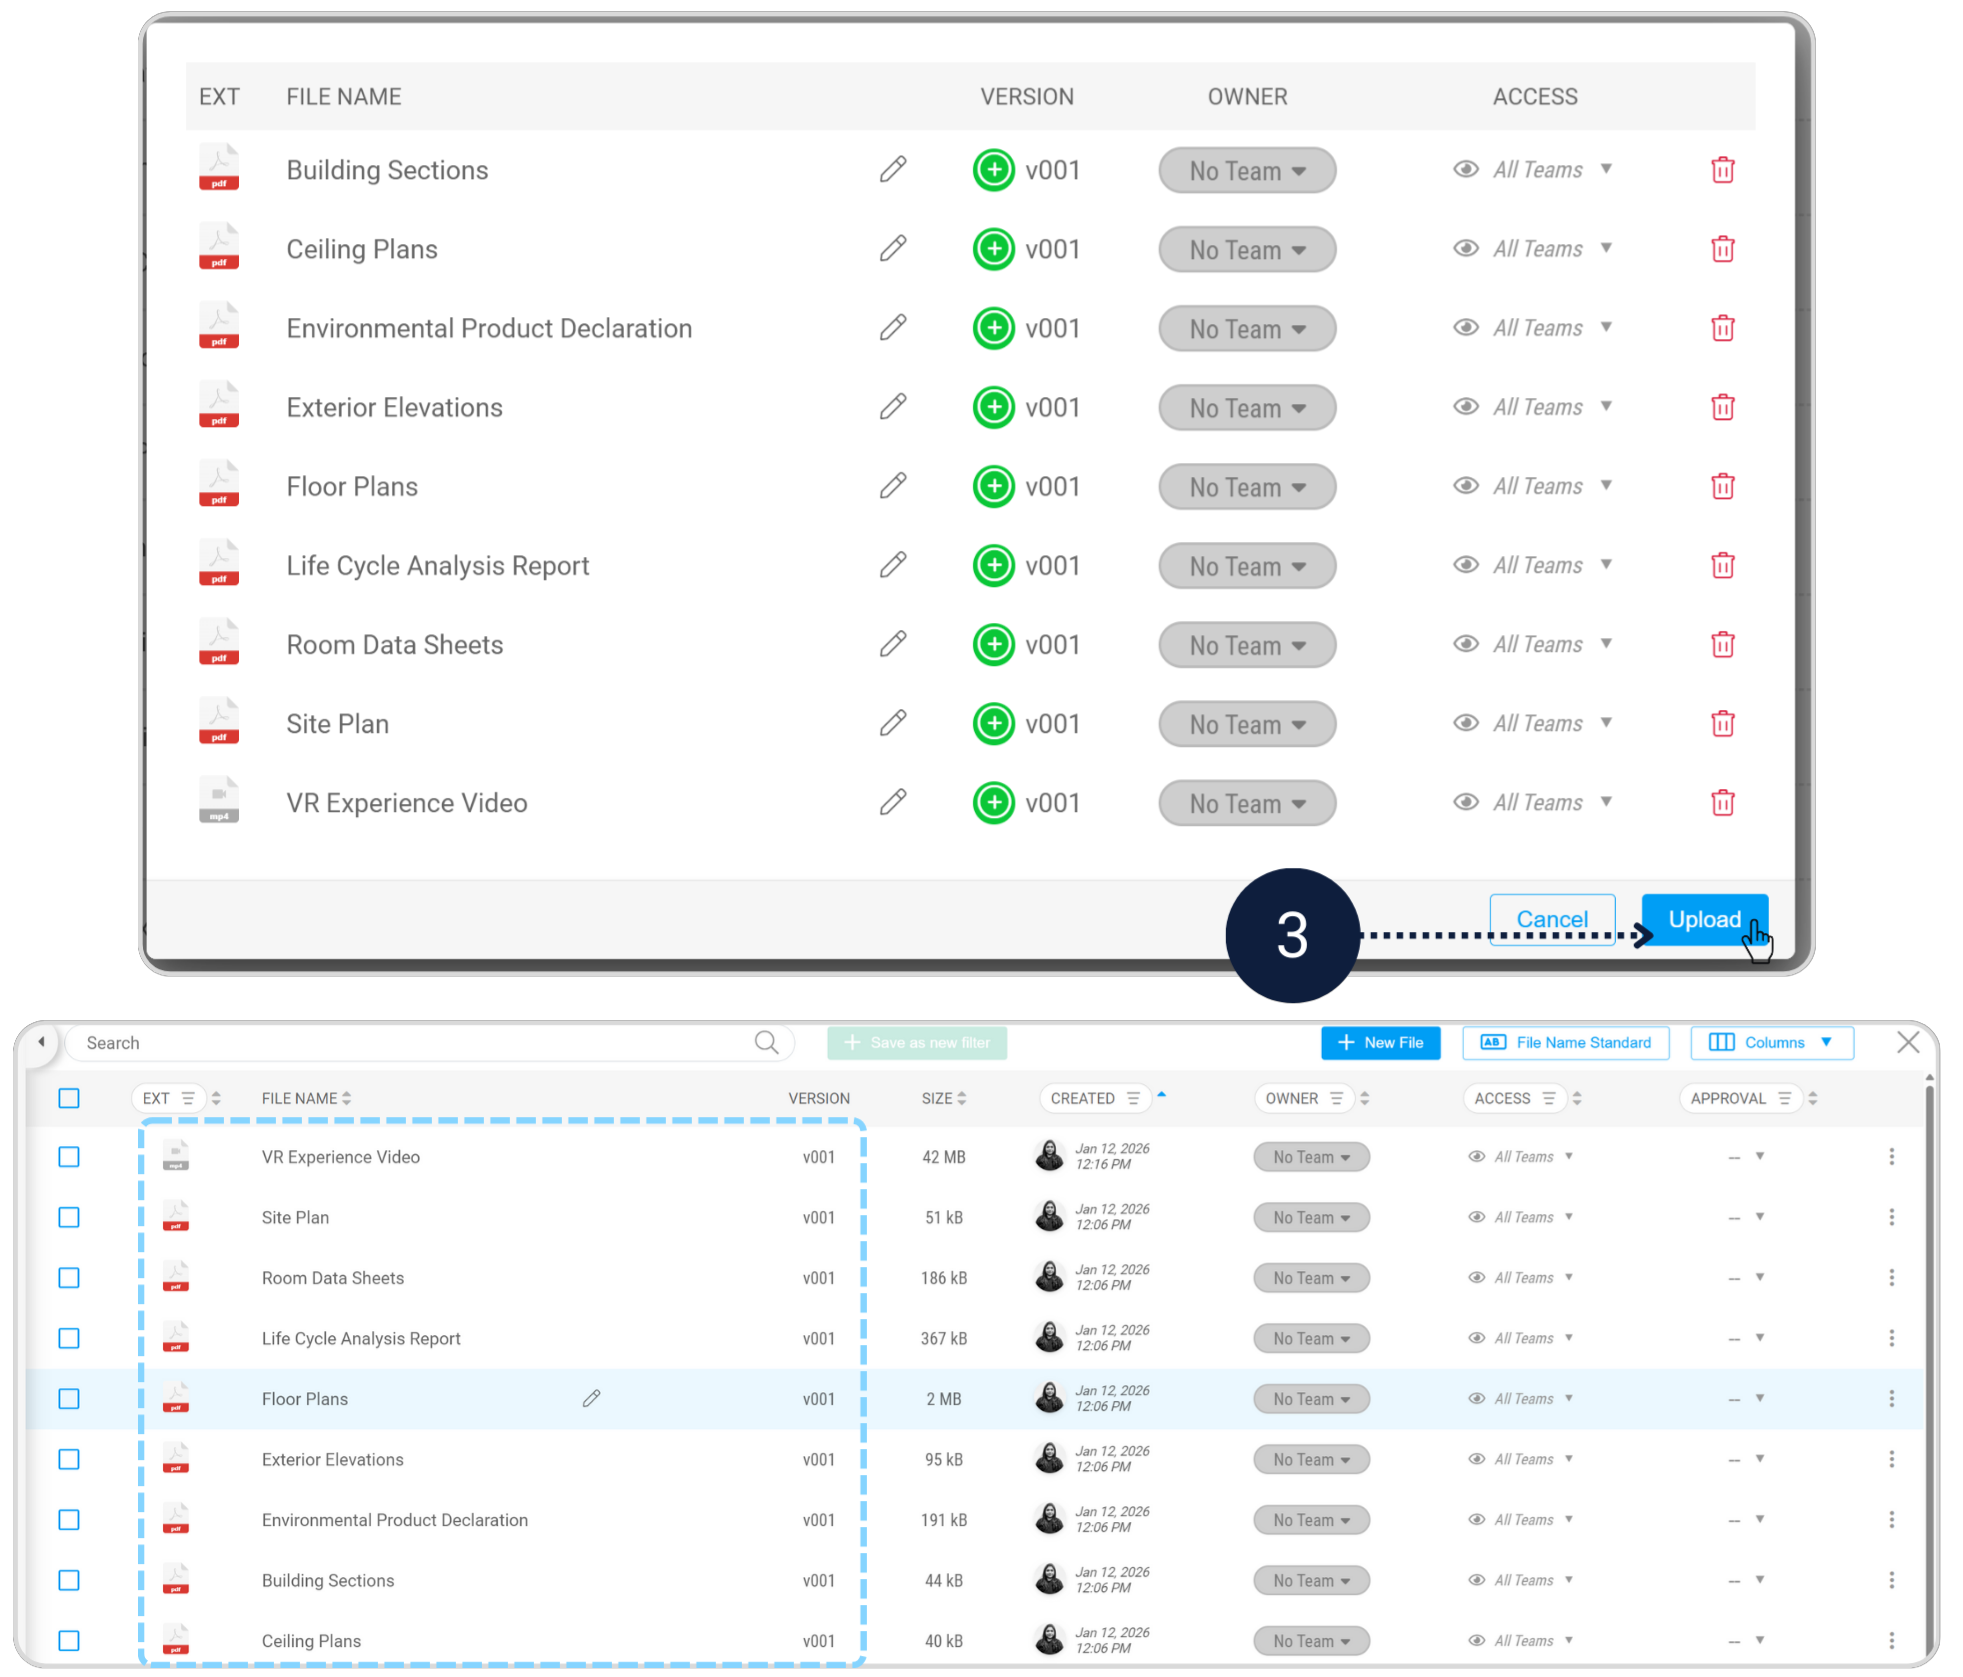
- Download and extract Assignment_Office Building_ Deliverables.zip
- Go to File Manager and upload all extracted files.
- Confirm files automatically attach to their placeholders.
Upload your project deliverables
Download and extract Assignment_Office Building_ Deliverables.zip.
Go to File Manager and Upload all extracted files to the project.
All required document placeholders are populated.
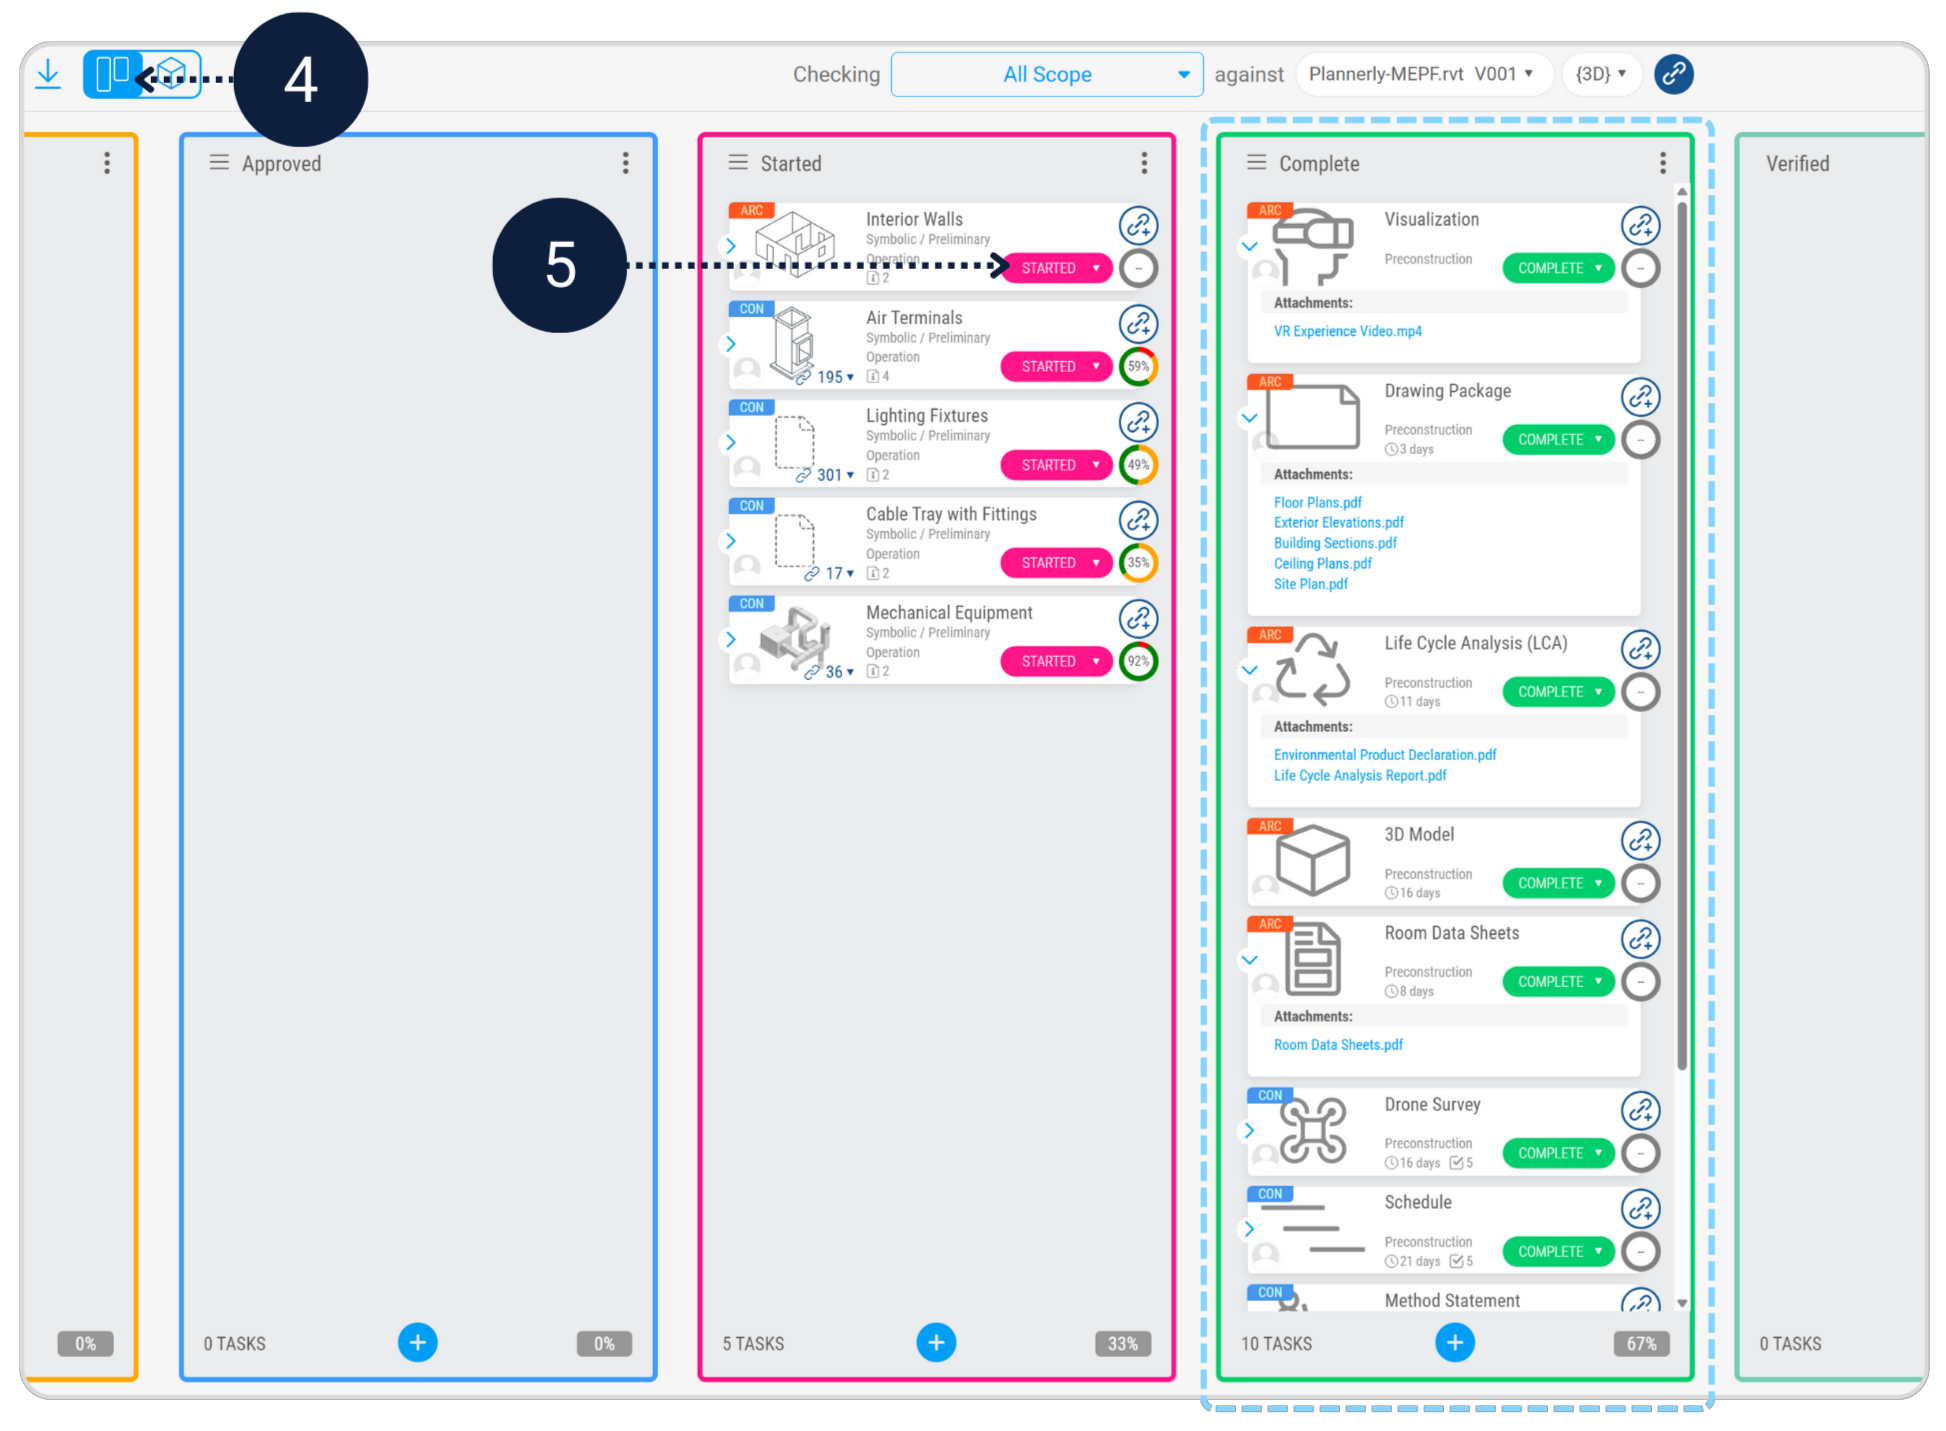
In the Verify module, switch to Kanban view and update the task status to Started or Completed, as appropriate.
Step 3.3 - Finalise, approve, and export the handover File Manager Handover
Module - File Manager
As Lead Appointed Party, you now confirm acceptance of the deliverables and export the structured handover data for client use.
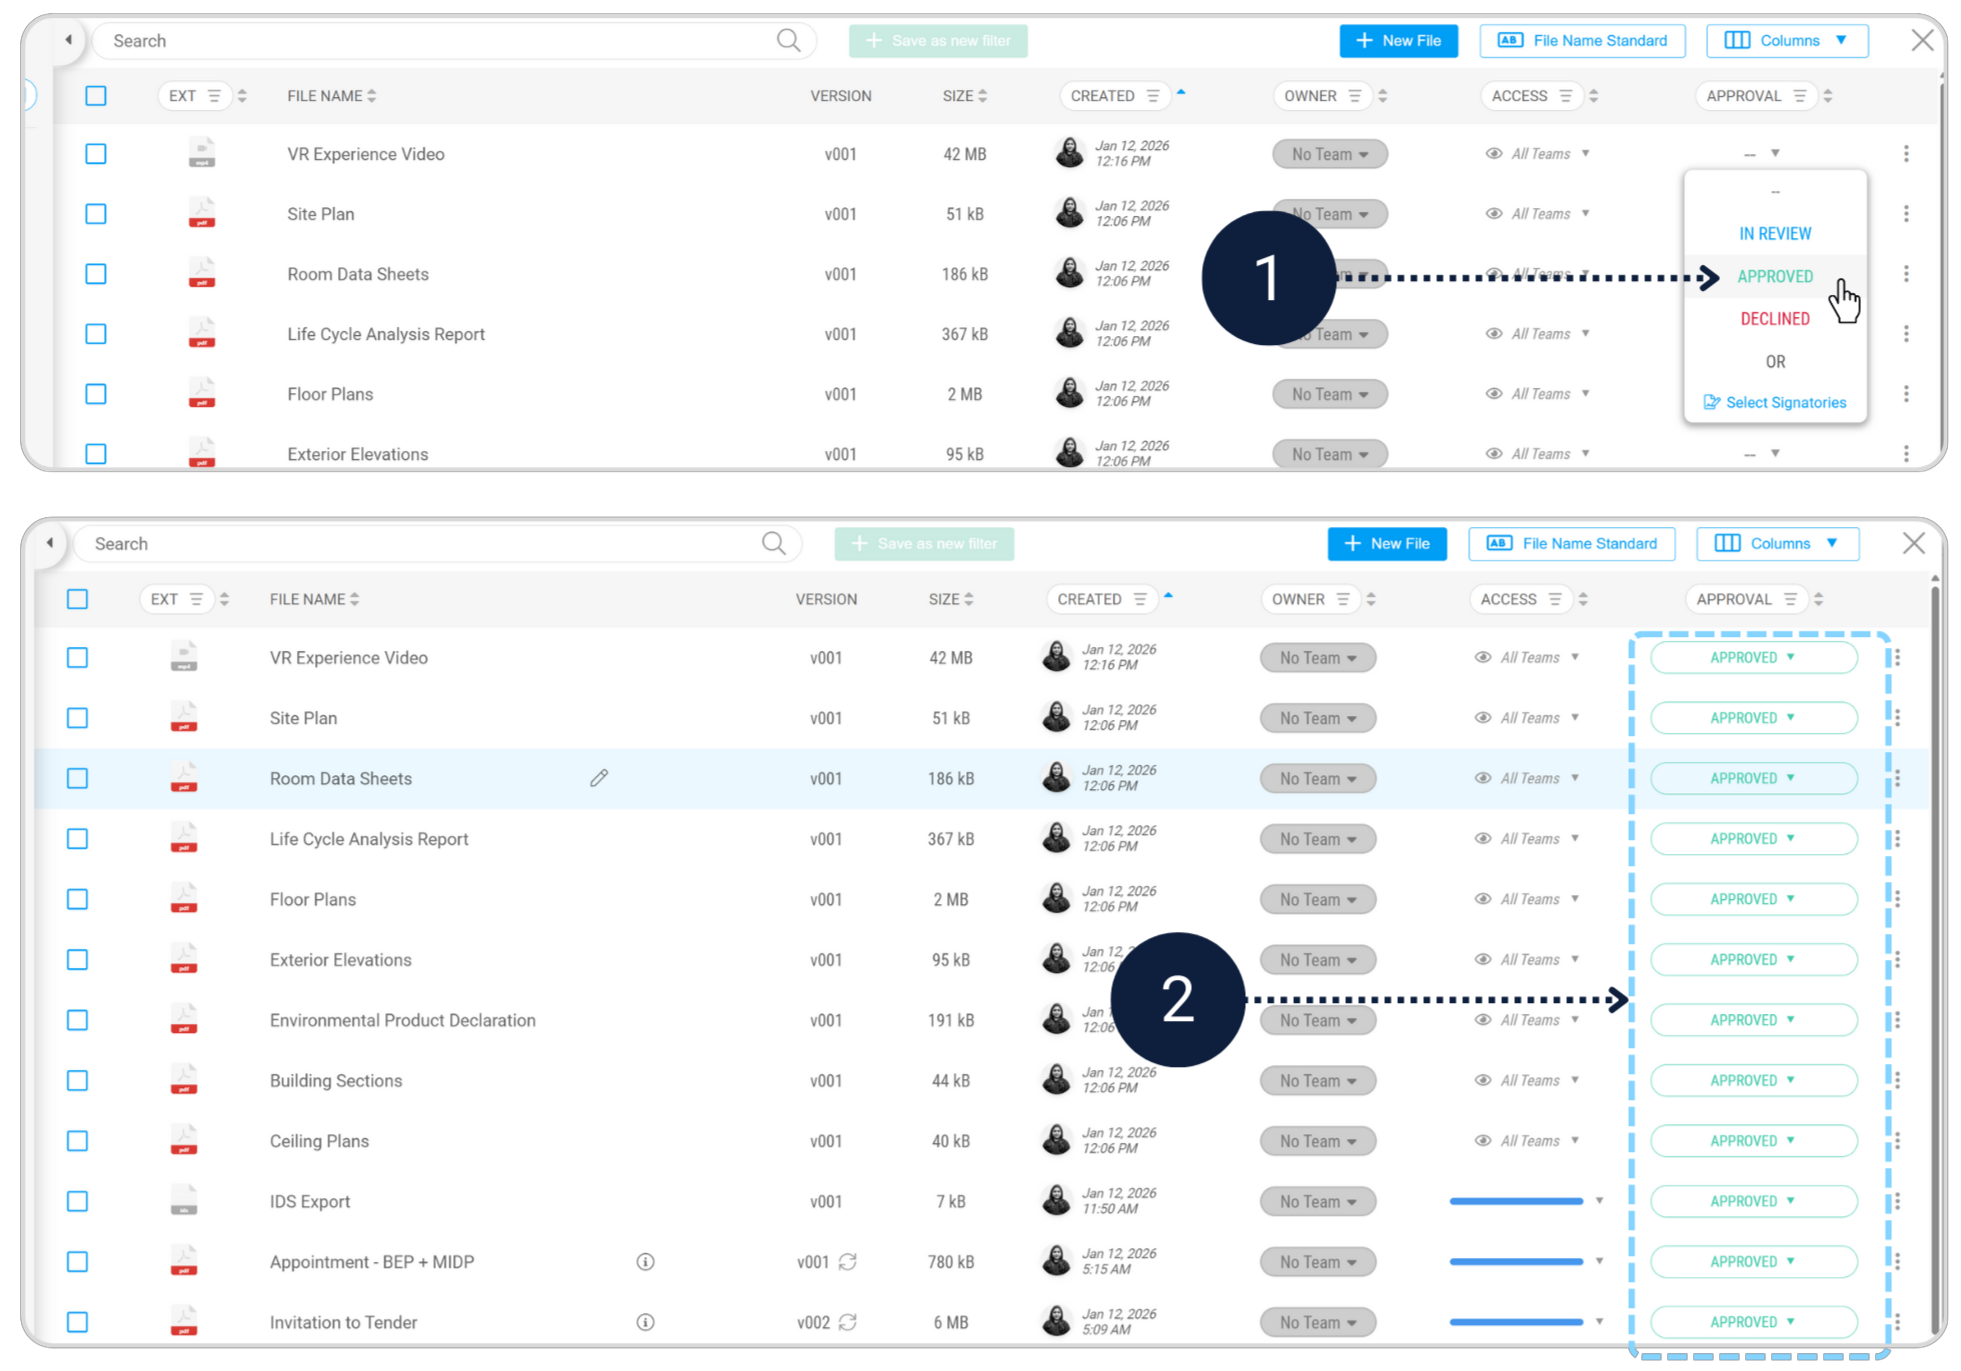
- Review and approve documents in File Manager.
- Export handover data.
- File Naming Standard.
Approve documents
Review and approve uploaded documents in the file manager.
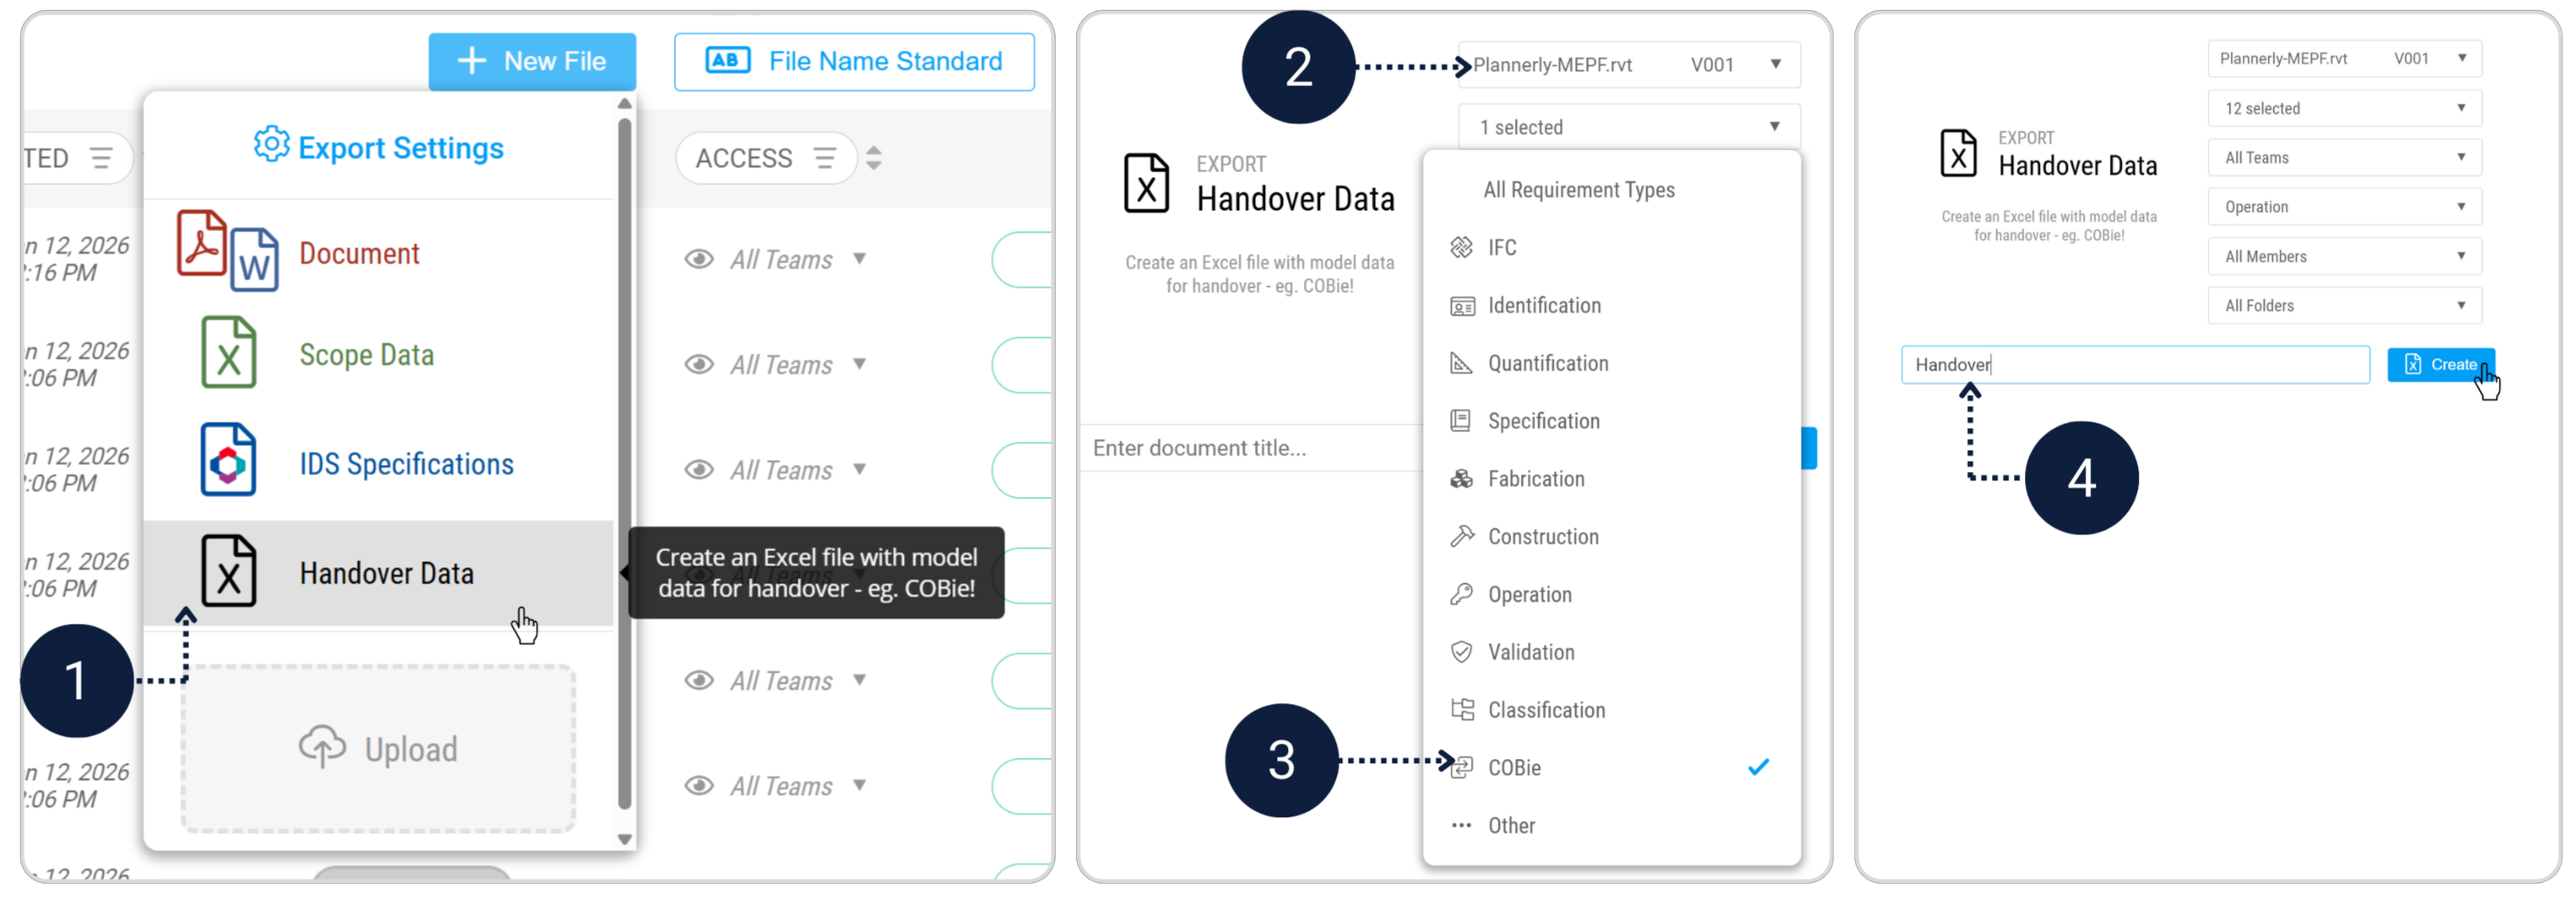
Handover data export
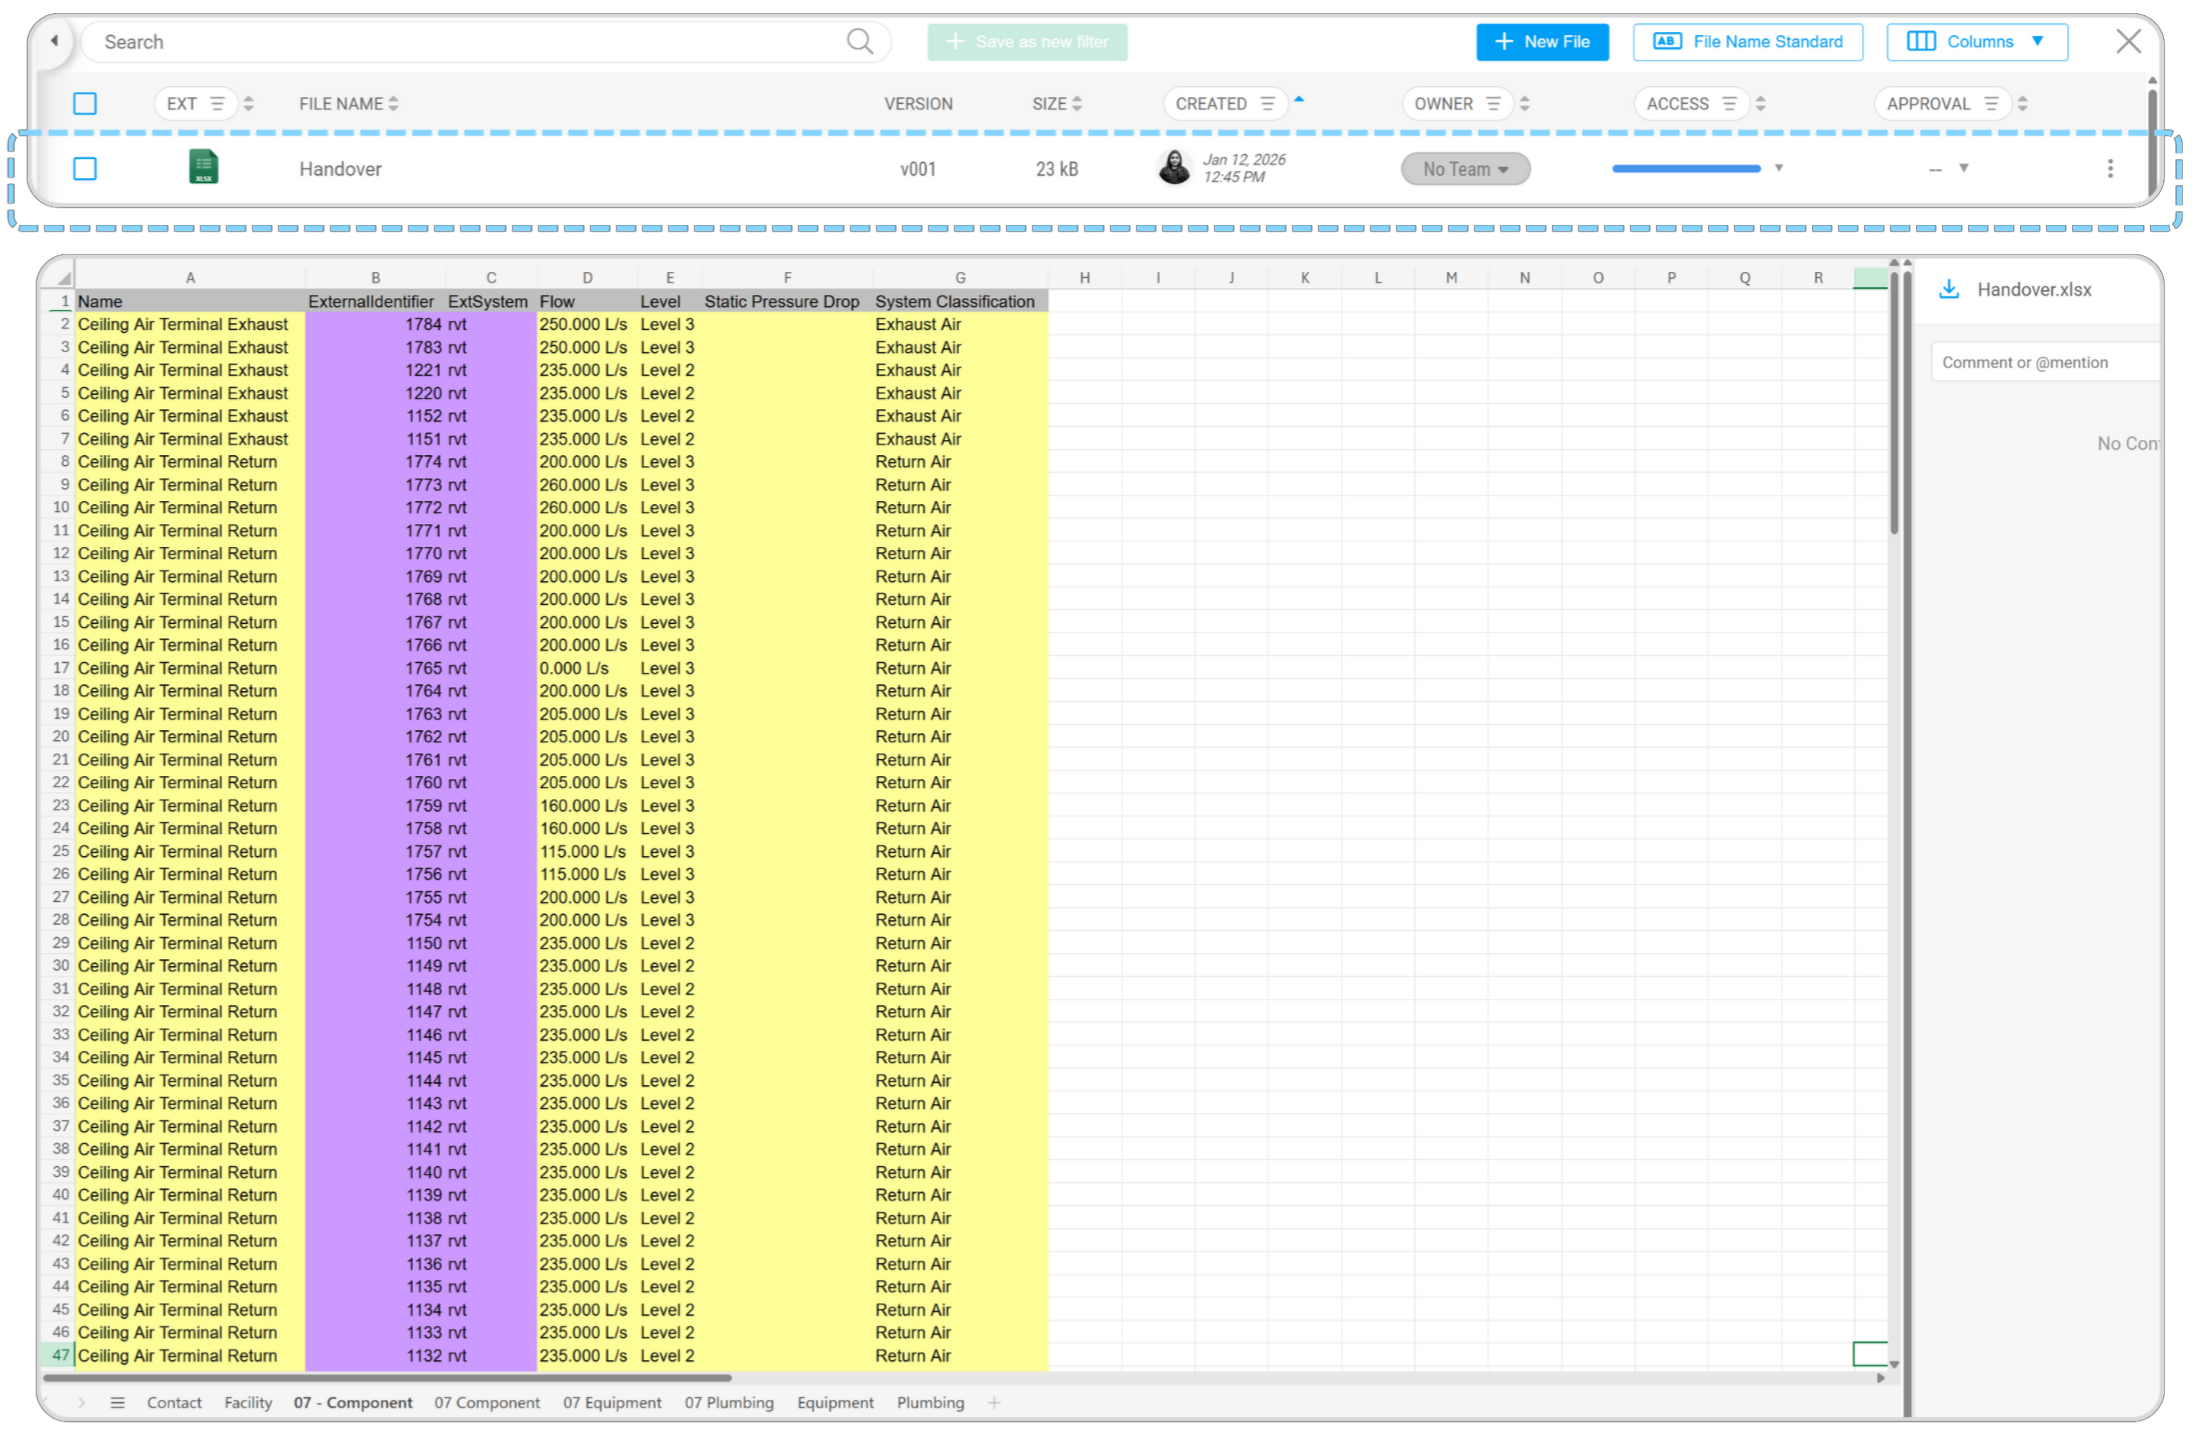
Go to File Manager, click New File → Handover Data.
Select Plannerly MEP Model and filter by COBie requirement type.
Add a clear title and create the file.
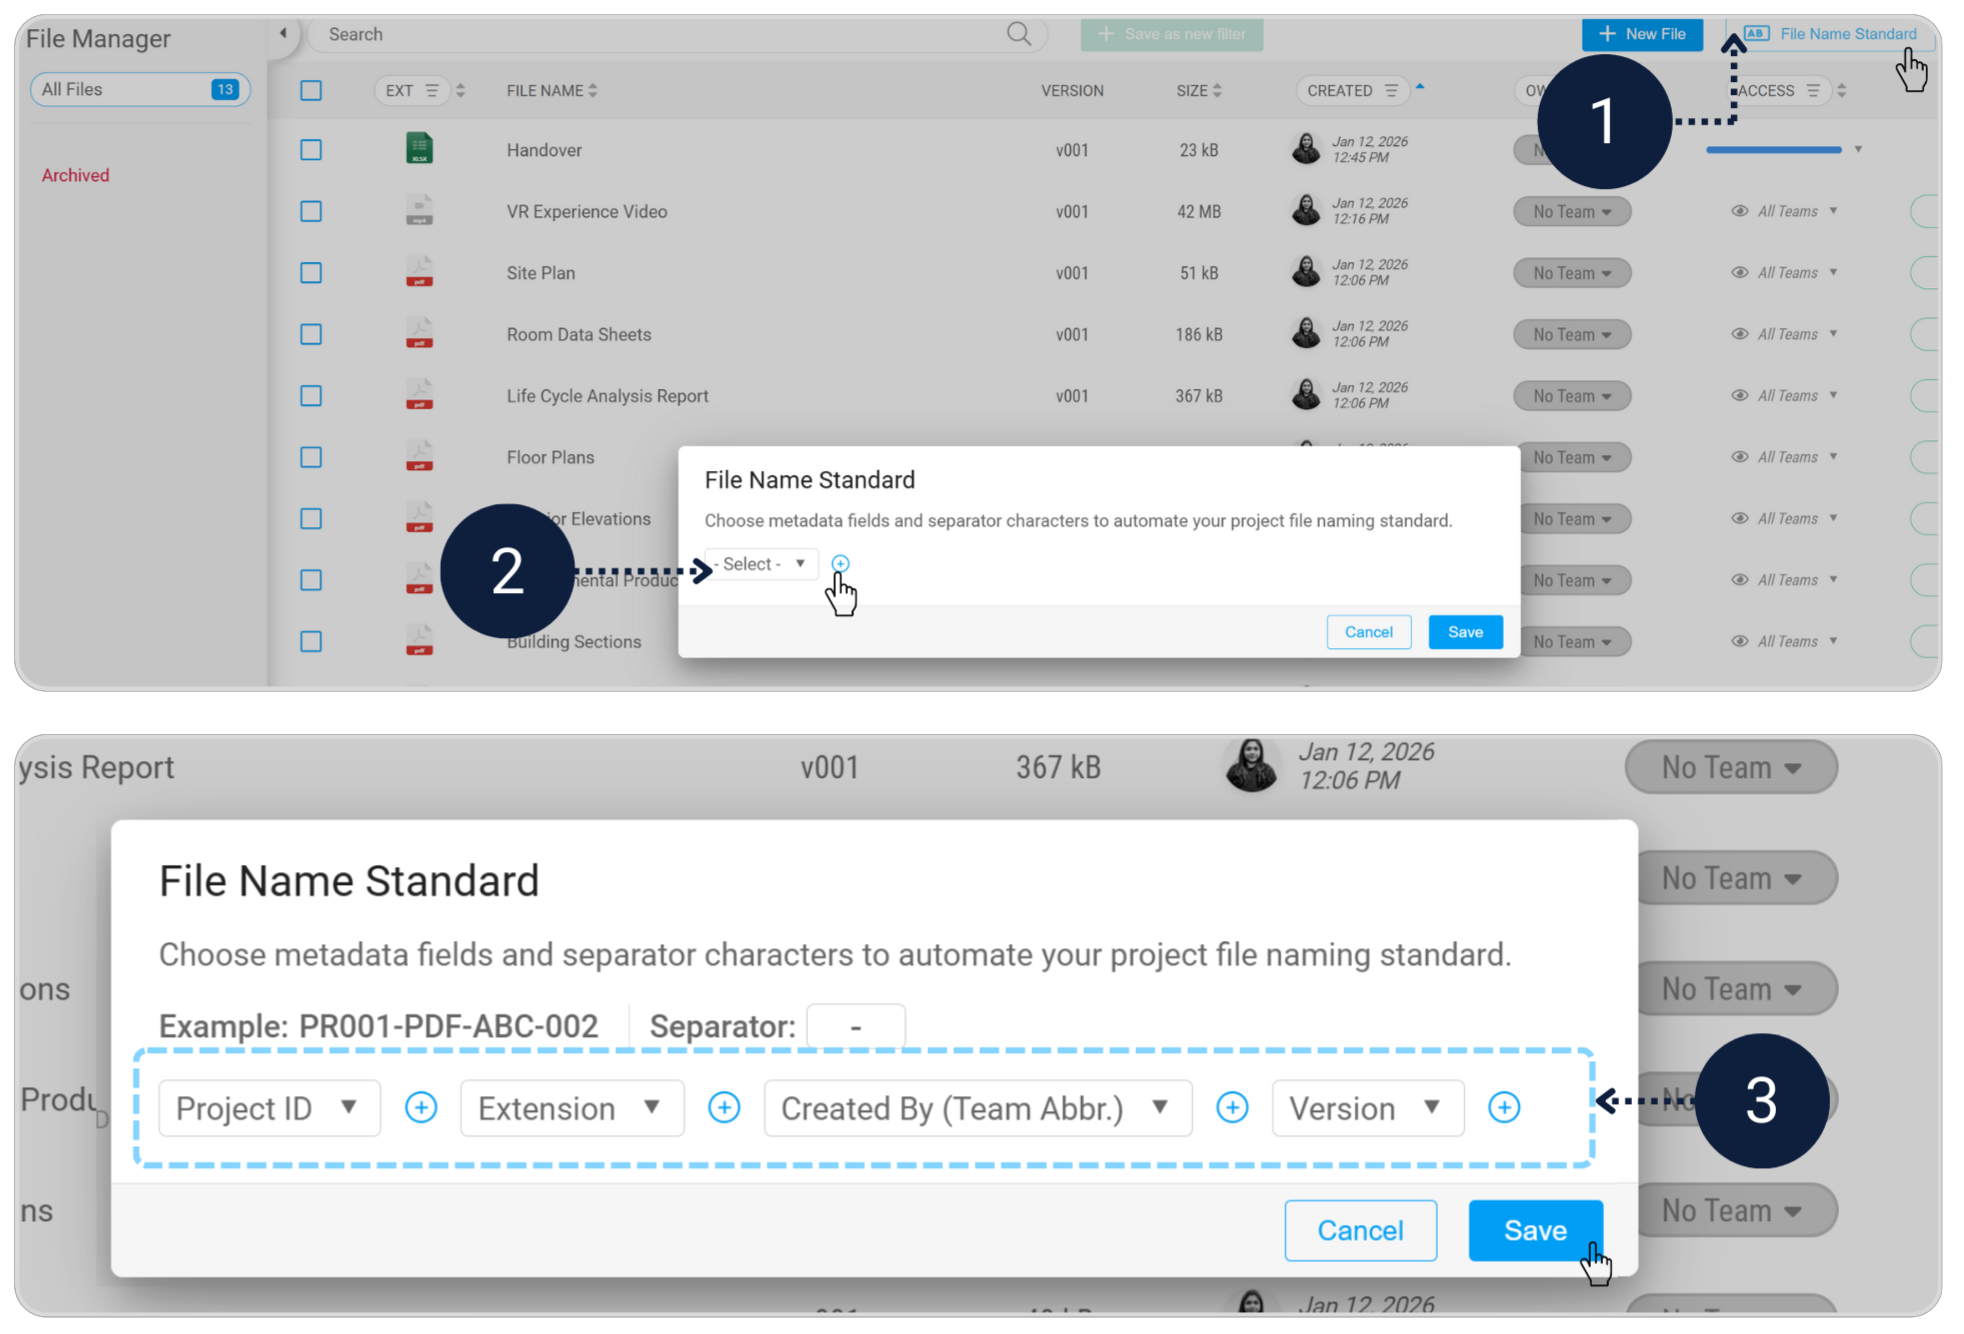
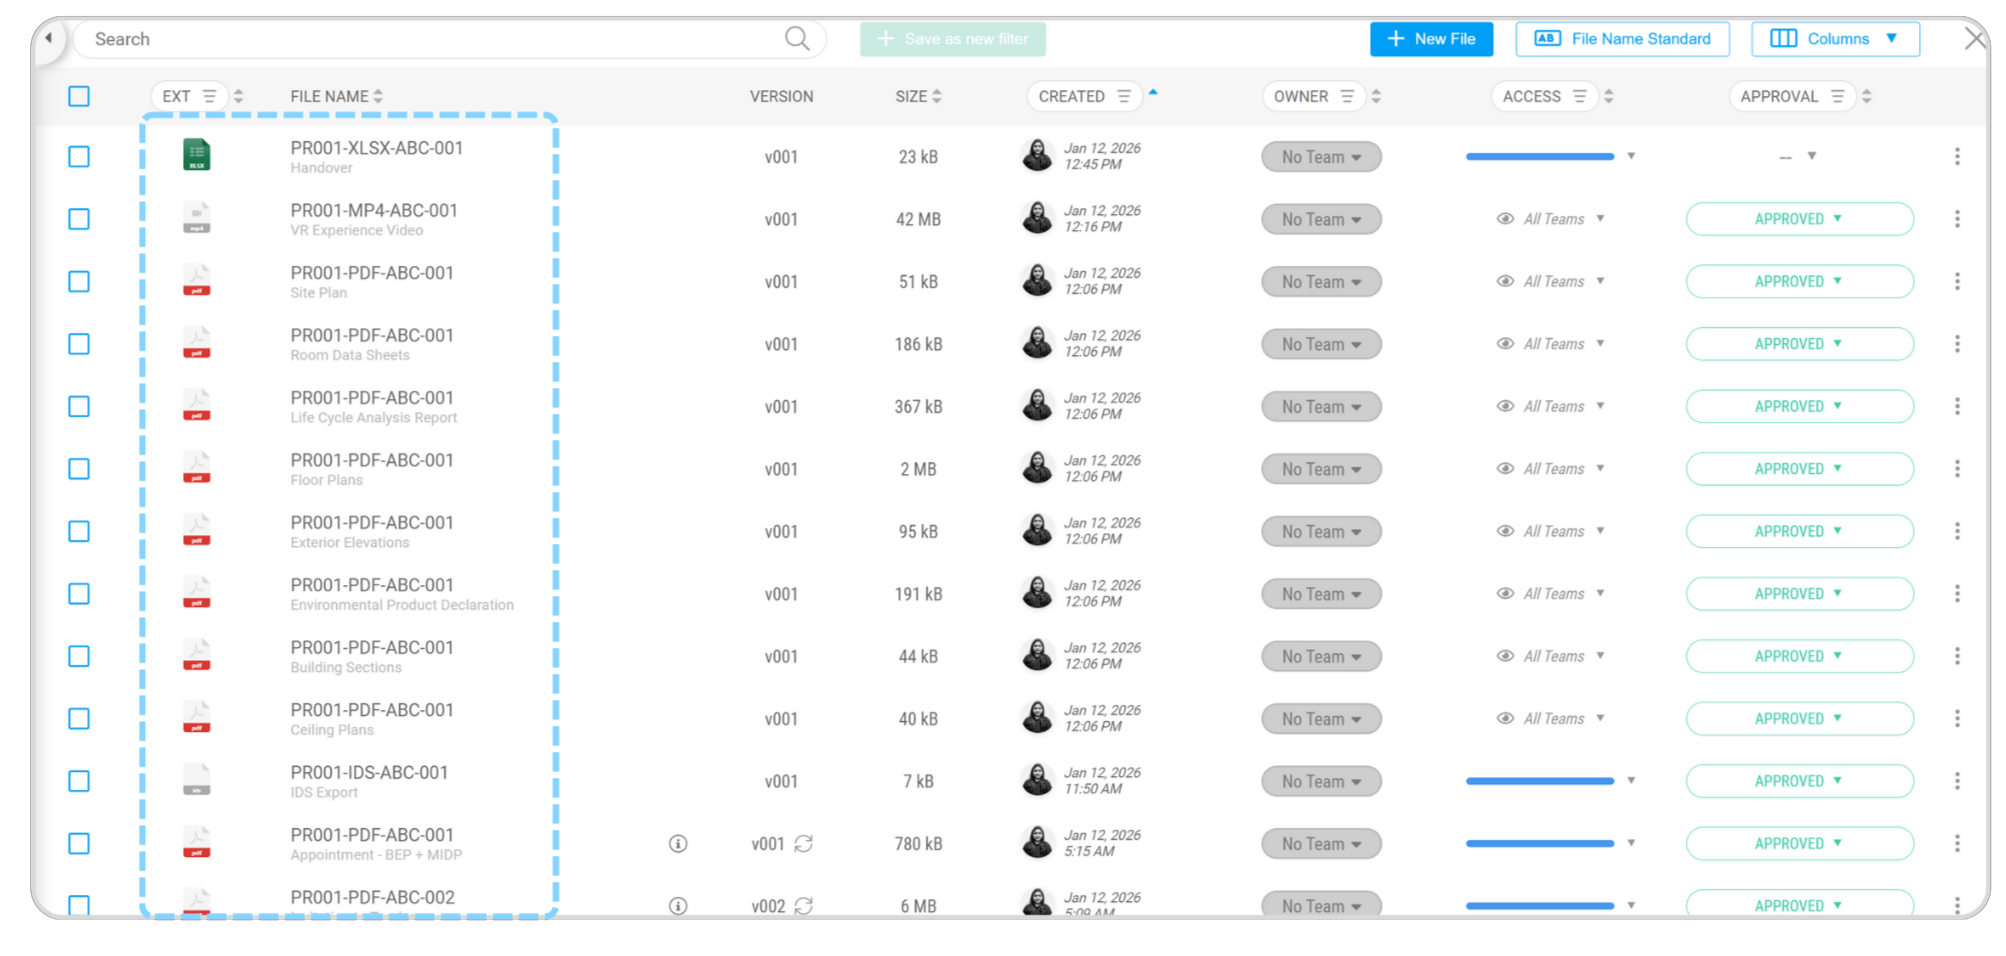
File Naming Standard
In the File Manager, open File Name Standard.
Configure the naming rule using the following metadata fields, in order: Project ID → Extension → Created By (Team Abbr.) → Version.
Click Save to apply the naming standard.
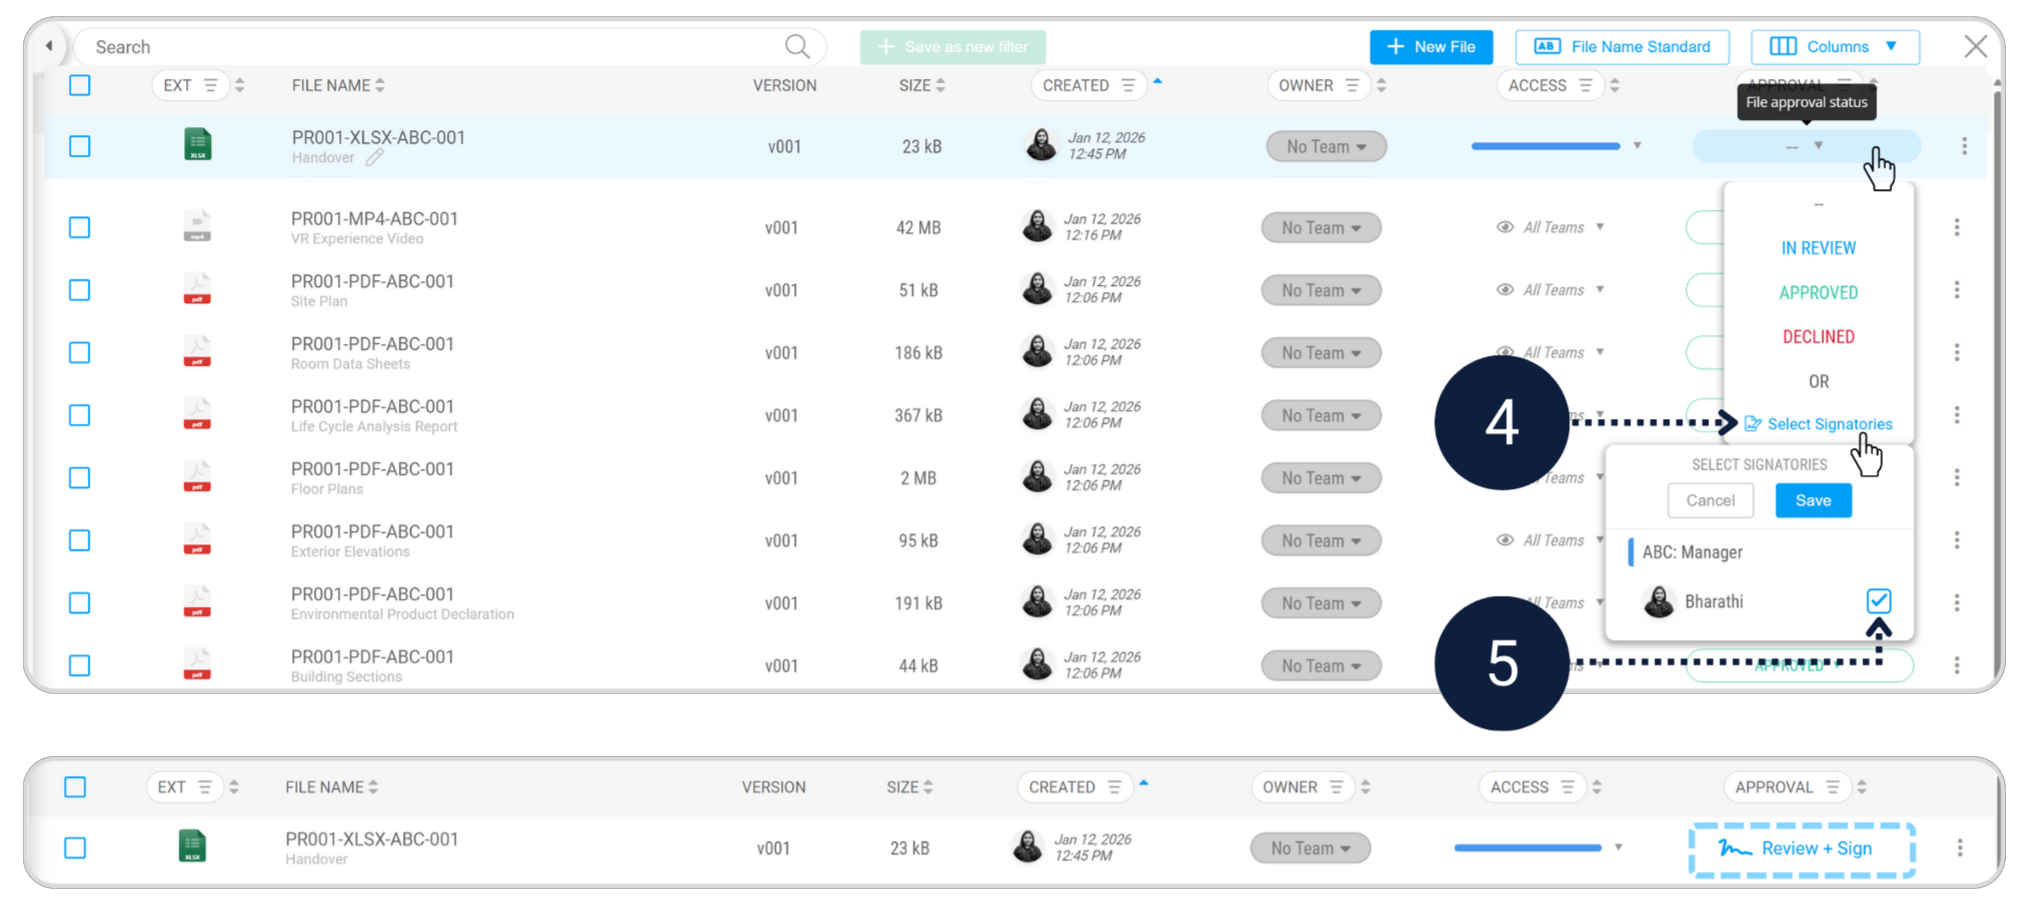
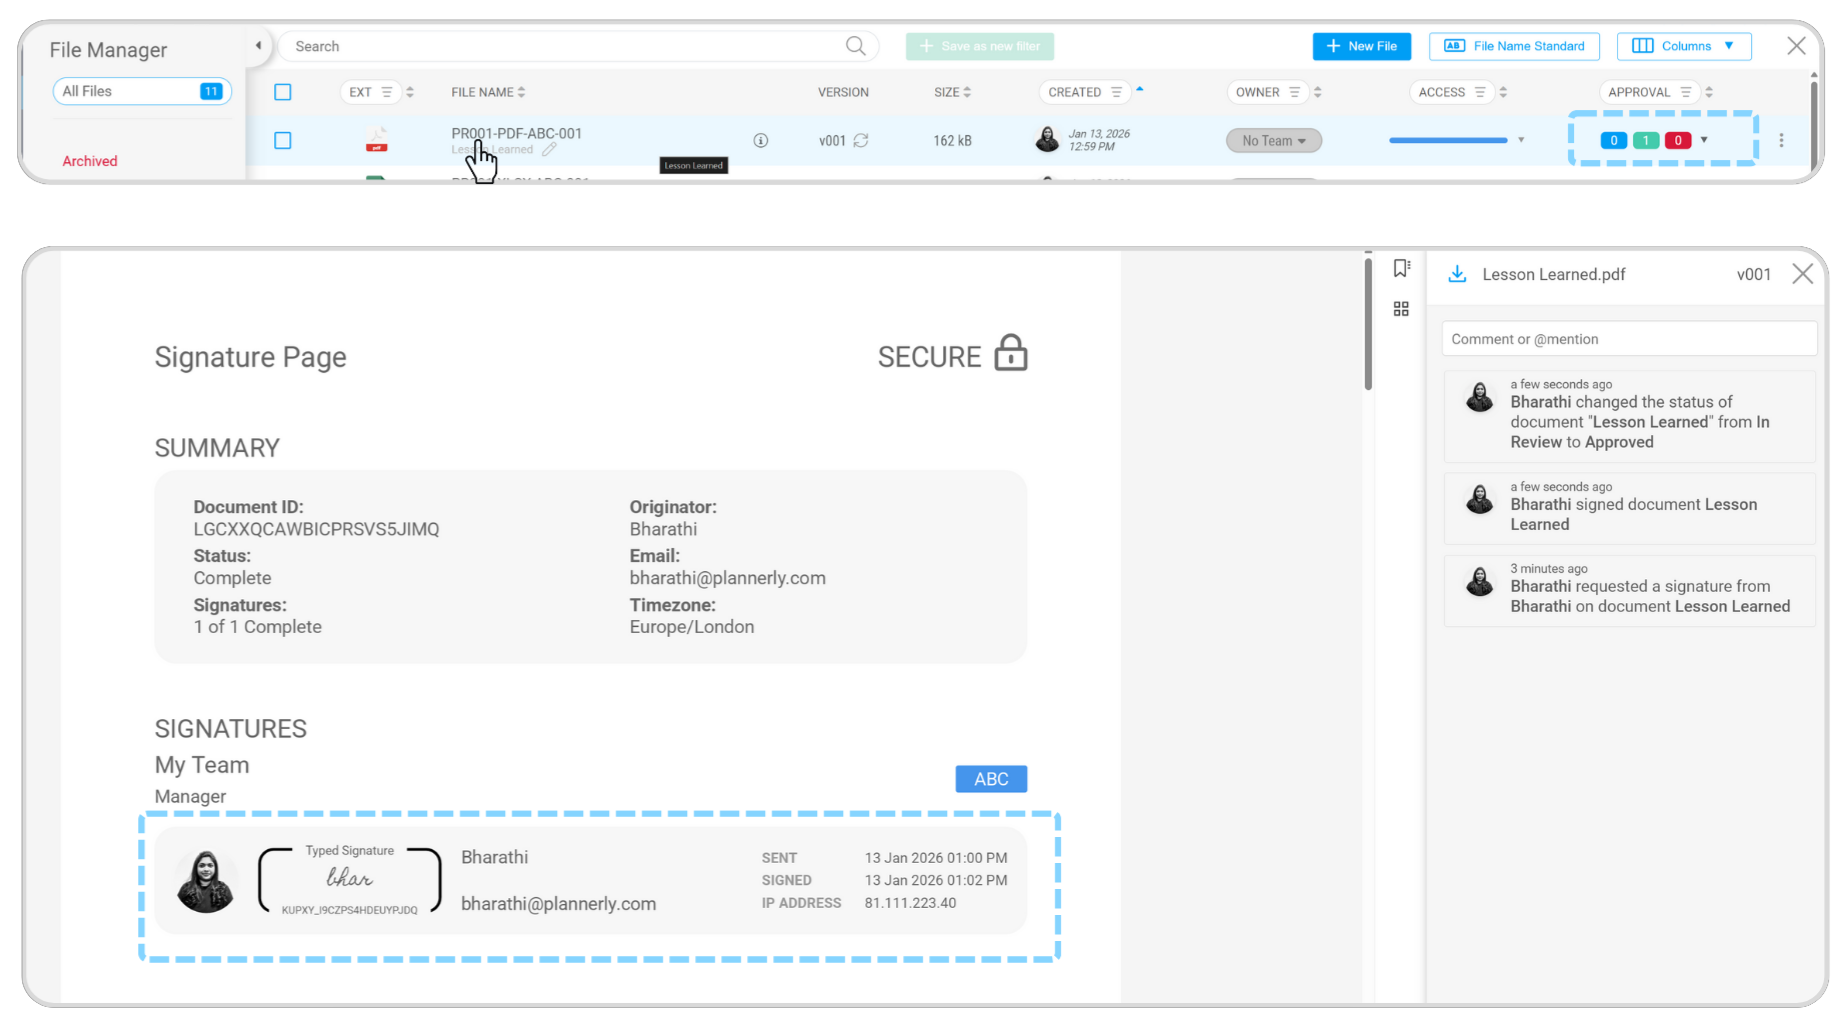
For handover data, set the approval status and request signatory acceptance to complete handover.
Assignment 3 - Video Walkthrough
Follow along as we complete every step of Assignment 3 live inside Plannerly. You will see exactly how to verify models against agreed information requirements, organise deliverables, and export a structured handover package. Every click, every decision, right alongside you.
ISO 19650 Specialist Assignment 3 - Model Verification
Assignment 4 - Handover + Acceptance AIM Handover Acceptance
Final acceptance - hand over information that can actually be trusted.
This is the moment the Owner cares about most. You are now acting as the Appointing Party (Owner). Your job is to confirm the handover is usable, organised, and aligned with the requirements - and to capture what should improve next time. You will package the verified outputs into a structured handover and confirm acceptance against what was agreed. The goal is not “a folder of files” - it is information that is complete, consistent, and usable for operations. Because you verified delivery in Assignment 3, acceptance here becomes a decision - not a debate.
Assignment 4 - Video Walkthrough
Follow along as we complete every step of Assignment 4 live inside Plannerly. You will see exactly how to review and sign off handover data, capture lessons learned, and complete the final sign-off workflow. Every click, every decision, right alongside you.
ISO 19650 Specialist Assignment 4 - Handover + Acceptance
What you will do
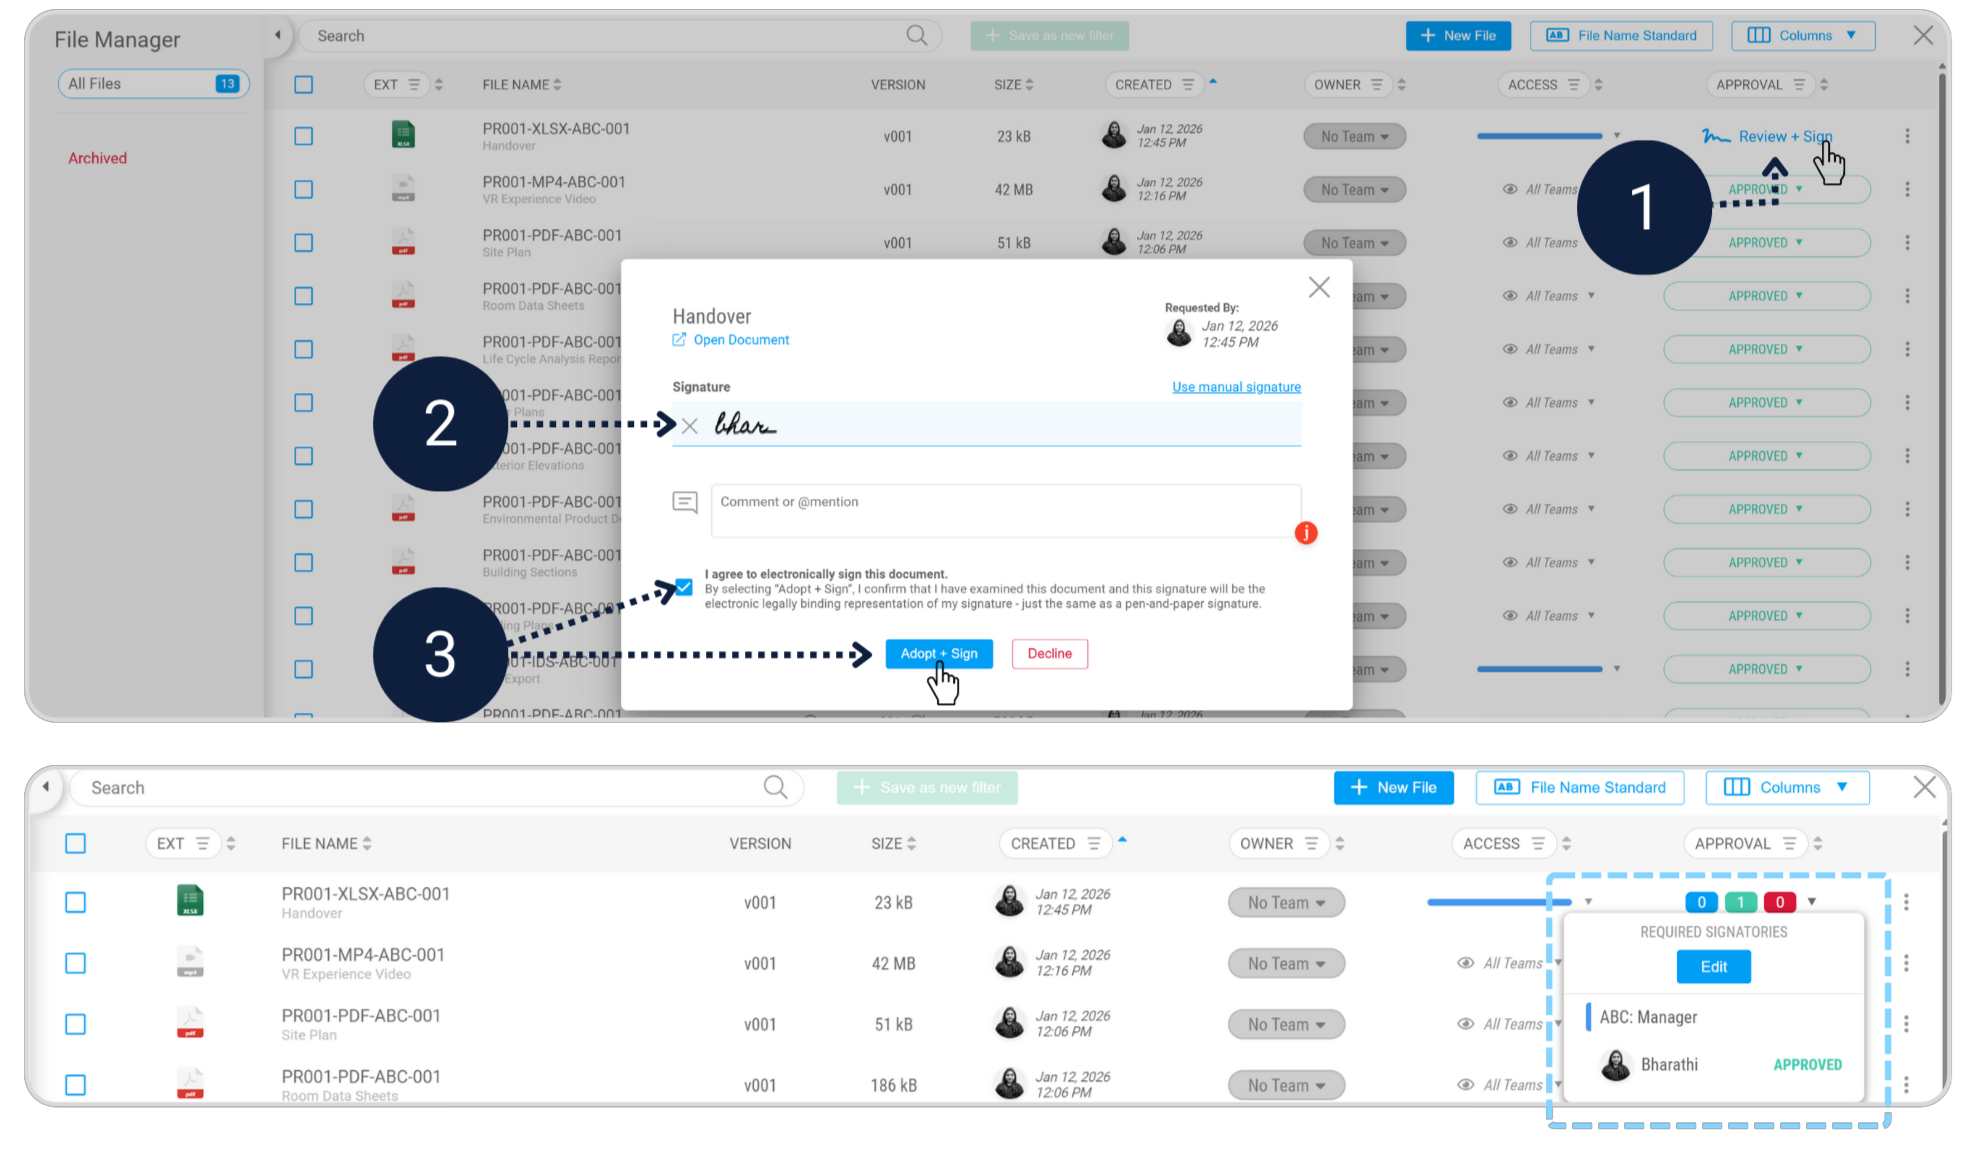
Step 4.1 - Review and sign off handover data File Manager Sign-off
Module - File Manager
Review the submitted handover data in the File Manager and complete the Review & Sign action to formally accept the handover.
- Review and sign off the submitted handover data
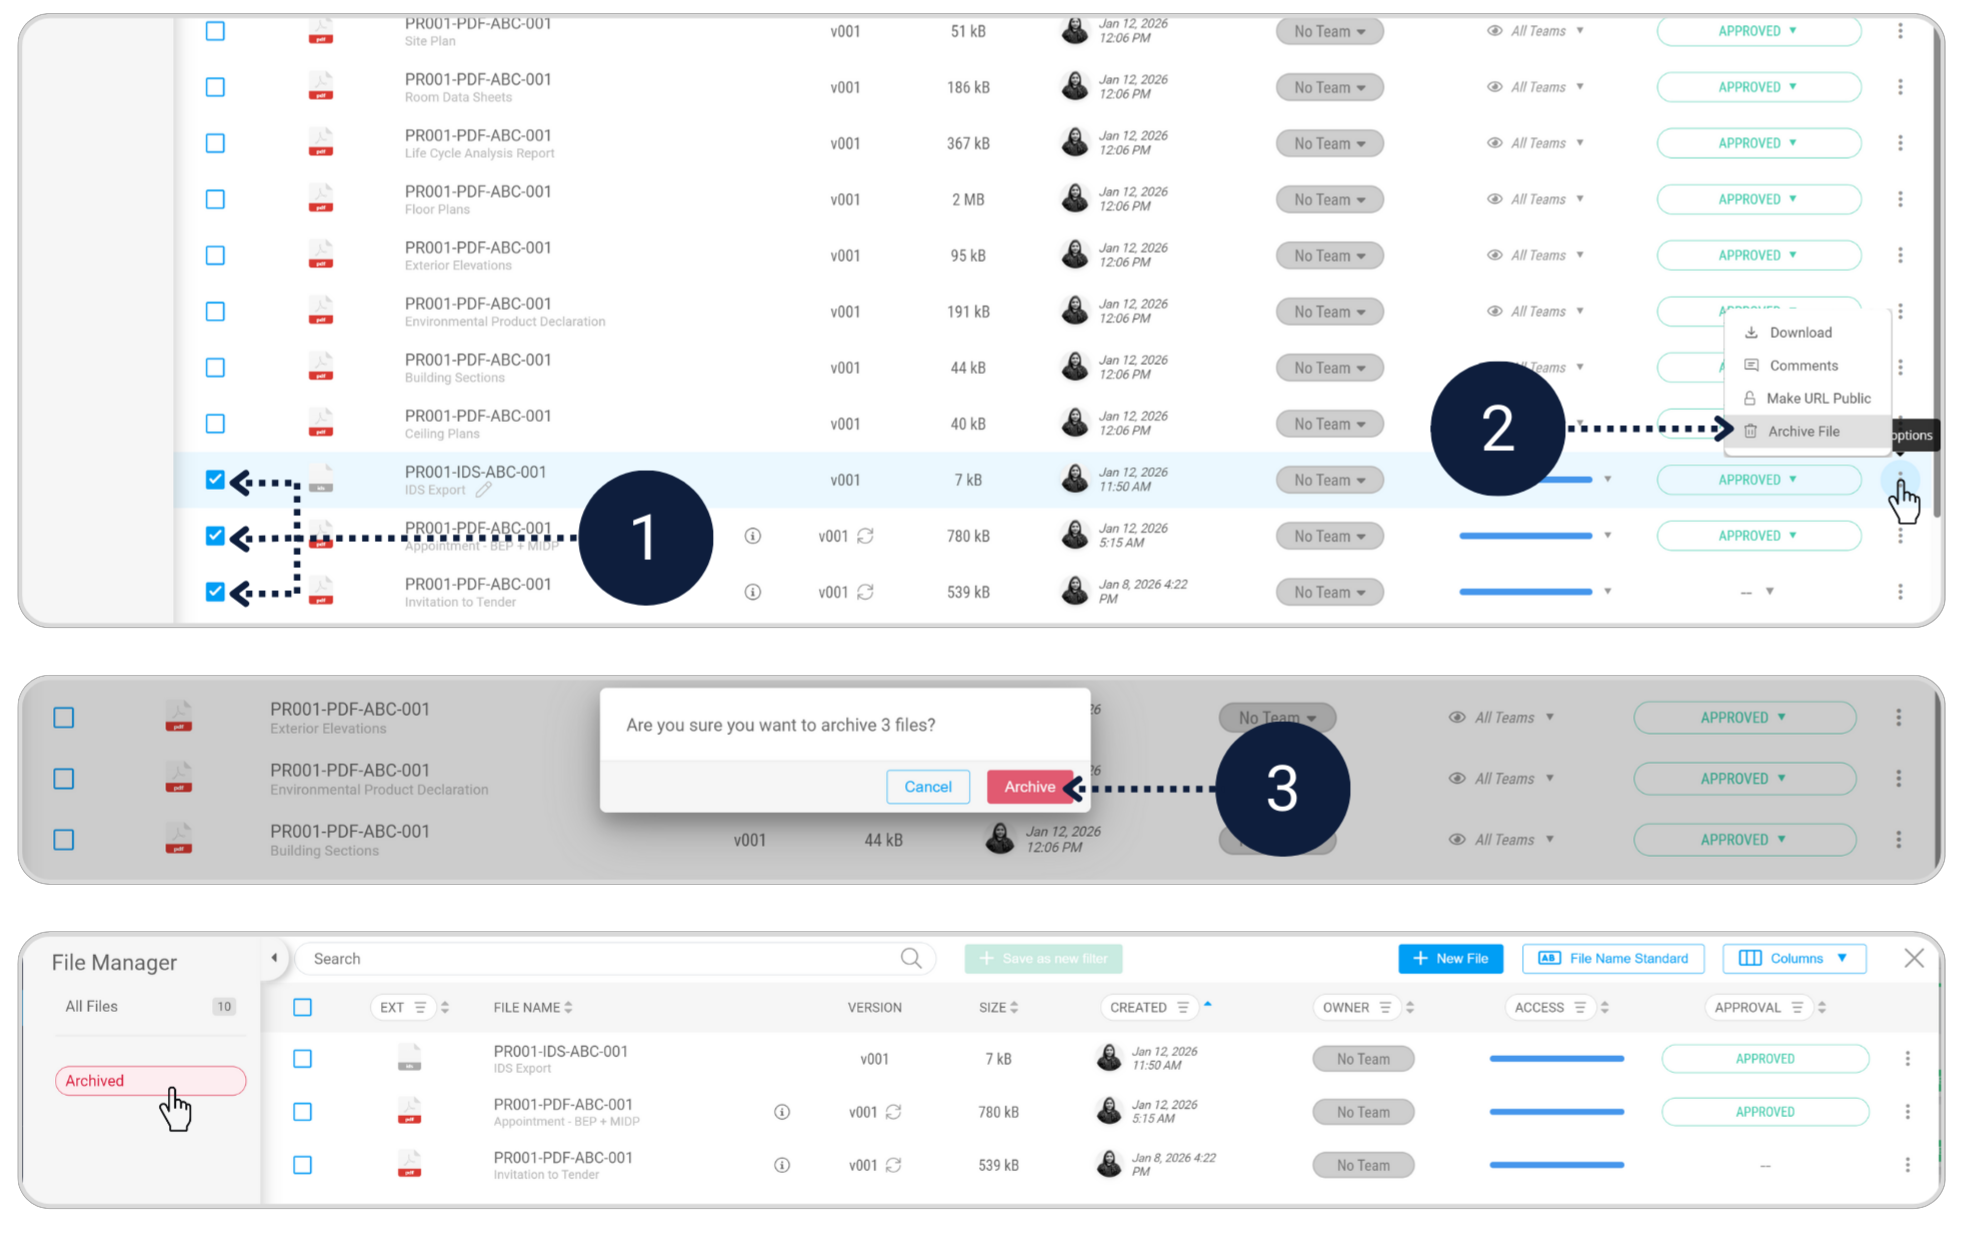
- Archive all non-operational files
- Keep operational information visible for day-to-day use
Review and sign off the handover data
Review the submitted handover data in the File Manager and complete the Review & Sign action to formally accept the handover.
Archive all non-operational files
In the File Manager, select files that are not required for the operational phase and click Archive.
Archived files are stored separately, leaving only operational documents visible for day-to-day use.
Want to learn more about final verification?
Learn more about final verification, compliance, and lessons learned
Step 4.2 - Capture lessons learned Docs File Manager
Modules - Docs + File Manager
Lessons learned is how teams improve. It turns “we should do better next time” into something captured, shareable, and repeatable. Your sign-off confirms the workflow is complete - and the handover is accepted.
- Complete lesson learned section
- Assign the document to the Lead Appointed Party and request an e-signature
- If working individually, request the e-signature for yourself to complete the workflow
Complete the Lesson Learned section
Answer the reflection questions in the Lessons Learned section below to capture key takeaways, then export/print to PDF so you can upload this to your Plannerly project.
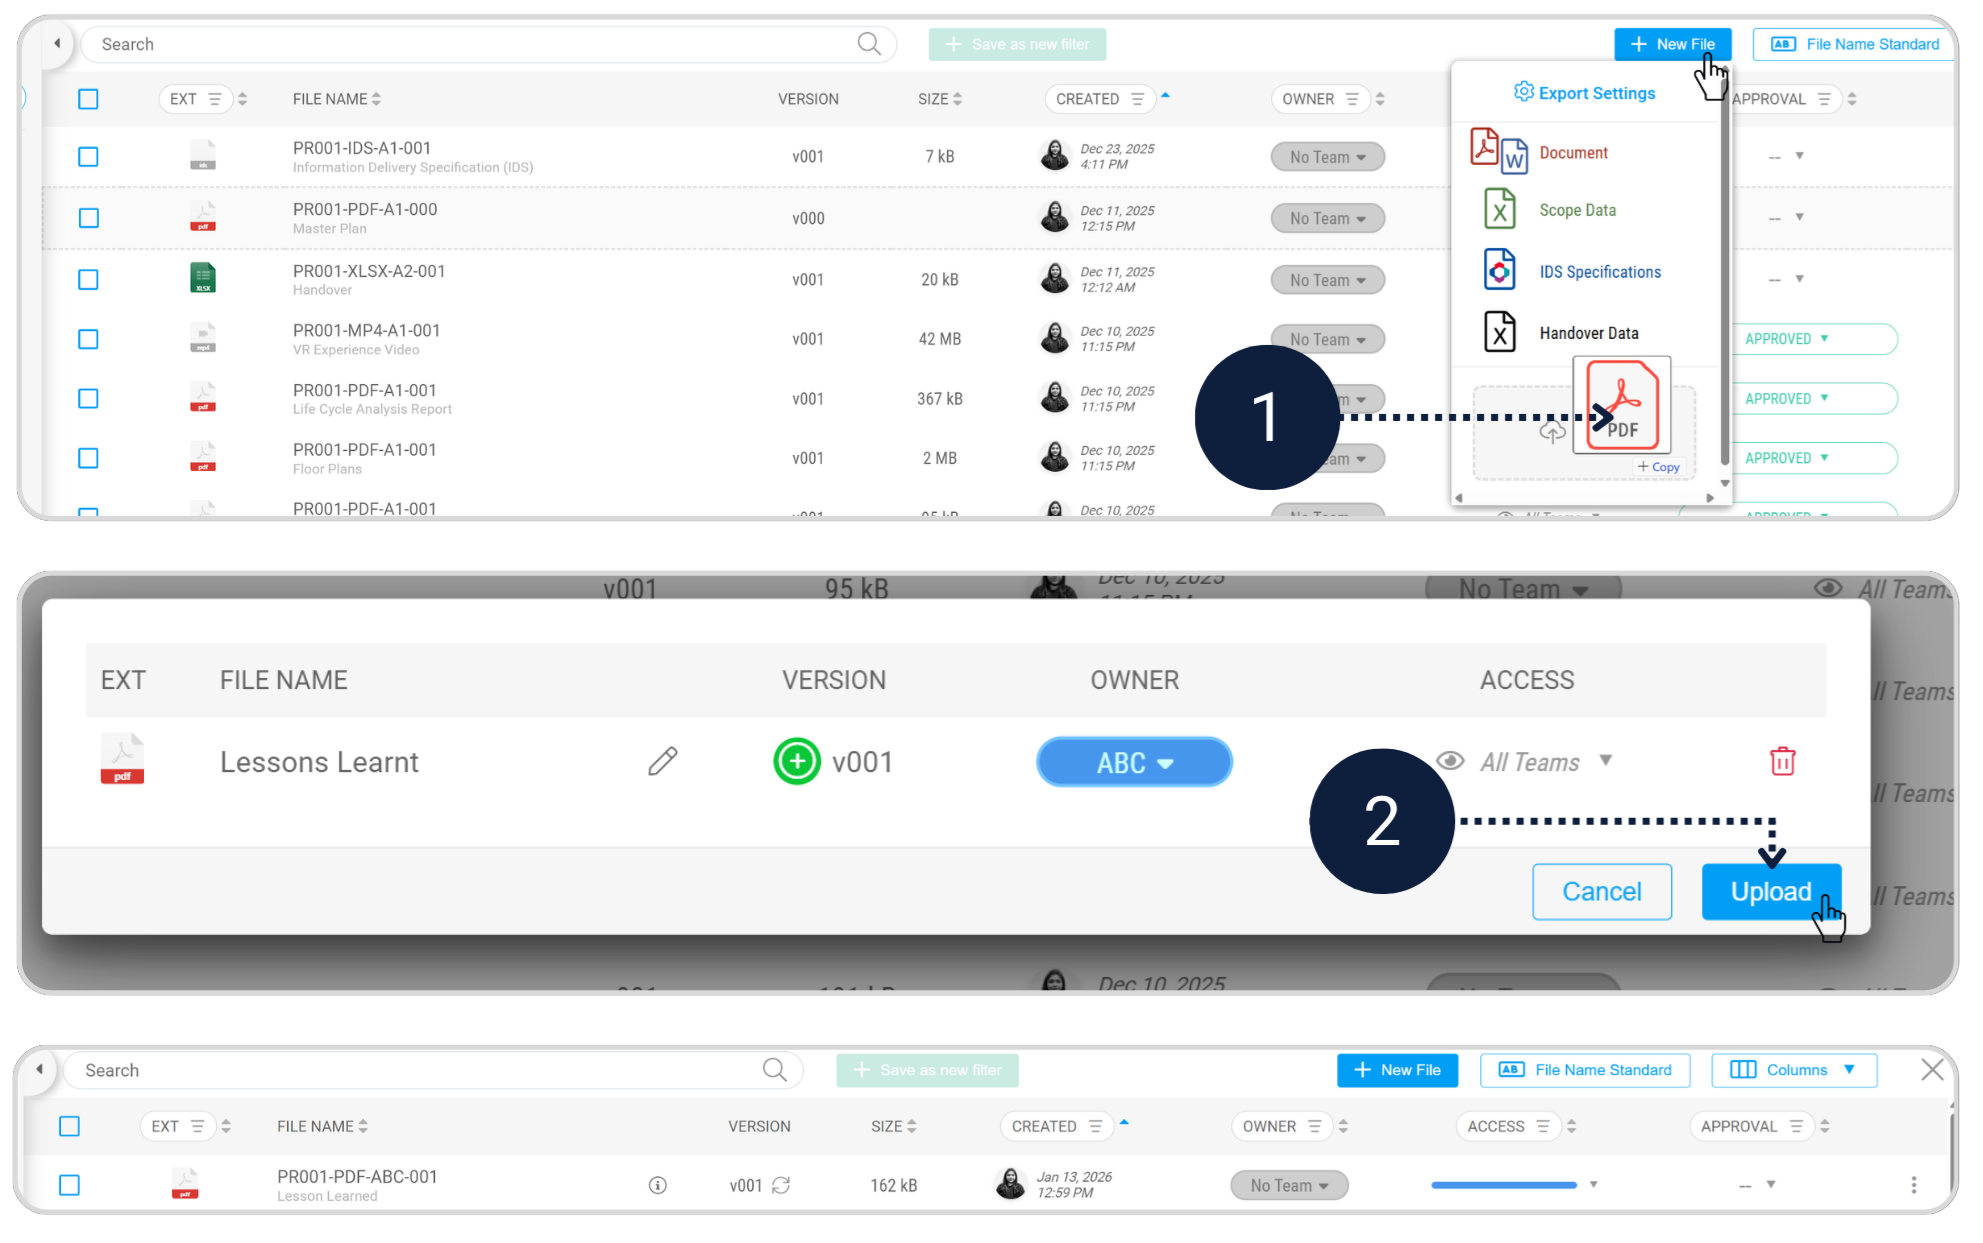
Step 4.3 - Export and complete final sign-off File Manager Sign-off
Module - File Manager
Export and complete final sign-off
- In the File Manager, upload your Lessons Learned document and export the ISO 19650 Specialist assignment document by filtering to Published sections only
- Add a clear title and create the document
- If working individually, request the signature to yourself; if working in a group, assign it to a relevant team member
- Once the signature is requested, review and sign to complete the assignment

You’ve now completed the assignment and experienced how structured information, clear roles, and simple tools can transform project delivery.
Assessment
Reflection + Bonus Credit Reflection Learning
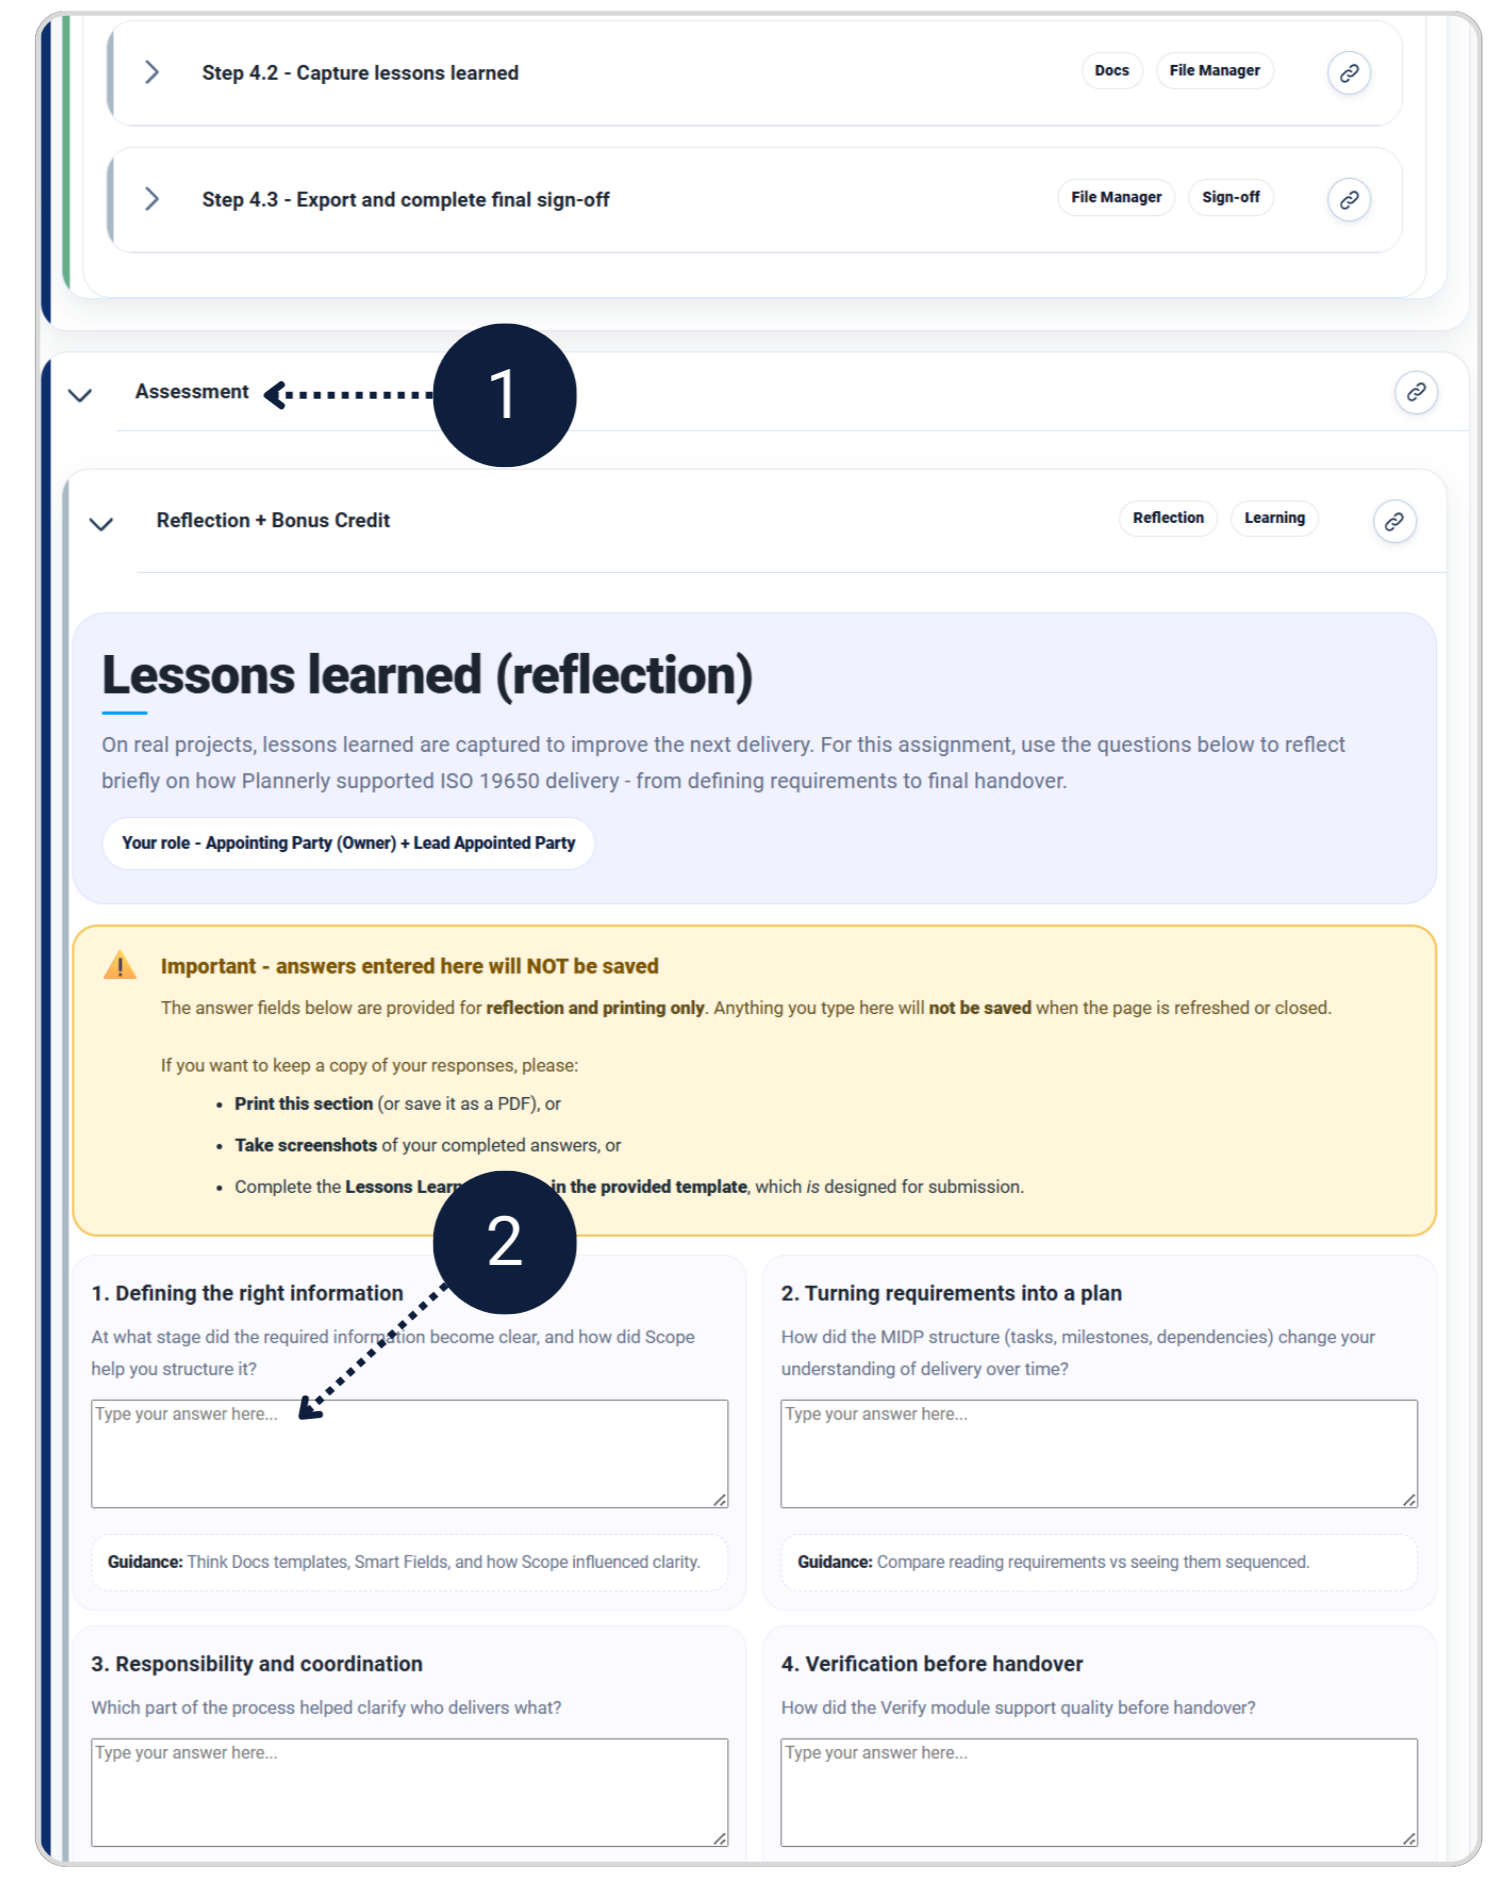
Lessons learned (reflection)
On real projects, lessons learned are captured to improve the next delivery. For this assignment, use the questions below to reflect briefly on how Plannerly supported ISO 19650 delivery - from defining requirements to final handover.
If you want to keep a copy of your responses, please:
- Print this section (or save it as a PDF)
- Take screenshots of your completed answers
At what stage did the required information become clear, and how did Scope help you structure it?
How did the MIDP structure (tasks, milestones, dependencies) change your understanding of delivery over time?
Which part of the process helped clarify who delivers what?
How did the Verify module support quality before handover?
What made the final handover feel usable, not just complete?
If you were starting another project tomorrow, what would you keep exactly the same and why?
How to Submit Your Work Submission Assessment
Submission options
You can submit your completed assignment in one of two ways. Check with your instructor which method they prefer.
Evaluation Criteria - Grading Guide Grading Guide Assessment
Evaluation criteria
- Clear, accurate EIRs using relevant templates (OIR, PIR, AIR)
- Tasks mapped with correct verification rules
- Correct classification applied where needed
- Mostly correct EIRs with minor errors
- Task mapping present (may miss small elements)
- EIRs included but inconsistent template use
- Some gaps in rules or task assignment
- Incomplete or incorrect EIRs
- Missing verification rules
- Unclear task assignment
- Tailored BEP & MIDP
- Clear responsibilities, milestones, and dependencies
- Work packages linked to correct models
- BEP and MIDP present
- Most tasks assigned
- Model linkages may lack detail
- Basic BEP/MIDP submitted
- Incomplete or not well-aligned
- Models assigned with gaps
- BEP or MIDP missing or unclear
- Work packages not created or not linked
- Verification run correctly and issues resolved
- Relevant tasks marked complete
- Placeholder file added properly
- Structured folders created with proper naming conventions
- All required files included + verification report included
- Verification completed (small issues missed)
- Task status mostly updated
- Folder structure mostly correct
- Minor naming issues or missing report
- Basic model check completed
- Task status not fully updated
- Placeholder file may be missing
- Folder exists but lacks structure / naming conventions
- Report may be incomplete
- Verification not performed correctly
- Status updates and placeholder absent
- No clear handover structure / missing files
- Non-compliance with standards
- Thorough review completed
- Archive folder used correctly
- Sign-off document complete with lessons learned
- Final review evident
- Archive present
- Sign-off may lack reflection or signature
- Final review basic
- No archive or missing sign-off
- No evidence of final acceptance or review process
- Insightful reflection, strong presentation, or added value
- Examples: creative structure, extra detail, clearer organisation
- Some extra effort shown
- Minor enhancements
- No attempt for bonus work