TL;DR
In this video I walk through every key element of the Plannerly Scope user interface - folders, task rows, cells, information requirements, view preferences, custom fields, document placeholders, data dictionaries, and work packages. If you are about to start building an Information Production Schedule or any other structured scope, this quick tour will help you navigate with confidence before diving into a workflow.
Watch: Quick tour of the Scope user interface in Plannerly
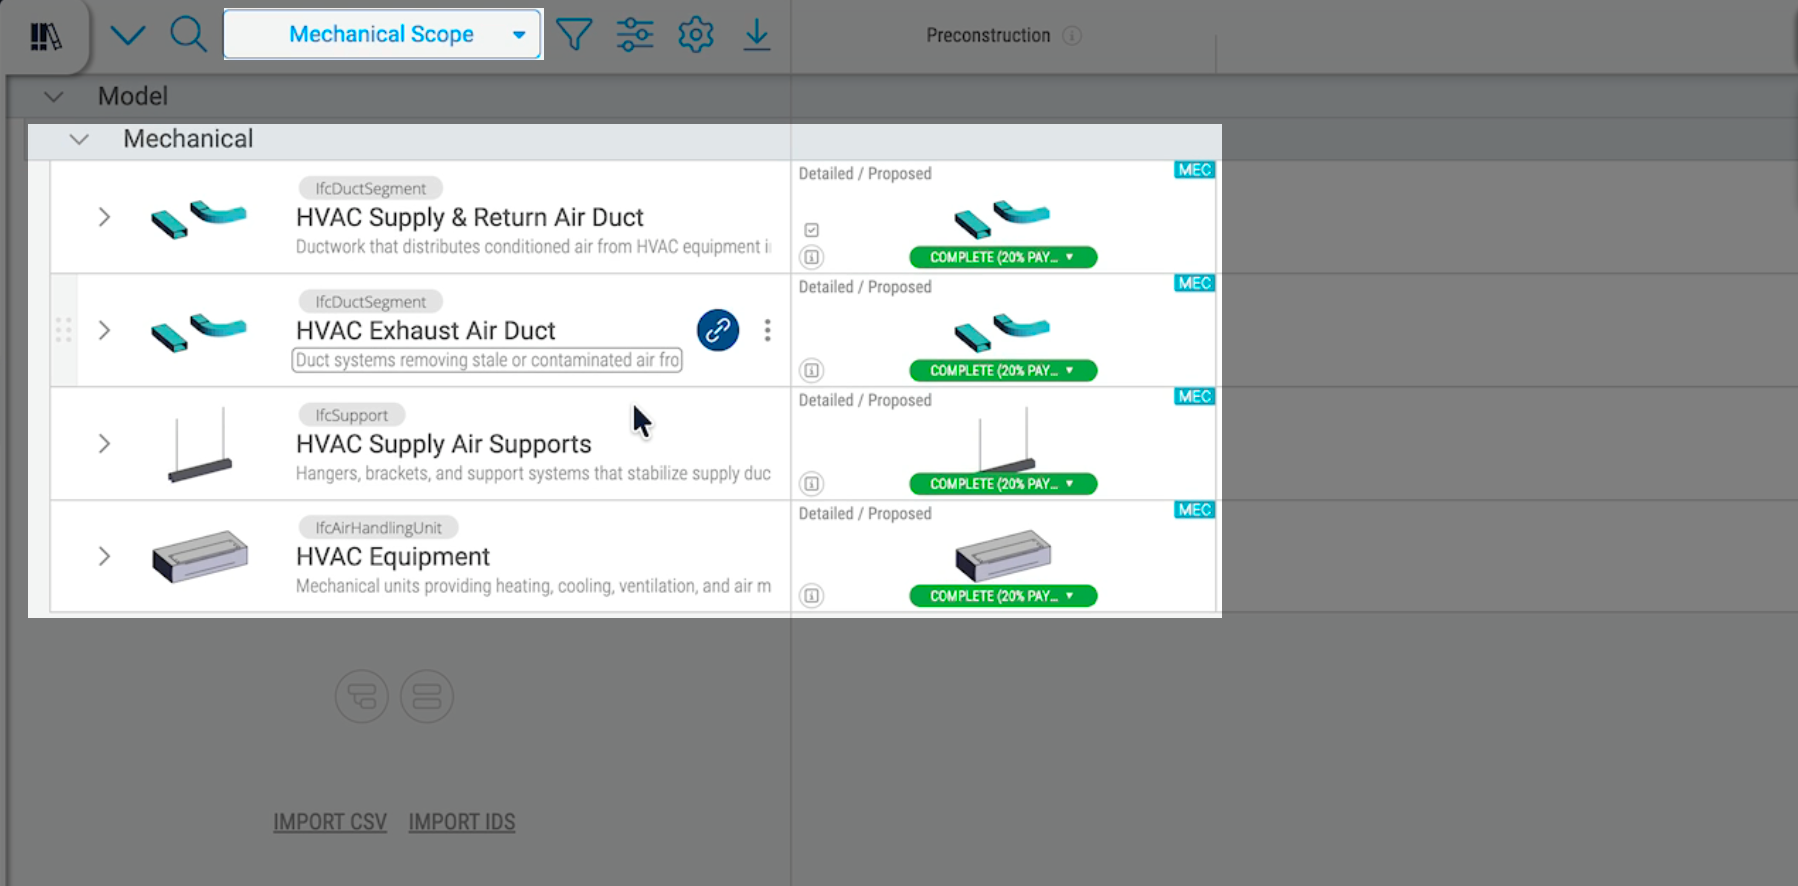
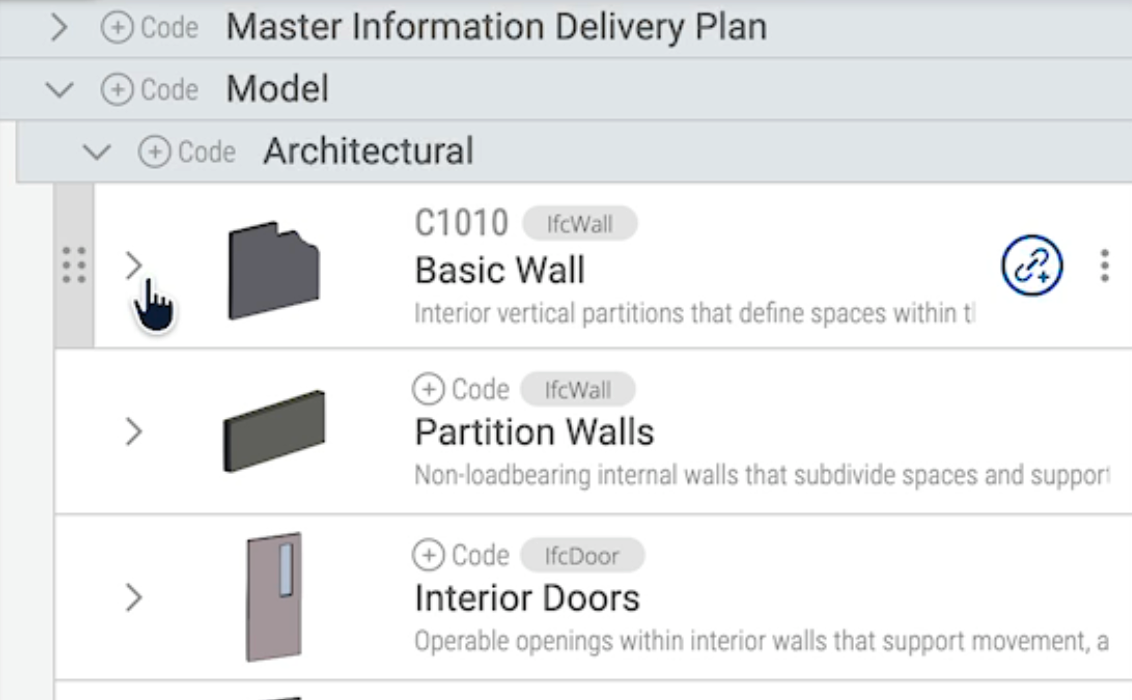
Folder hierarchy and task rows
The first thing you will see inside the Scope module is the folder hierarchy on the left. Folders are shown in grey and they can be nested to create a work breakdown structure - for example, a parent folder for your Information Production Schedule with discipline sub-folders inside.
Inside each folder you will find task rows. Every task row has a task name - this is the label for a specific deliverable or information container. Task rows also carry a classification code, a subtitle, and an entity type. You can edit any of these by clicking on the three dots > edit on the row to open the task modal.
If a task row represents geometry-based information, the geometry details are available inside the modal too. For non-model-based items like drawing packages, the geometry section will be empty and a single placeholder image is shown instead.
Cells and milestones
Each column in the Scope grid represents a milestone - a key delivery gate in your project. Where a task row intersects a milestone column, you get a cell. A cell is where you define what needs to be delivered at that milestone for that particular task.
Some cells will contain a task (meaning there is a deliverable expected at that milestone), while others will be empty (meaning nothing is required at that point). You can click on any cell to open it and see or edit the deliverable details, including attached document placeholders, checklists, and acceptance criteria.
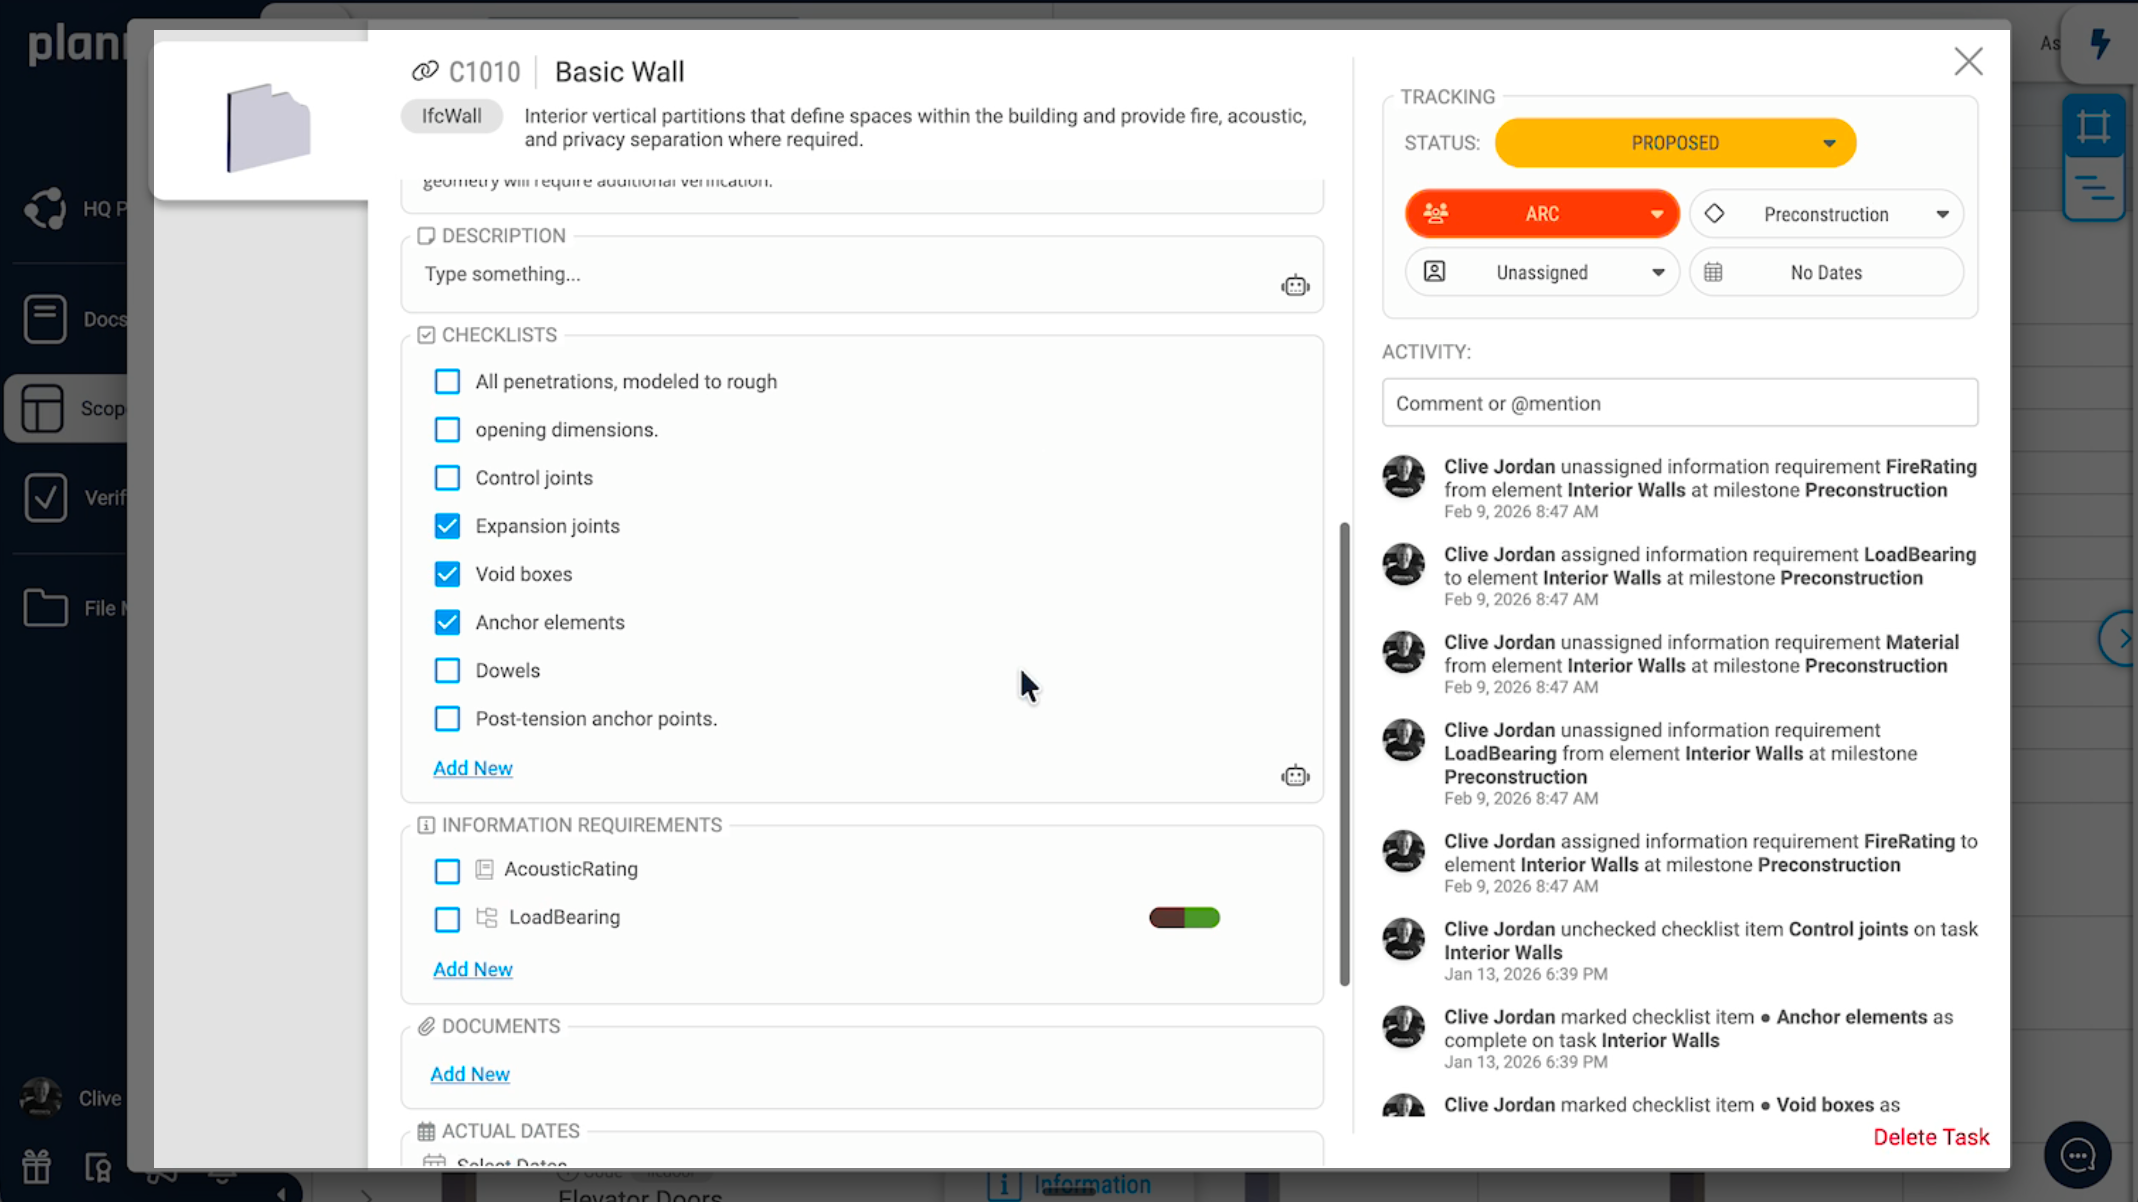
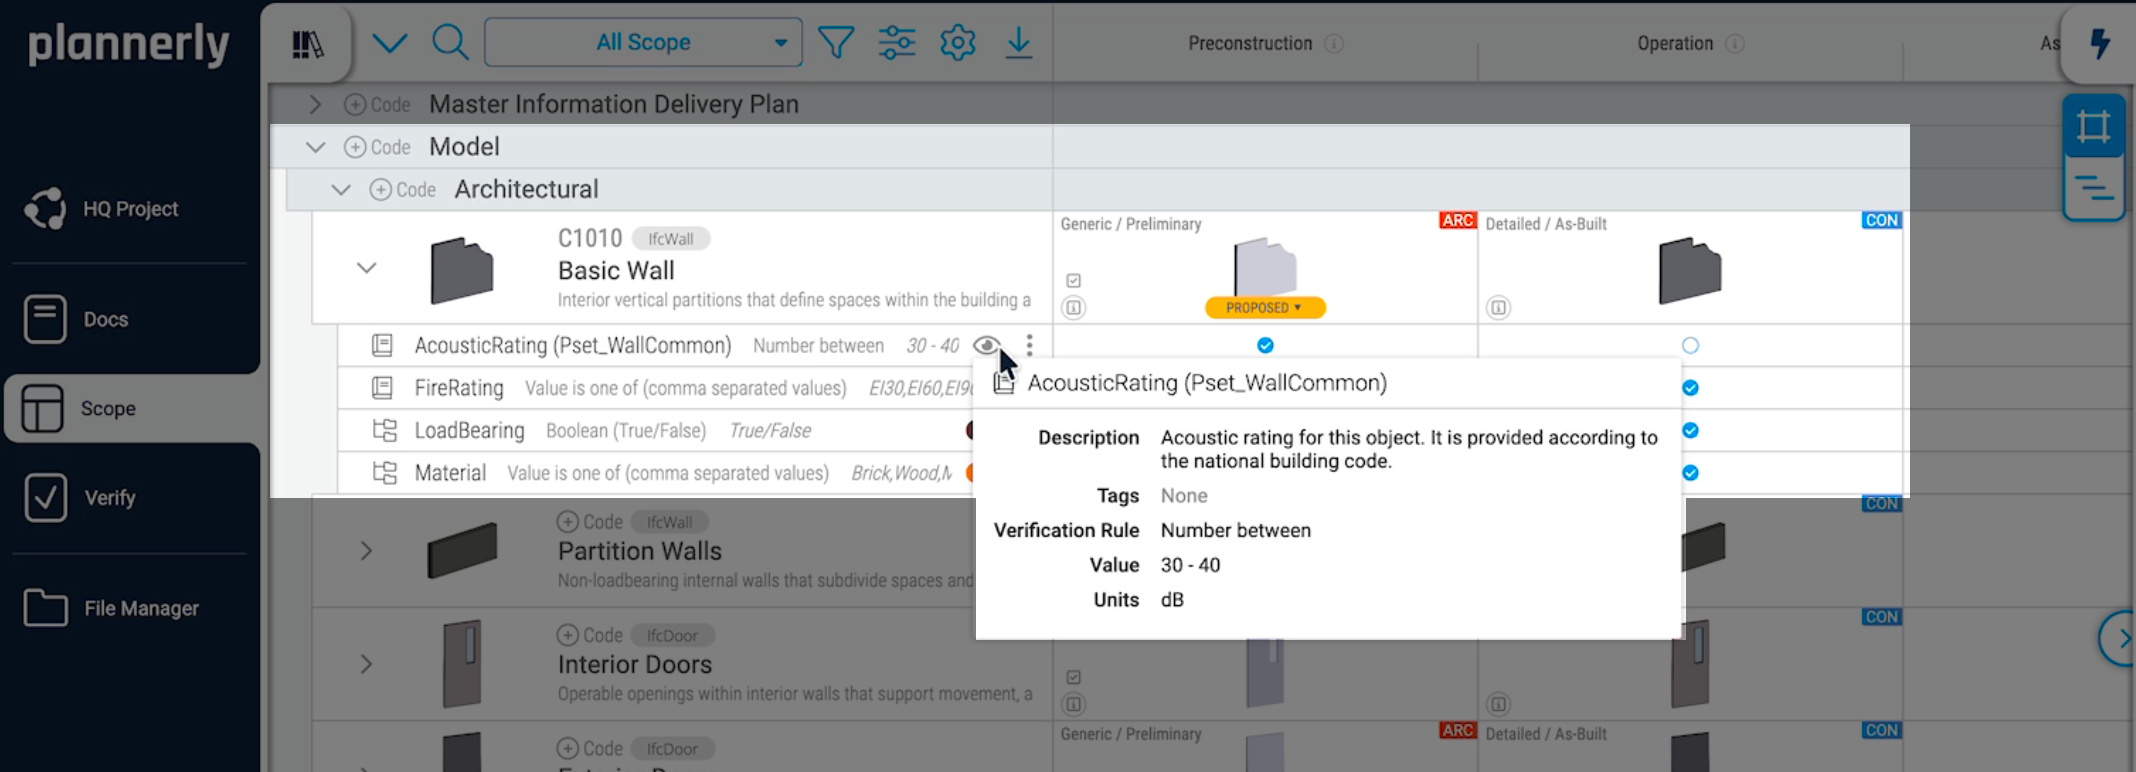
Information requirements
When you open a task, you will see the information requirements attached to it. These are structured using the same concepts you will find in ISO 19650 and buildingSMART data dictionaries.
Each requirement is organised into:
- Information group - the property set (Pset), for example Pset_WallCommon
- Information title - the name of the specific property
- Information description - the long form explanation of the specific property
- Information tags - certain tags that help to explain the specific property
- Verification rule - how the value will be checked
- Allowed values - the acceptable entries
- Units - the unit of measurement where applicable
This structure means your information requirements are not just text in a spreadsheet - they are linked to recognised data standards and can be validated automatically during model checking.
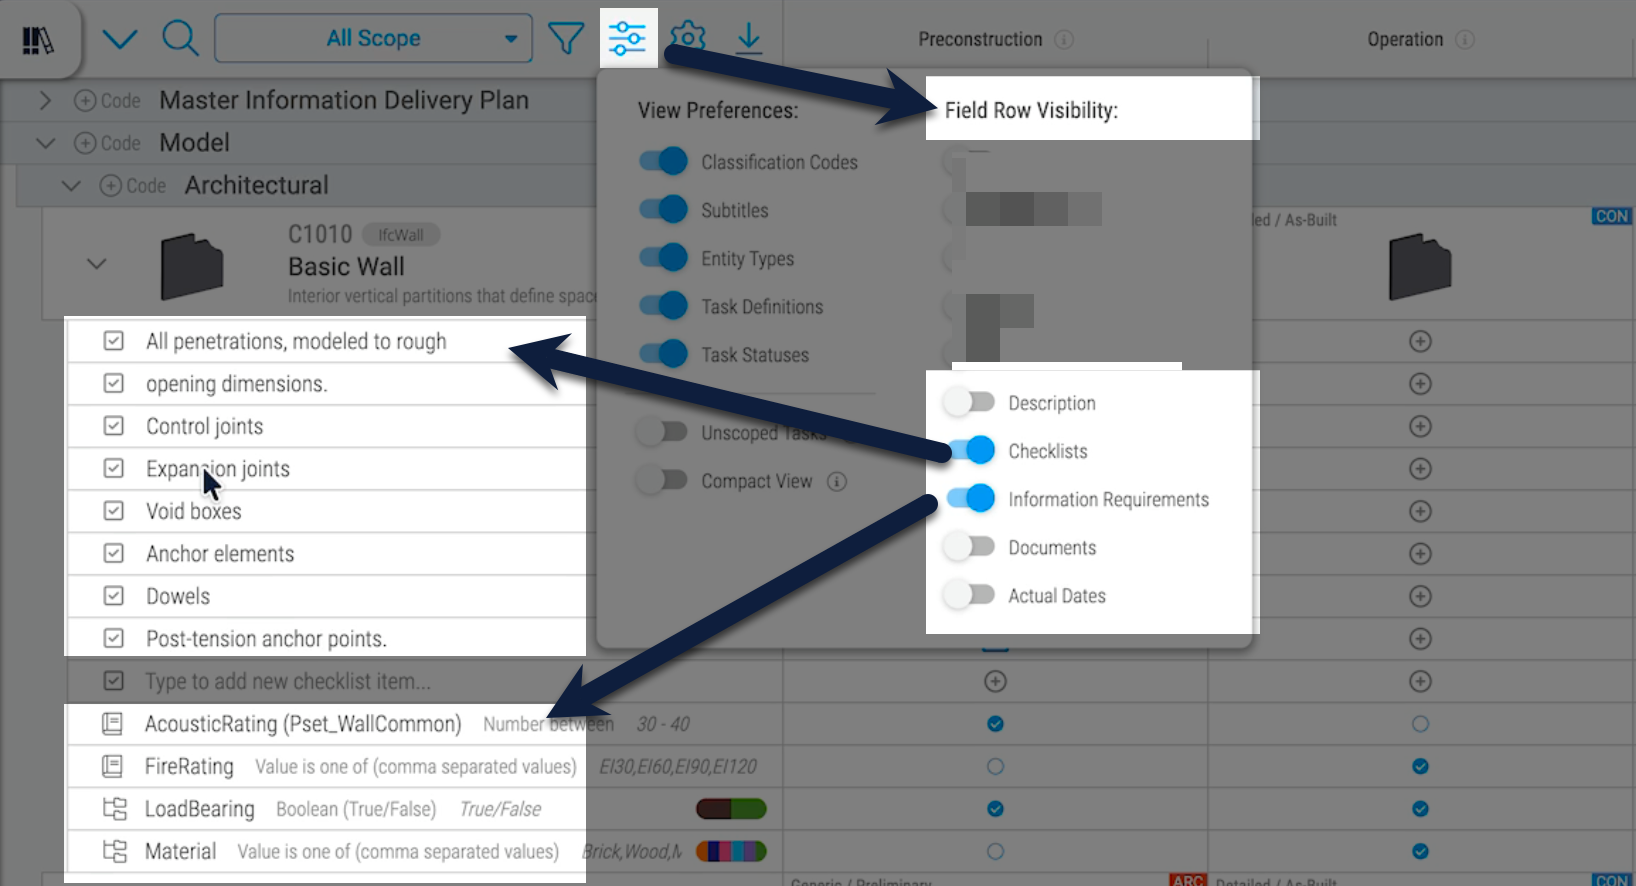
View preferences and field row visibility
The Scope grid can show a lot of data, so Plannerly gives you control over what is visible. In the view preferences (the settings icon at the top of the grid), you will find field row visibility toggles.
By default you might see information requirements displayed in the grid rows. But you can toggle these off and switch to other views:
- Checklists - see the checklist items for each task directly in the grid
- Description - show the task description
- Documents - show document placeholders and uploaded files
- and many others (completely customizable)
This lets you focus on exactly the data you need at any given moment without leaving the grid view.
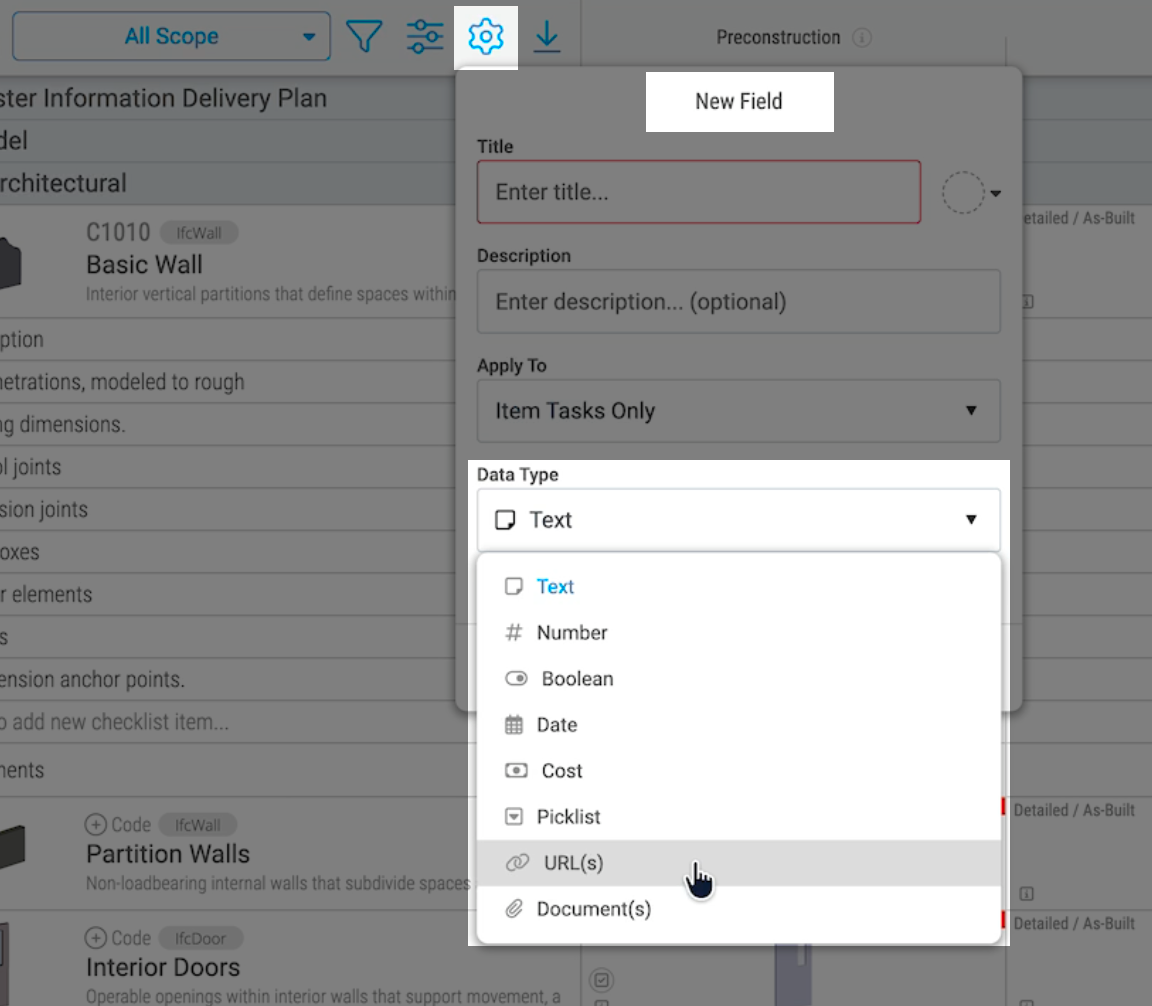
Custom task fields
Every project comes with a set of built-in fields, but you can extend them through the Manage Task Fields panel. This is where you add custom fields that appear on every task in the project.
You can create fields of different types:
- Data - for numeric values
- Text - for free-form text
- Pick list - for dropdown selections
- URL - for links to external resources
Once created, these fields are available on every task in the project. Open any task and you will see your custom fields alongside the standard ones - checklists, information requirements, documents, and descriptions.
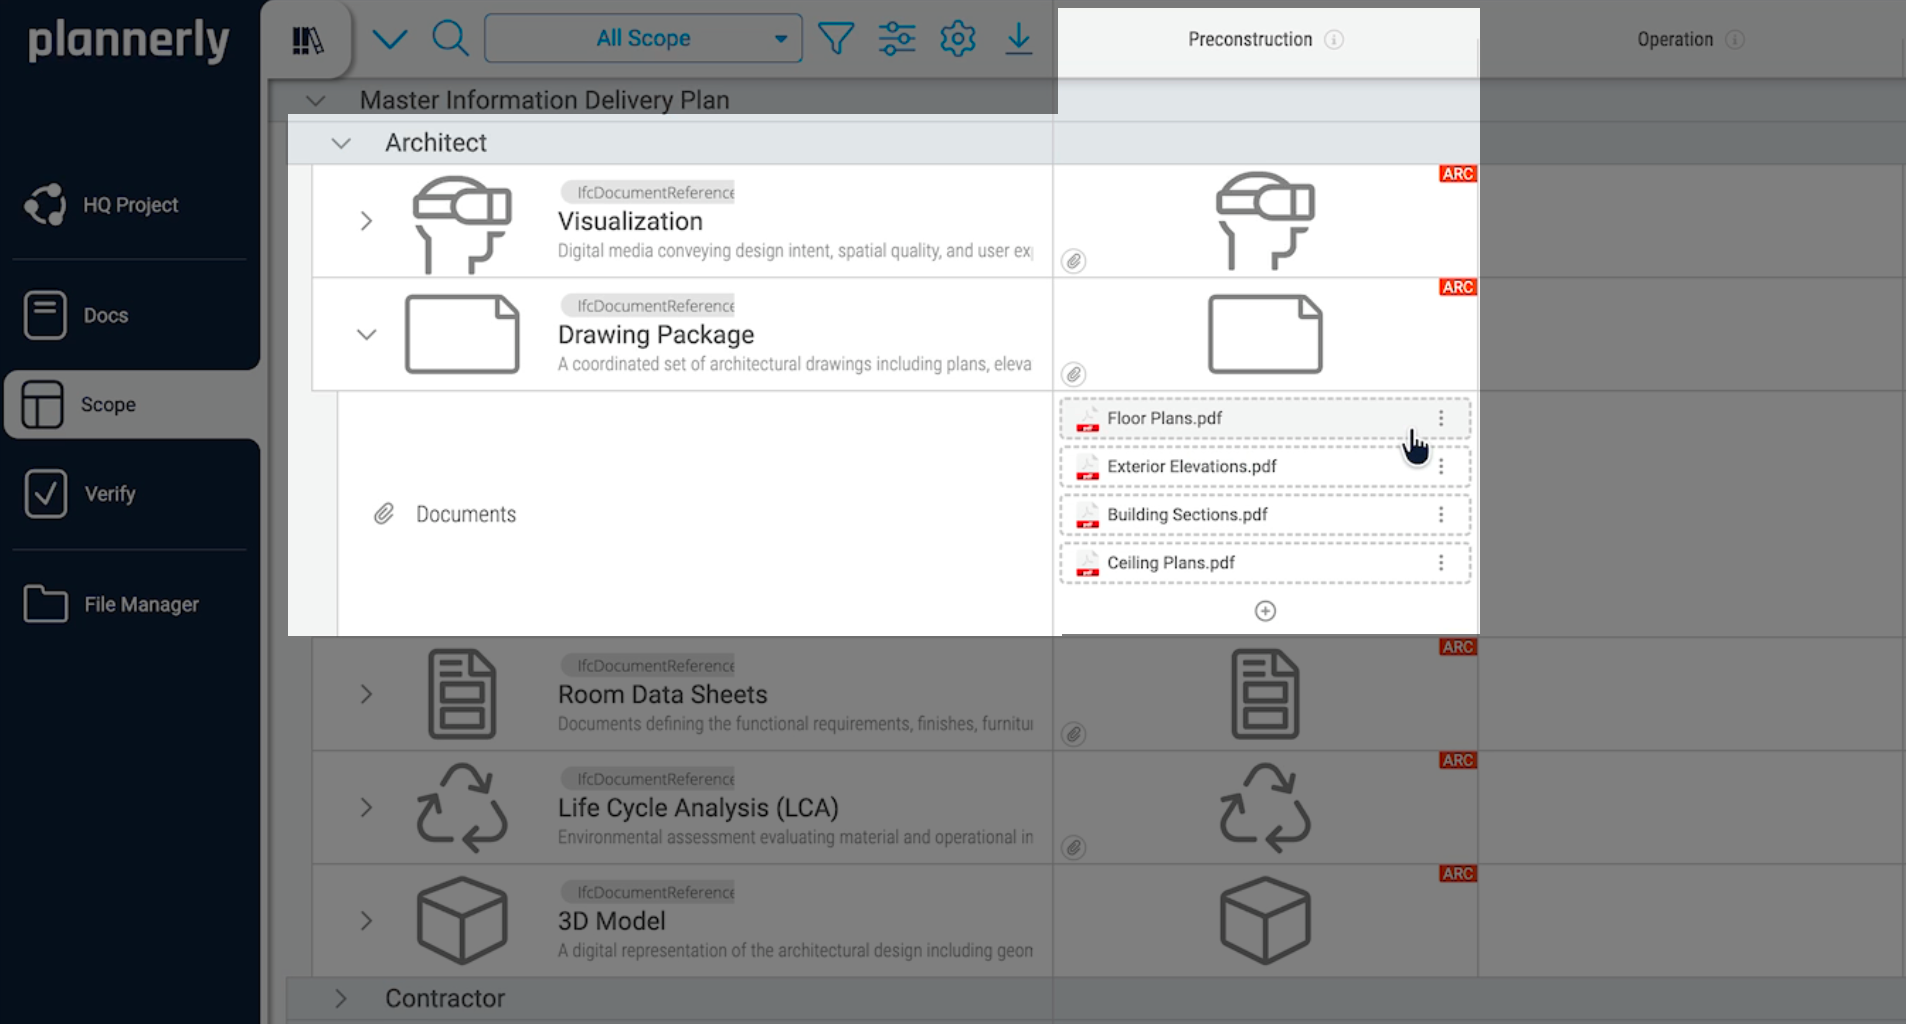
Document placeholders and non-model-based items
Not everything in your scope is a 3D model. Drawing packages, reports, specifications, and other traditional documents are just as important. In the Scope module, these show up as task rows without geometry - instead of a 3D preview, you will see a single placeholder image.
When you toggle the Documents view in field row visibility, you can see the document placeholders attached to each cell. These are the files your teams need to deliver at each milestone. You can upload documents directly into these placeholders, or add more placeholders specifying the required file extension and responsible team.
This is how Plannerly connects your information requirements to actual file delivery - every placeholder is a slot that needs to be filled, and the system tracks whether it has been.
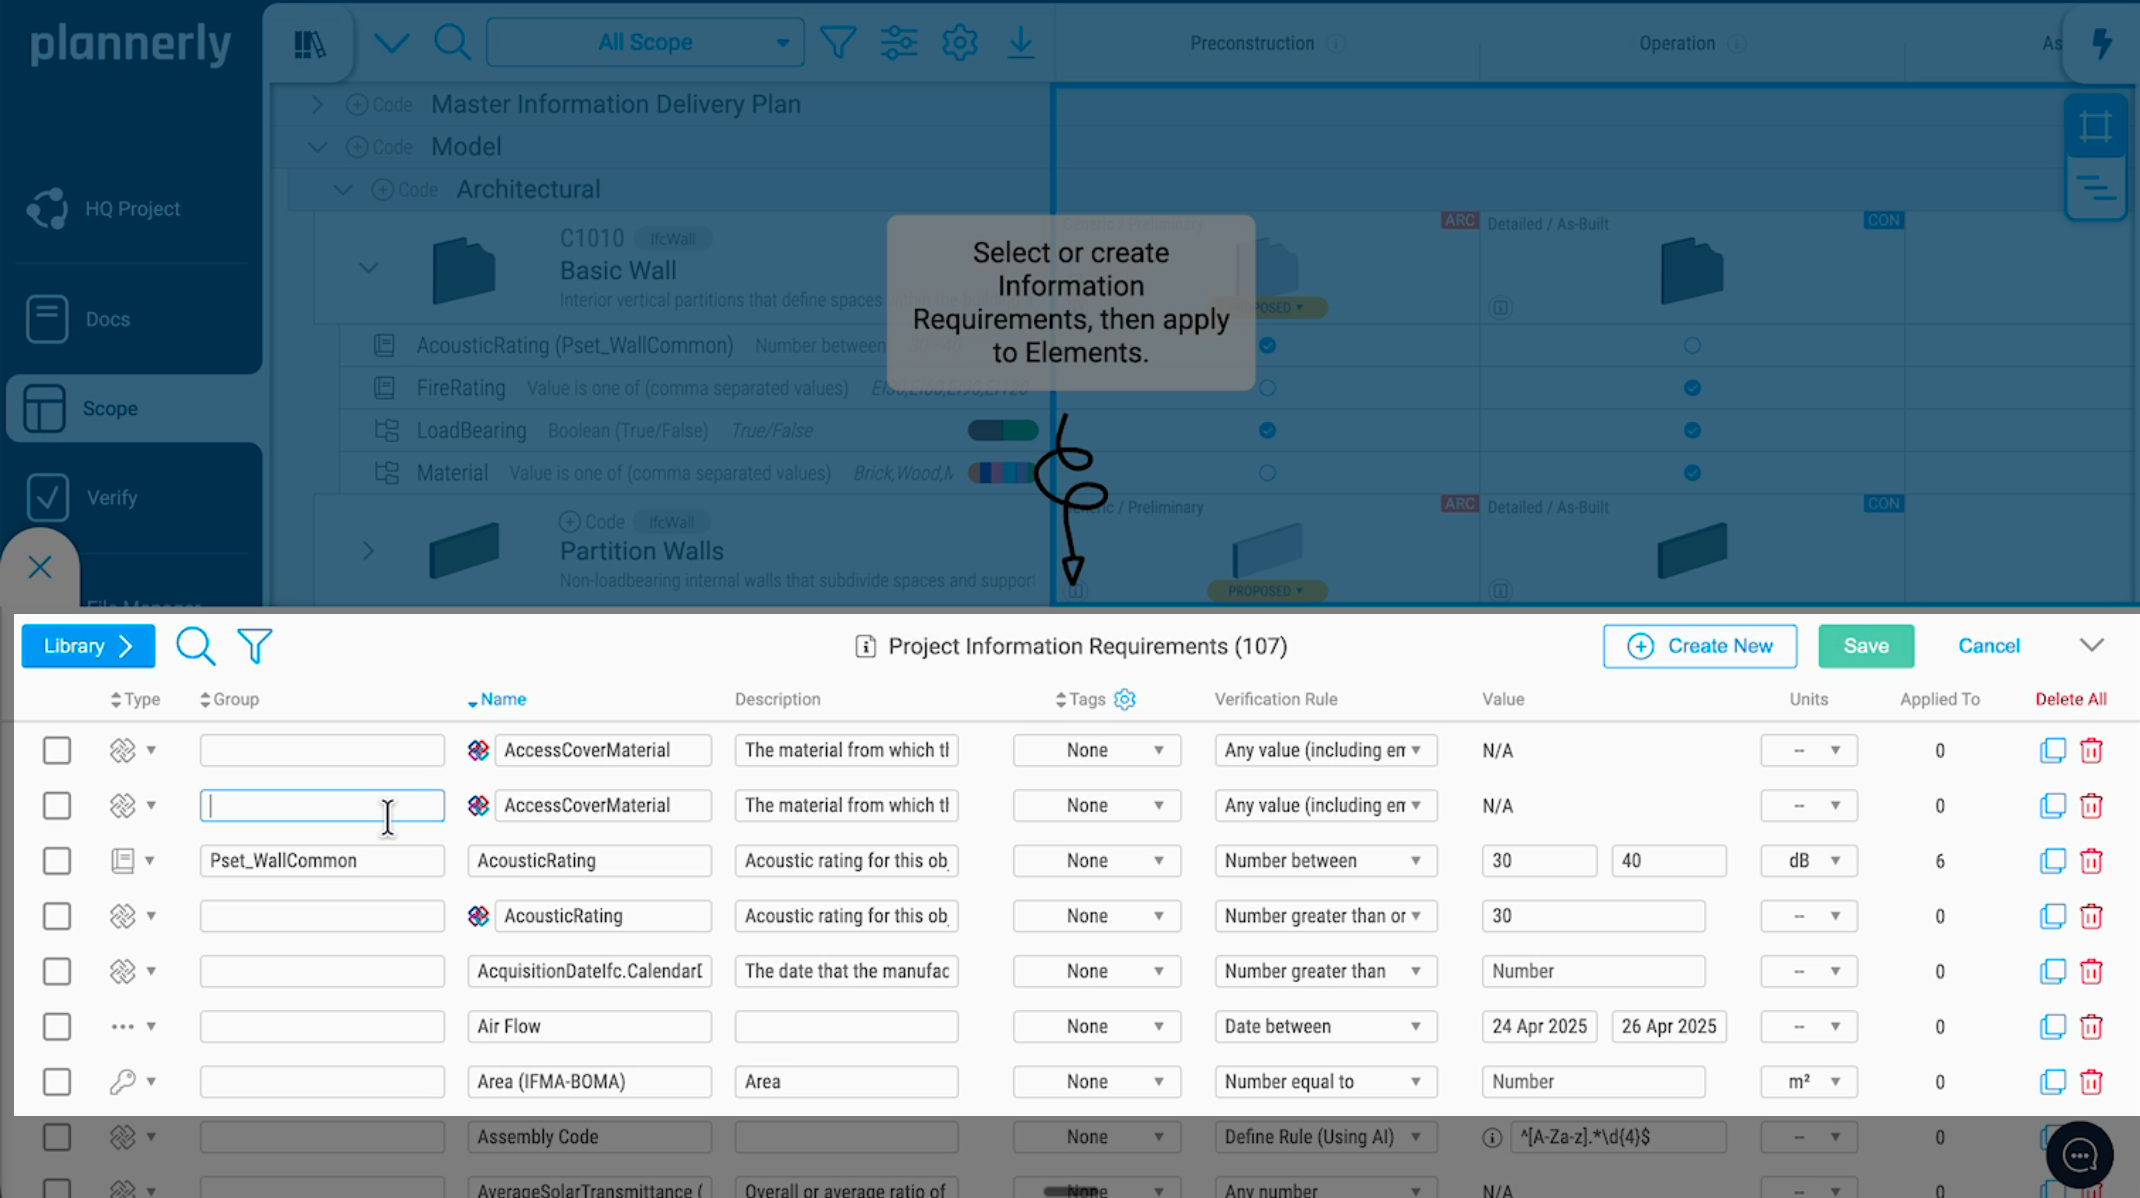
Project information requirements and data dictionaries
Information requirements are managed at the project level through a dedicated panel at the bottom of the interface. This is where you can see every requirement across the entire project in one place.
You can edit requirements by double-clicking or using the manage button. The fields search against the buildingSMART data dictionary that has been selected for the project.
To choose which data dictionaries your project uses, go to the project dashboard and open settings. From there you can select which buildingSMART data dictionaries are searched for both classifications and information requirements. This means your requirements are always aligned with recognised international standards.
Work packages
Work packages let you filter the Scope grid to show only the deliverables assigned to a specific team. Select a work package from the dropdown and the grid updates to show just that team's scope - making it easy to review, share, and discuss a focused set of deliverables.
Work packages are also used in model checking. When you run a check against a submitted model, you can target a specific work package to validate only the deliverables that team was responsible for, rather than checking the entire project scope at once.