TL;DR
This is a complete, click-by-click workflow guide that walks you through building an ISO 19650 Information Production Schedule inside Plannerly. You will define deliverables, assign teams, set acceptance criteria, create contract-ready exports with e-signatures, schedule your timeline with dependencies, and build live dashboards that automatically track document delivery progress. Every step is designed so you can follow along in a free Plannerly account at your own pace.
Watch: Complete walkthrough of the Information Production Schedule workflow in Plannerly
What You Will Build
Follow this single, connected workflow to build a complete Information Production Schedule inside Plannerly. You will define it, agree it, contract it, deliver it, and track it - moving from an empty project to a fully structured, agreed, contracted, scheduled, and monitored delivery plan, all inside one system. Instead of managing requirements in Word, schedules in Excel, and files in email, you will connect requirements directly to deliverables, timelines, and payment - eliminating the manual reconciliation between what was agreed and what was delivered. You will define who delivers what, when, and to what standard, then get genuine agreement through collaboration rather than blind signatures. You will export professional PDF appointment documents directly from your scope, secure them with e-signatures backed by a full audit trail and chain of custody, and track delivery automatically with live dashboards. Each step builds directly on the previous one, so by the end you will have a working system that connects requirements to deliverables to acceptance - saving up to 80% of setup time compared to traditional approaches.
In ISO 19650 terms, the Information Production Schedule is the plan that defines every information container that must be delivered, who is responsible, when it is due, and what the acceptance criteria are. It is known by several names: Master Information Delivery Plan (MIDP), Task Information Delivery Plan (TIDP), or simply IPS. Regardless of the label, the purpose is the same: give every team member clarity on what they need to deliver and give every stakeholder confidence that delivery is on track.
This guide covers 4 steps. Work through them in order and you will have a production-ready information delivery system.
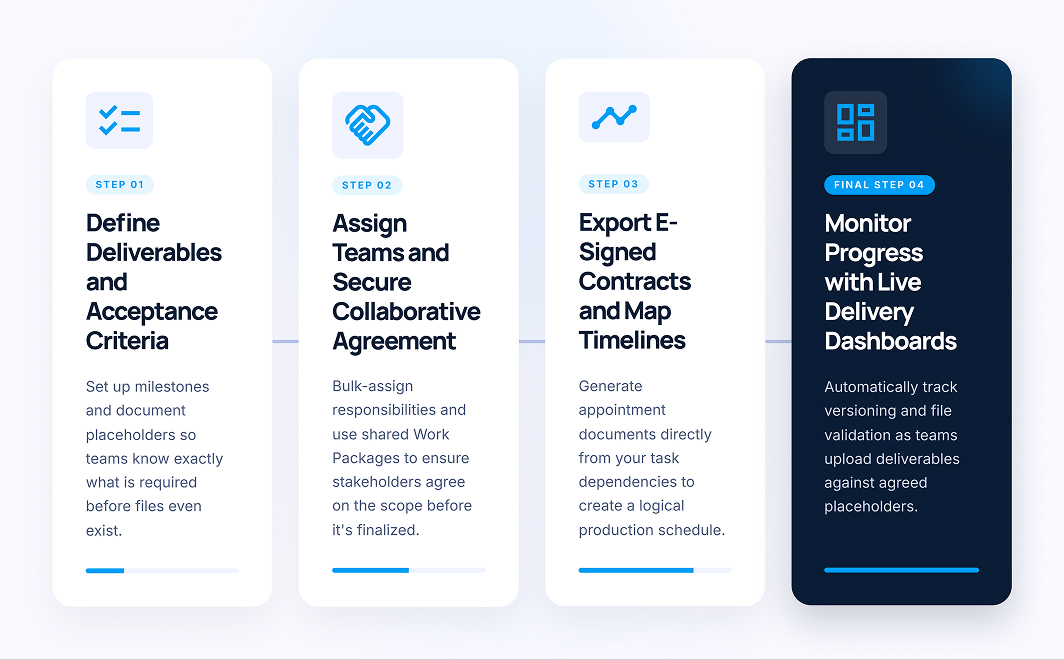
Step 1 - Project Setup and Deliverables
In this step you will create a new project, set up milestones and discipline folders, and populate the scope with every deliverable your teams must produce - including document placeholders and acceptance criteria. By the end you will have a fully defined Information Production Schedule that is ready for team assignment.
Video: Setting up your project, folders, deliverables, placeholders, and acceptance criteria
Required checklist
- Create a new project and select the Scope module
- Add milestones: Pre Construction and Operation
- Create a parent Information Production Schedule folder with discipline sub-folders nested inside
- Remove the Geometry field from the IPS folder settings
- Add deliverable task rows under each discipline folder
- Add document placeholders to each milestone cell specifying file name and format
- Define acceptance criteria for each deliverable (use AI assist, then review and refine)
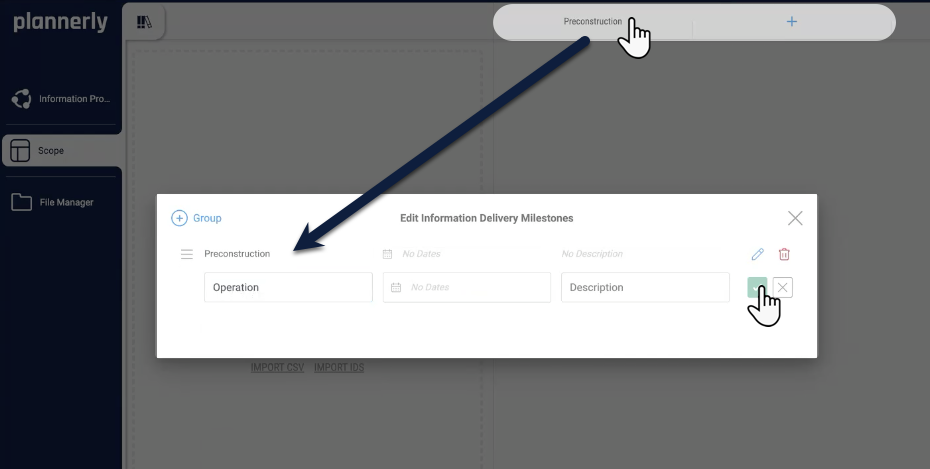
1.1 - Create your project and add milestones
From your Projects workspace, click New Project (or the plus button). Enter a descriptive project title - for example, the project name followed by "Information Production Schedule". Select Scope from the module options and click Create. The Scope module is where you will define, structure, and manage all of your information deliverables - it is the backbone of the Information Production Schedule.
Next, add your delivery milestones. Milestones represent the key delivery gates - the points at which the appointing party expects to receive agreed deliverables. In ISO 19650 terms, these are your information exchange points.
- Click the Plus Milestone button
- Click on the new milestone to open the milestone modal, type Pre Construction, and click the green checkmark to confirm
- Repeat to add a second milestone called Operation
You can add as many milestones as your project requires. For this walkthrough we use two, but real projects may have milestones for concept design, detailed design, construction, commissioning, and operation.
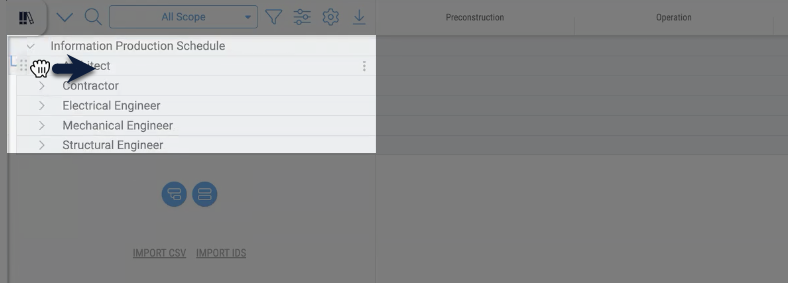
1.2 - Build your folder structure
The folder hierarchy organises your deliverables by discipline or delivery team. Start by creating a top-level parent folder called Information Production Schedule (or IPS). This acts as the overarching container, equivalent to the MIDP in ISO 19650 terminology.
Next, create individual folders for each discipline that will deliver information on your project:
- Architect
- Contractor
- Electrical Engineer
- Mechanical Engineer
- Structural Engineer
Drag each discipline folder (a little) directly to the right so that it nests inside the parent Information Production Schedule folder (see the blue arrows to see where it will be indented). This indentation creates a clear hierarchy - the IPS contains all discipline-level delivery plans, and each discipline contains its own tasks.
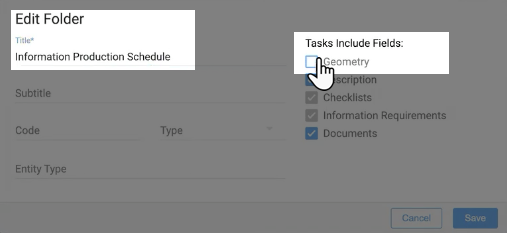
Now remove the Geometry field, since the IPS is focused on document-based deliverables (drawings, reports, data sheets, certificates) rather than geometric models. Click the three dots on the Information Production Schedule parent folder and select Edit. Under Task Include Fields, uncheck Geometry and click Save. This setting cascades to all sub-folders and tasks, so you only need to do it once at the parent level.
Tip: On real projects, your folder structure might mirror your responsibility matrix or work breakdown structure (WBS). Each folder typically represents a party or discipline that has distinct delivery responsibilities.
1.3 - Add deliverables and document placeholders
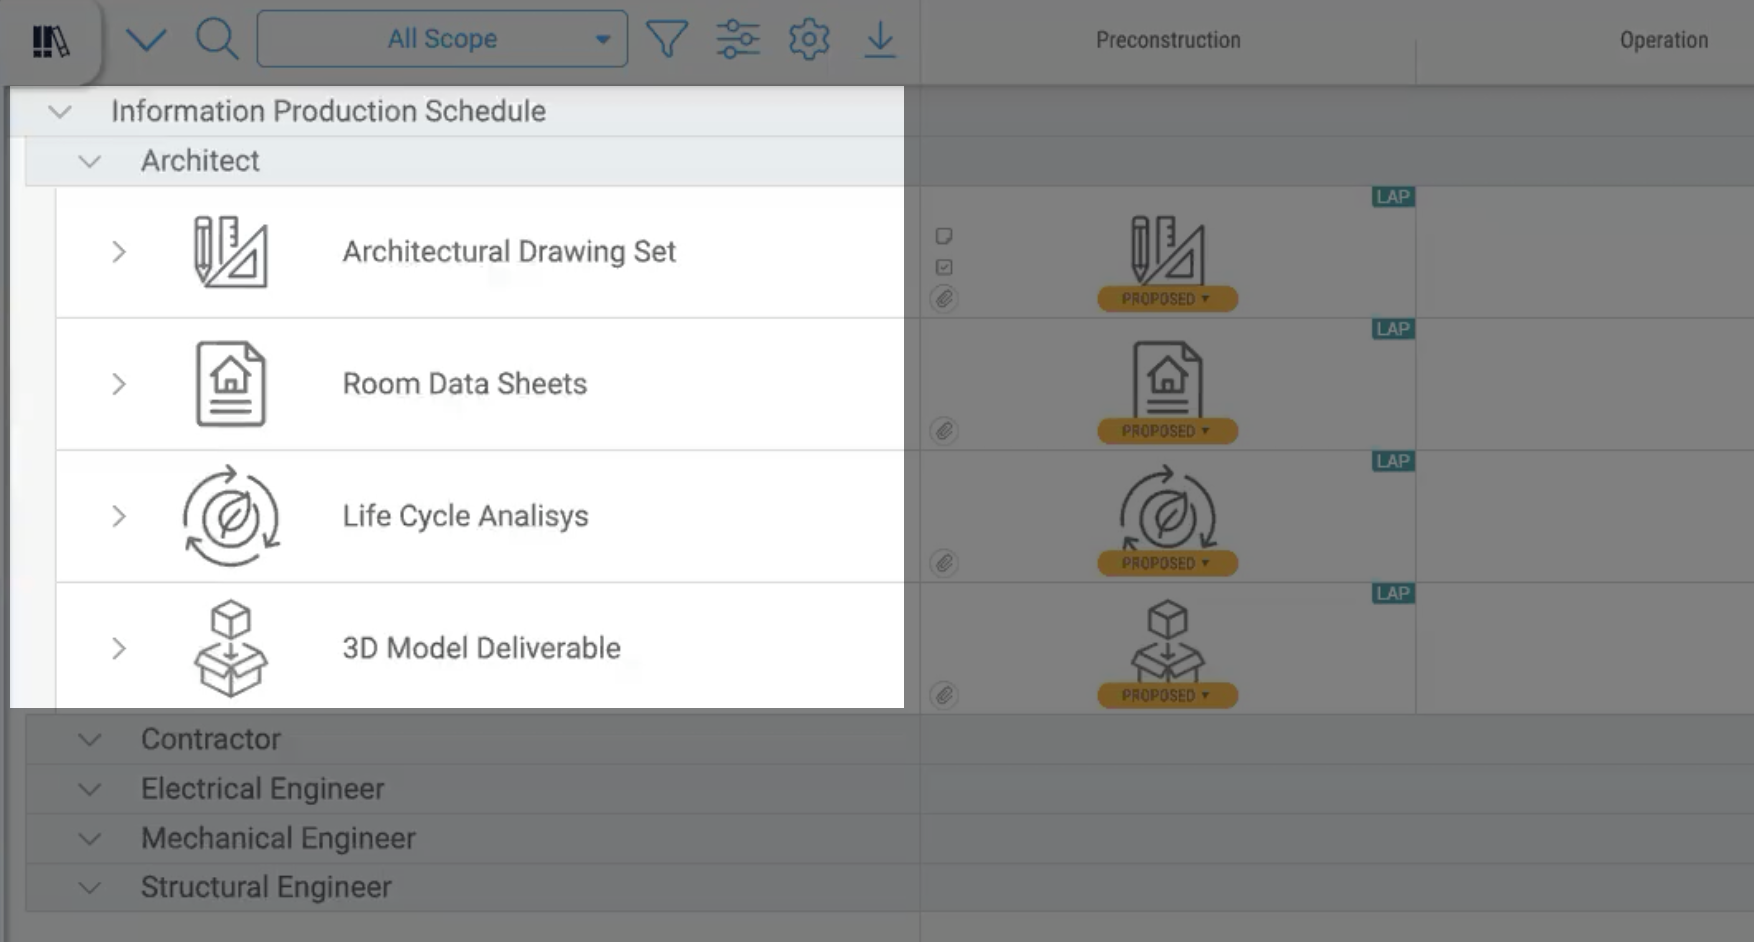
Each task row in Scope represents a single deliverable or group of related deliverables that a team must produce. Within each discipline folder, add tasks for the major information containers expected from that team. For example, under the Architect folder you might create:
- Drawing Set - architectural drawings package
- Room Data Sheets - room-by-room specifications
- Life Cycle Analysis - sustainability and whole-life cost data
- Architectural Preconstruction Model - the BIM model deliverable
Repeat for each discipline folder, using names your project team will immediately recognise.
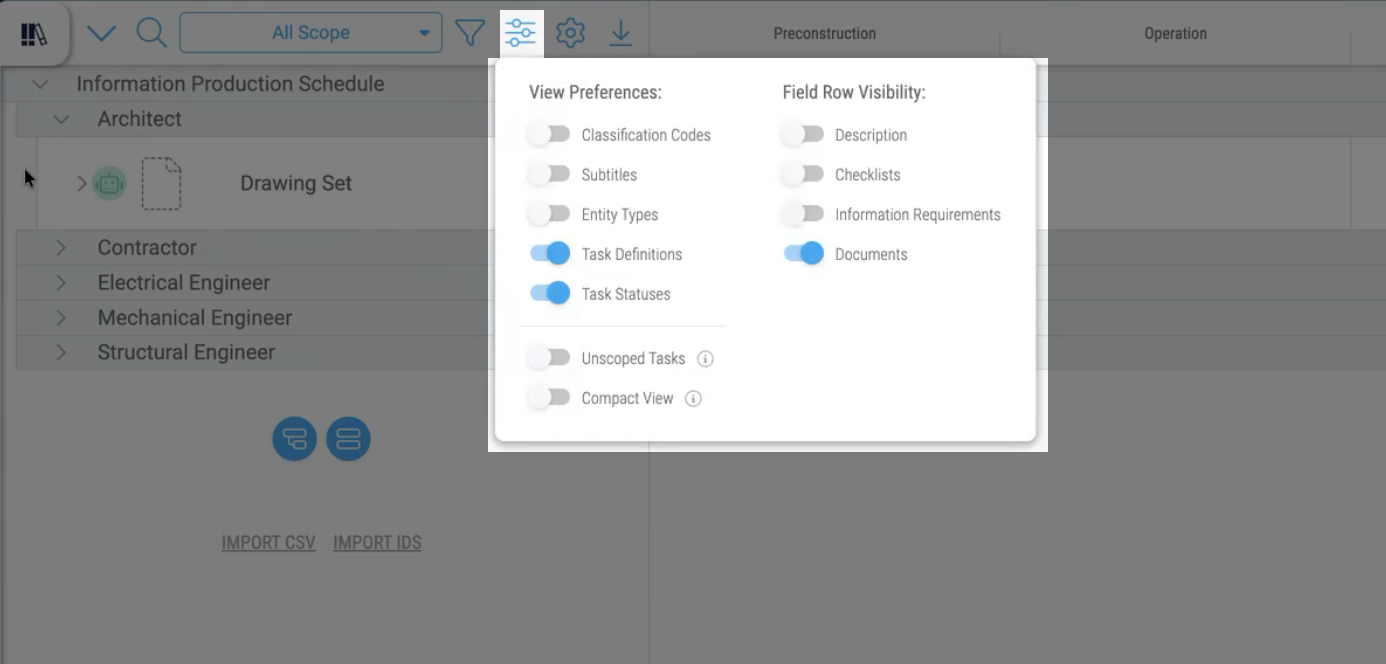
Open View Preferences and toggle Documents to ON. You can toggle Information Requirements to OFF initially to keep the view focused on document delivery. Save your preferences - you can always change these later as your workflow evolves.
You can also use Plannerly's AI features to generate a visual icon for each deliverable. Click the green AI/robot icon on a task row and the system will generate an appropriate image. This is optional but helpful when sharing the scope with stakeholders who benefit from visual cues alongside text descriptions. Free Plannerly accounts have limits on AI generations.
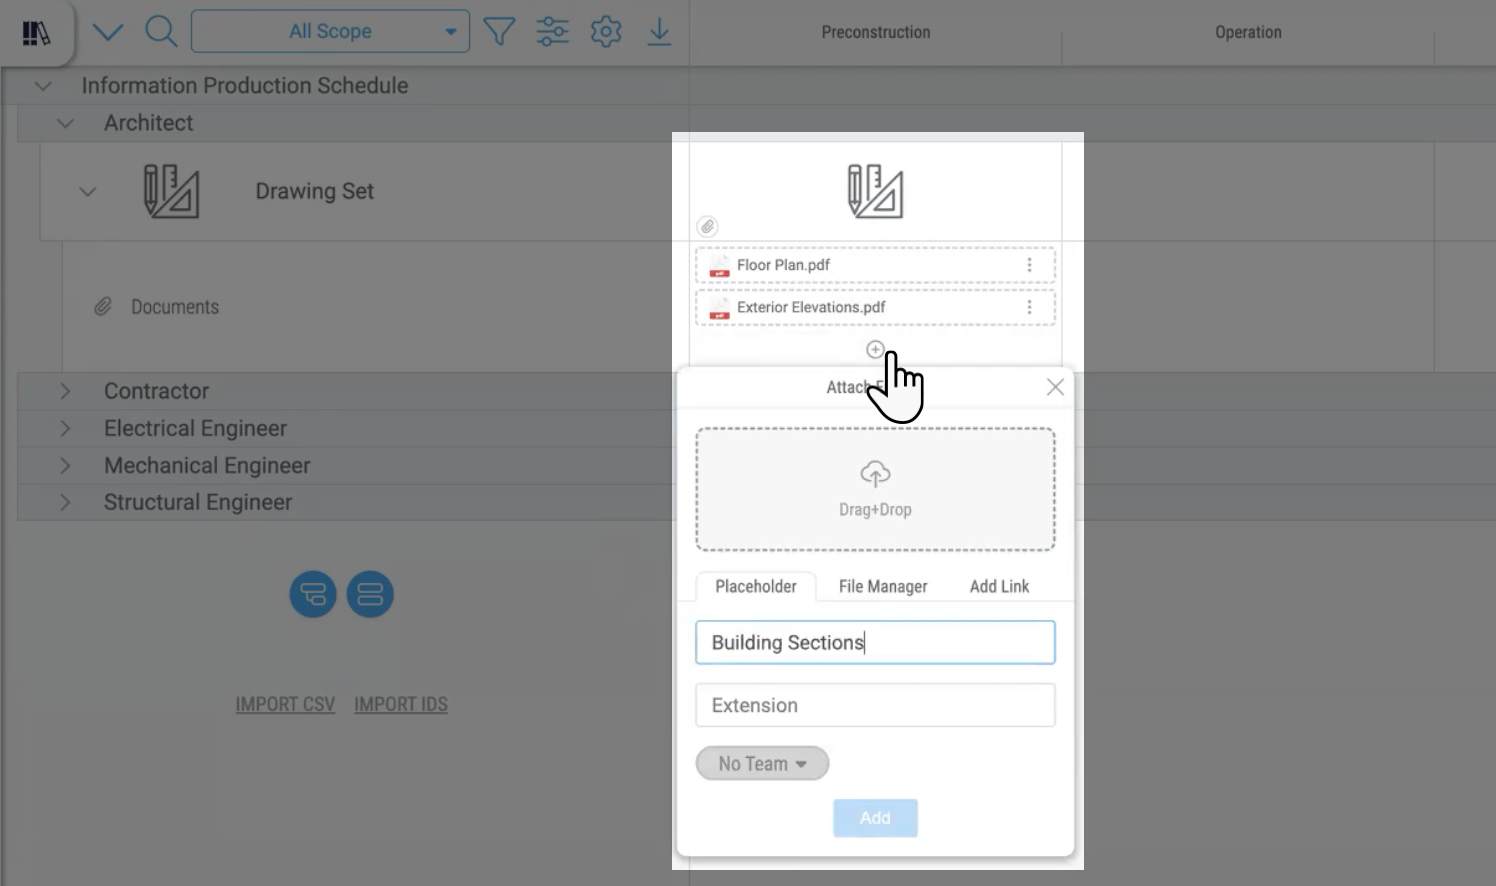
Once your tasks are in place, add document placeholders to define exactly what files are expected - before the files exist. Click on a task's milestone cell and you will see four attachment options:
- Drag and drop - upload actual files directly
- Add placeholder - define a file that has not yet been delivered
- Add from existing files - attach files already in File Manager
- Add link - reference an external document location
Use Add placeholder. Type the expected file name and format. For example, for the Architectural Drawing Set at the Pre Construction milestone:
- Floor Plans (PDF)
- Exterior Elevations (PDF)
- Building Sections (PDF)
When a team uploads a file later, Plannerly will automatically match it against the placeholder, validate the file format, and update the version from v0 (placeholder) to v1 (delivered). This means delivery tracking is automatic, not manual.
1.4 - Define acceptance criteria
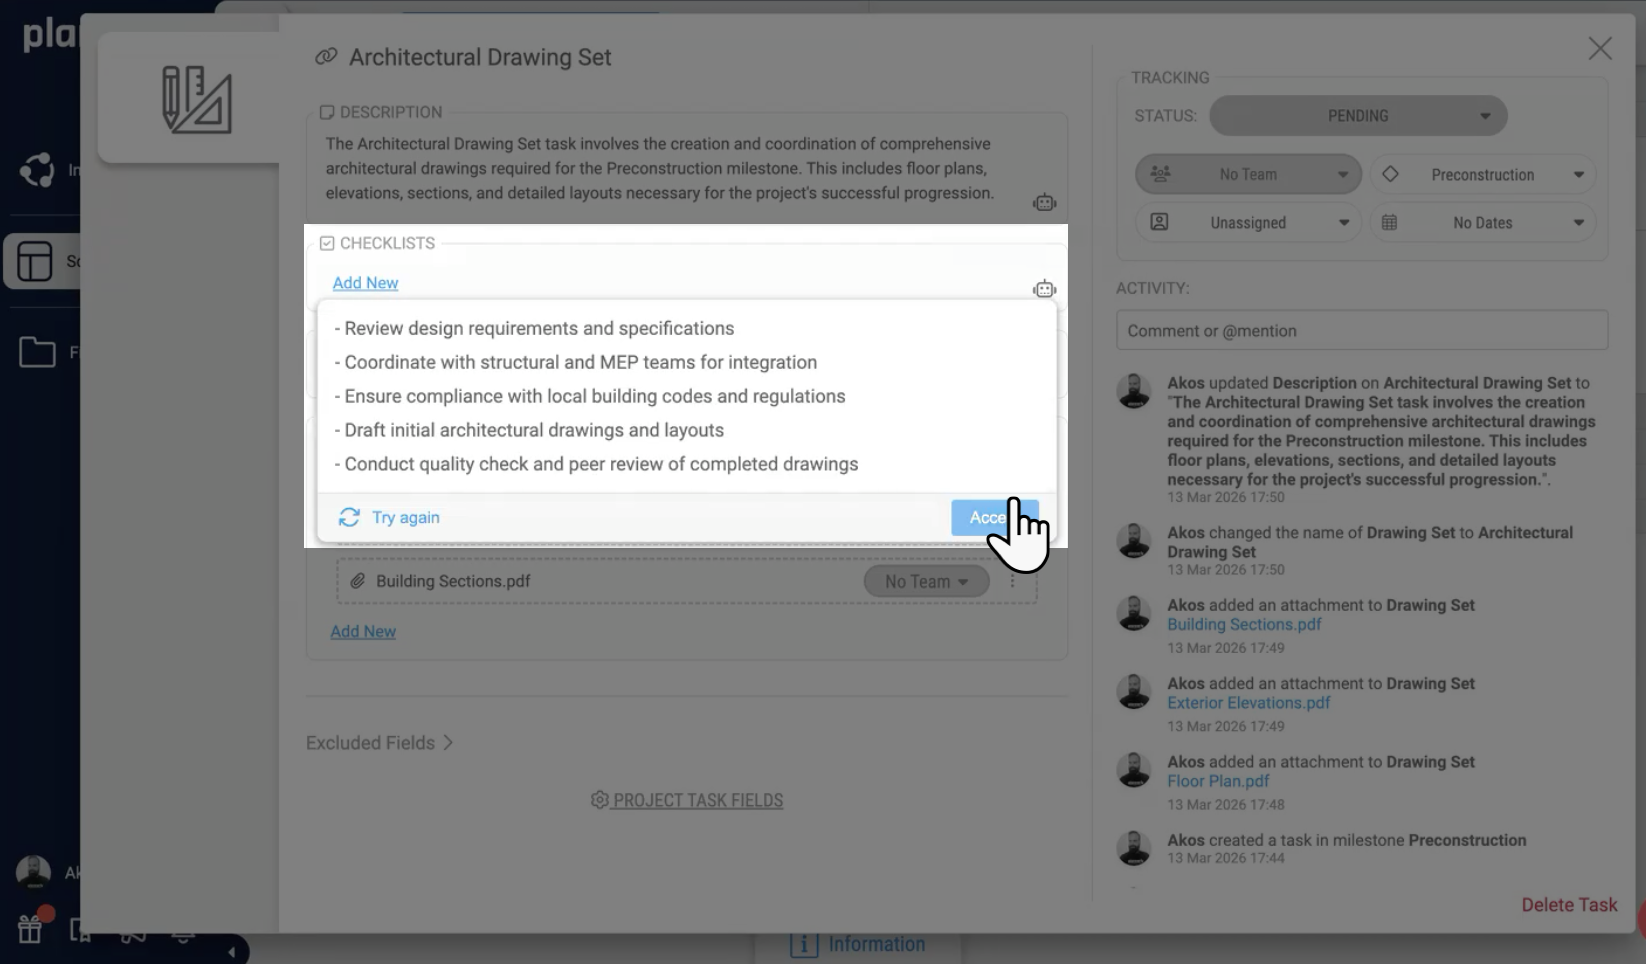
Click on a task cell to open the task detail modal. Here you can edit the task name to be fully descriptive (e.g., "Architectural Drawing Set"), add a description explaining what the deliverable involves, and most importantly, define the acceptance criteria - the specific conditions that must be met for this deliverable to be considered complete and acceptable.
Click the AI button to "Fill out this field with AI" to generate an initial set of descriptions and checklists automatically. The AI will produce relevant criteria based on the task name and context. Always review and refine the AI-generated content to match your project's specific requirements.
Example acceptance criteria for an Architectural Drawing Set:
- Sheet index matches included PDFs
- North arrows included on all plan drawings
- Levels and datums clearly annotated
- Scale is readable and defined for each drawing type
- Coordination adequate for this project stage
- Quality assurance check completed by originator
- Ready for formal review and feedback
Acceptance criteria eliminate ambiguity. When a team delivers a file, both sides can objectively check it against the agreed criteria. In ISO 19650 workflows, clear acceptance criteria are essential for verification and for resolving disputes about deliverable quality.
Step 2 - Team Assignment and Agreement
Deliverables only get delivered when someone is responsible for them. In this step you will assign teams to every task, create filtered Work Packages for each tender or contract package, and share those packages with stakeholders for genuine collaboration and agreement. This is where the Information Production Schedule stops being your plan and starts being the team's shared commitment.
Video: Assigning teams, creating work packages, and getting collaborative agreement
Required checklist
- Create teams with name, role, abbreviation, and colour
- Use Quick Assign to bulk-assign teams and set status to Proposed
- Filter by milestone and team, then create a Work Package for each combination
- Share the Work Package link with stakeholders for collaborative review
- Review feedback and change task status from Proposed to Approved
2.1 - Create teams and assign in bulk
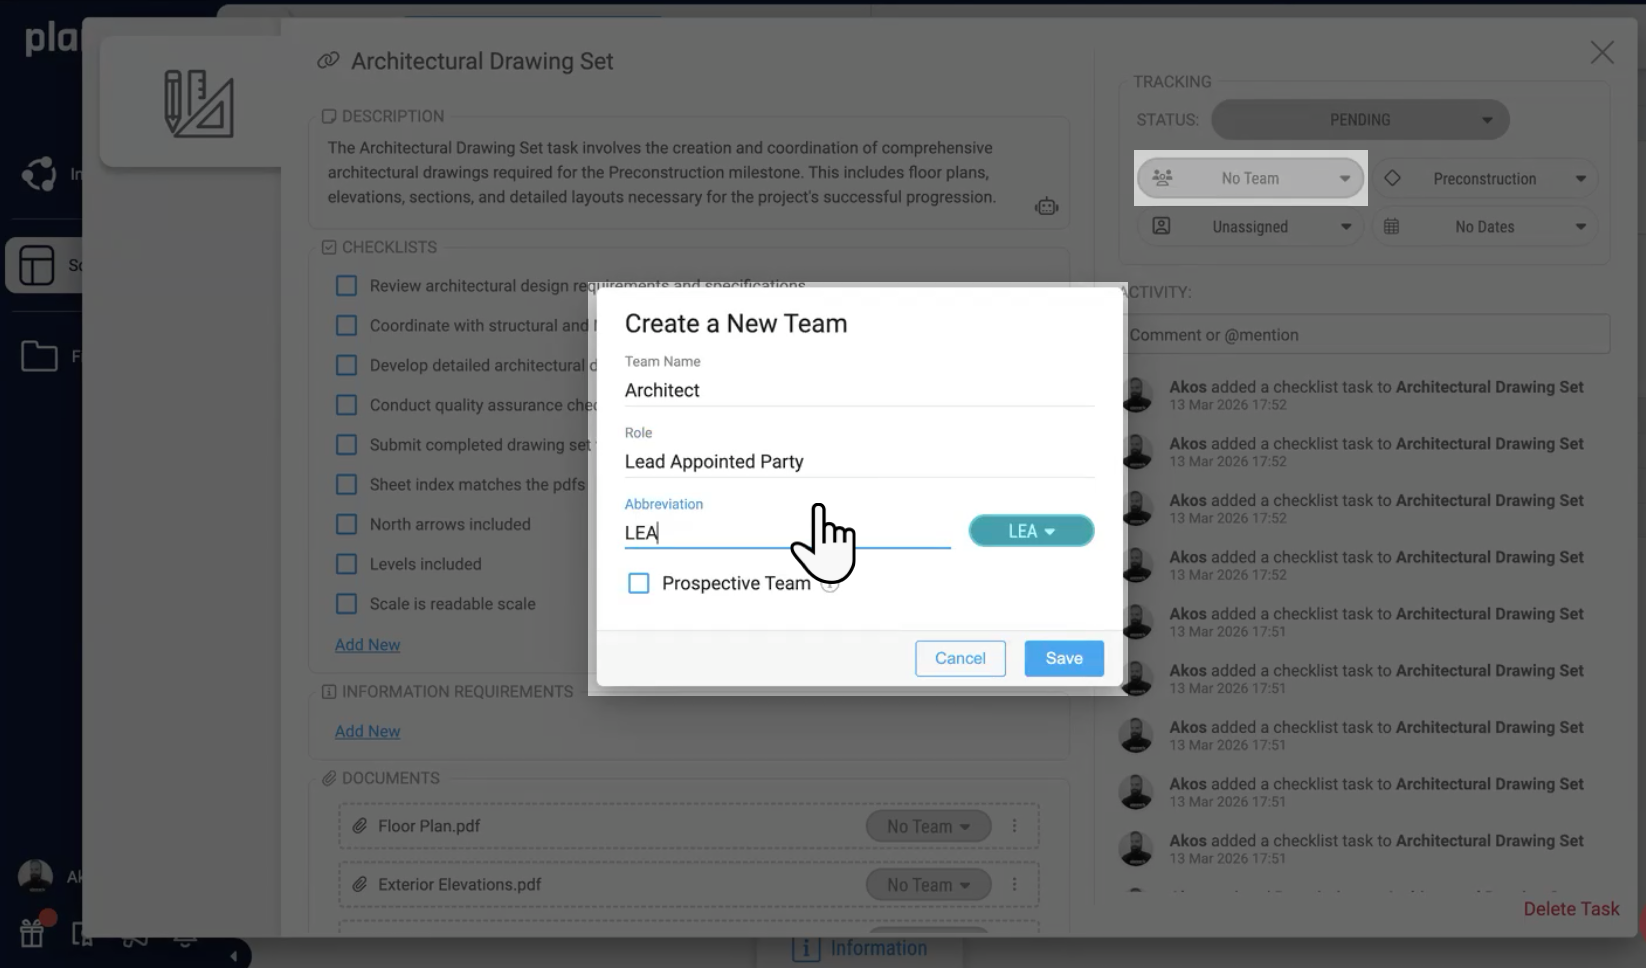
Open any task and look for the No Team dropdown in the tracking section. Click Add New to create a team. Enter:
- Team name - e.g., "ABC Architecture" (or your company name)
- Role - e.g., "Lead Appointed Party" or "Architecture" (in ISO 19650 terms, this maps to the appointing party, lead appointed party, or appointed party roles)
- Abbreviation - e.g., "ARC" or "LAP"
- Colour - choose a colour that helps visually identify this team
Click Save. The team is now available to assign to any task in the project. You only need to create each team once.
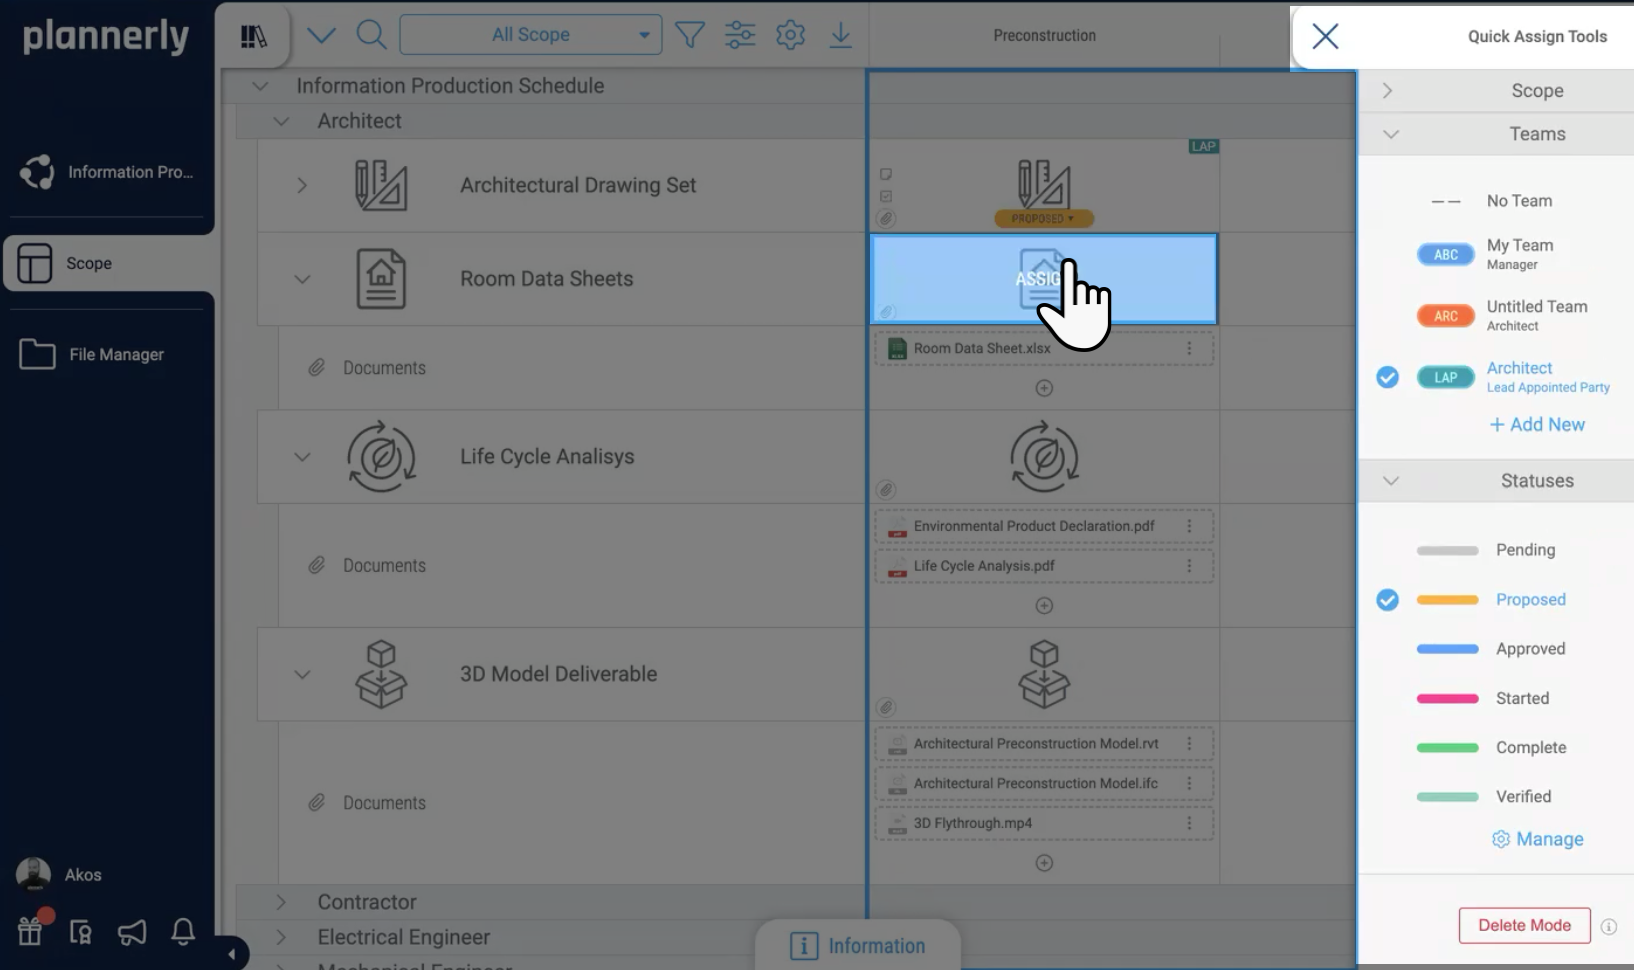
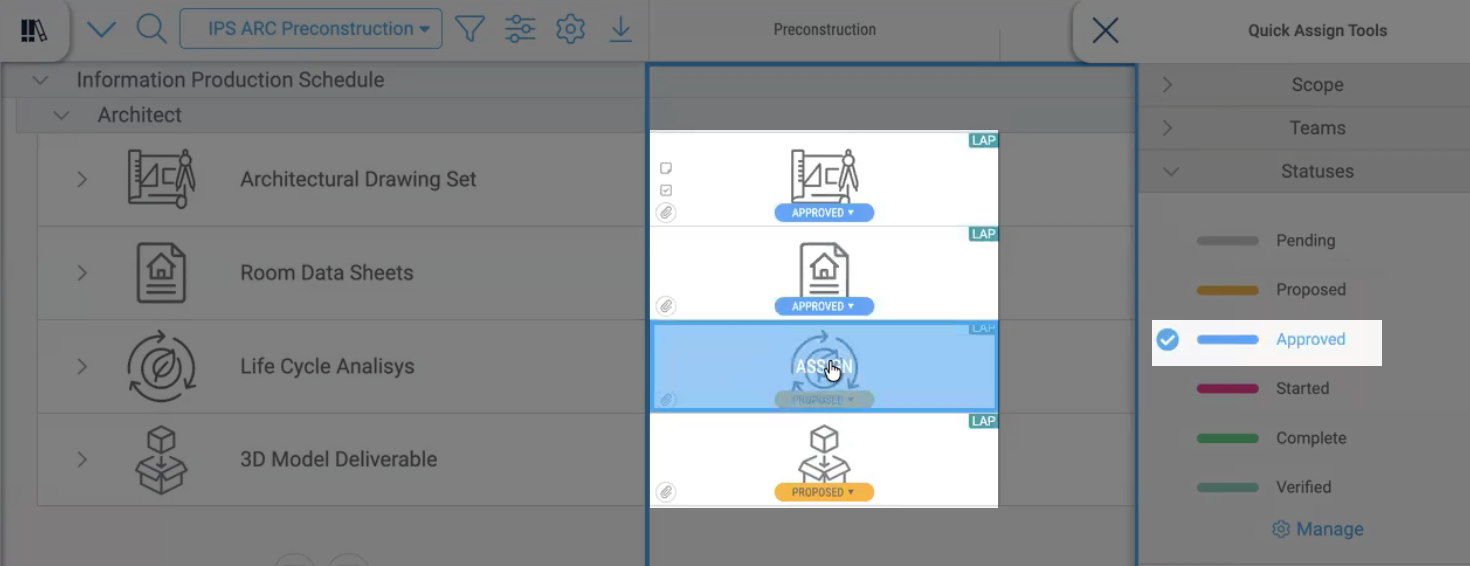
Instead of opening every task individually, use the Quick Assign tool in the top right corner of the Scope grid. Set a default team (e.g., Architect) and a default status (e.g., "Proposed"). Now, each time you click on a cell in the grid, both the team and status are automatically applied. Change the default team and repeat for the next discipline until all tasks are assigned.
Setting the initial status to Proposed signals that these deliverables are still under discussion - not yet committed. This is important for the collaboration step that follows.
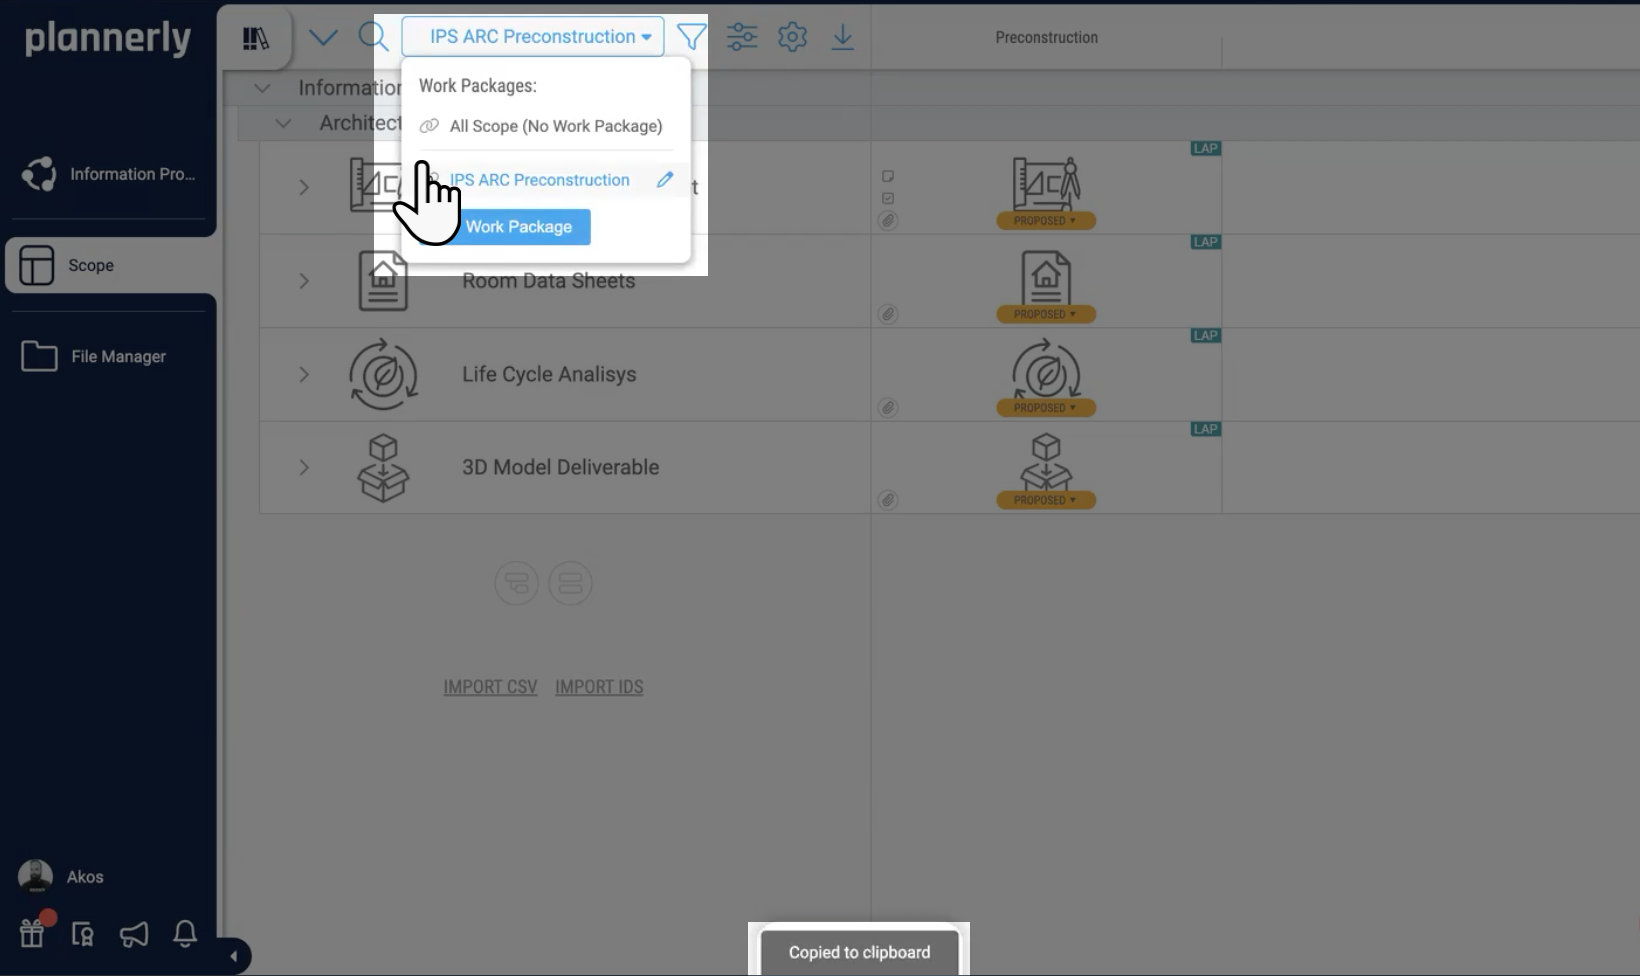
2.2 - Create filtered Work Packages
A Work Package is a saved, filtered view of your scope that isolates the deliverables relevant to a specific team and milestone. This is what you will share with stakeholders, export as contract documents, and use to track delivery.
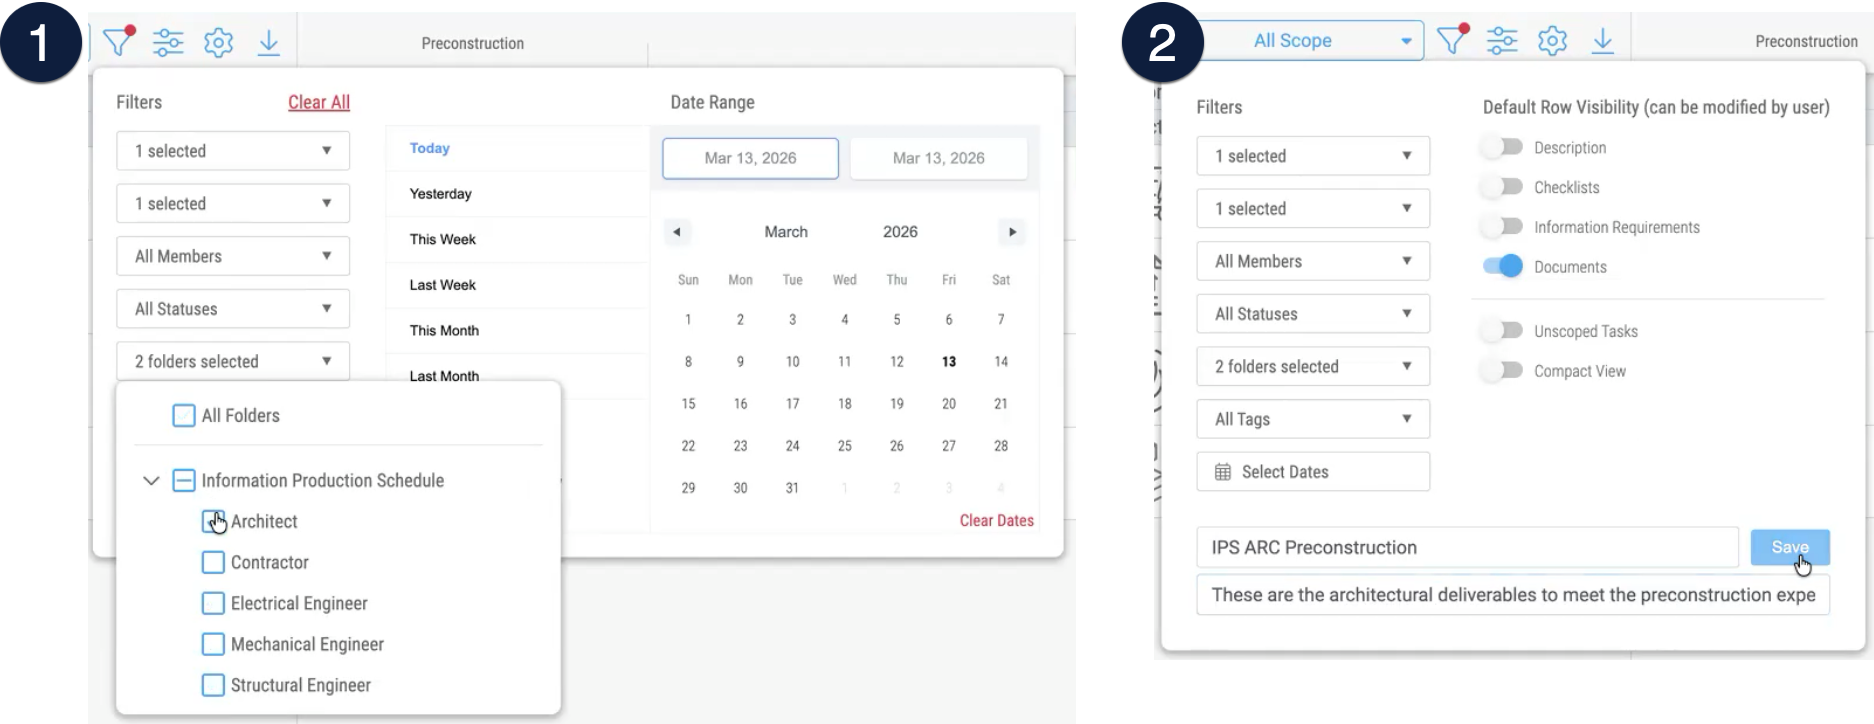
- Click the Filter icon in the toolbar
- Select a specific milestone (e.g., Pre Construction) and a specific team (e.g., Architect)
- Click the All Scope dropdown and select Add New Work Package
- Name it using a consistent convention: IPS ARC Preconstruction (or IPS_ARC_PRECON)
- Add a description such as "Architectural deliverables for the pre-construction milestone"
- Click Save
Repeat for each combination of team and milestone that requires its own tender or contract package. In ISO 19650 terms, this is how you organise the scope for each appointed party or task team.
2.3 - Share, review, and approve
One of the most common failures in construction information management is teams signing contracts they have not genuinely reviewed. This substep changes that.
Copy the link to the Work Package and share it with the relevant stakeholders - architects, contractors, owners, or whoever needs to review and agree ( must be invited to the project for security reasons).
When recipients open the link, they can:
- Click into any cell to review the requirements
- Add comments with feedback or questions
- Use @mentions to notify specific people
- Suggest changes to requirements or acceptance criteria
All changes and comments are tracked in the activity log, creating a complete audit trail of who said what and when.
Once all stakeholders have reviewed the Work Package and feedback has been incorporated, change the task status from Proposed to Approved.
You can update statuses individually or use Kanban view to quickly drag tasks between status columns. Do not approve tasks prematurely - the status change from Proposed to Approved represents a genuine agreement. Only approve once you are confident the requirements are clear, achievable, and accepted by the delivery team.
Step 3 - Contracting, Scheduling, and E-Signature
Your approved scope is now ready to become a formal contract and a scheduled timeline. In this step you will export Work Packages as professional PDF appointment documents, set up e-signature workflows so all parties can sign digitally, review the completed signature chain of custody, and then schedule every task with durations, dependencies, and individual team member assignments. The contract and schedule are generated directly from the same scope - no separate document, no copy-paste, no version confusion.
Video: Exporting contracts, e-signing, and scheduling your timeline
Required checklist
- Click Export → PDF with Grid and Details checked, selecting the specific Work Package
- Customise cover page, headers/footers, document index, and teams page
- Open the PDF in File Manager, select signatories, and send for e-signature
- Review the signed contract and verify the chain of custody
- Switch to Timeline view and set durations for each task
- Create dependencies between tasks by dragging node-to-node
- Assign individual team members to each scheduled task
3.1 - Export scope as a PDF contract
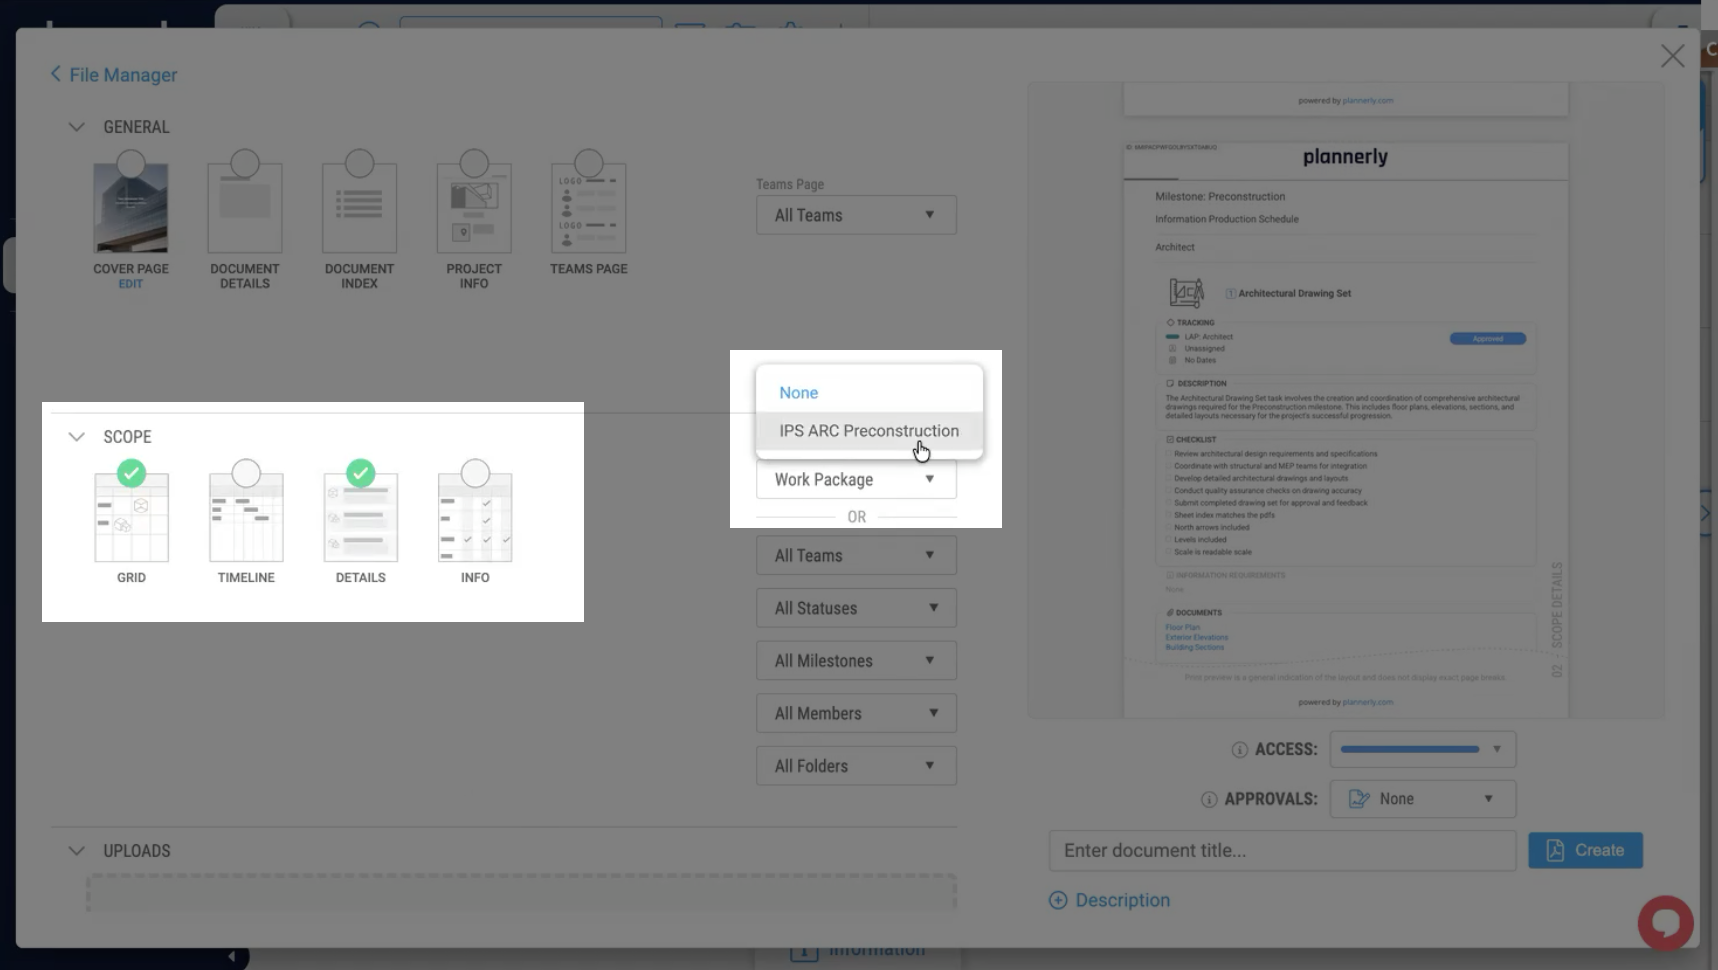
Click the Export button and select PDF. In the export options, check both:
- Grid - shows all tasks in the familiar scope layout
- Details - generates a full page for each task showing descriptions, acceptance criteria, document requirements, and checklists
In the Work Package filter dropdown, select the specific Work Package you want to export (e.g., "IPS ARC Preconstruction"). This ensures only that team's deliverables appear in the PDF.
Optional but recommended: add a cover page, customise headers and footers for branding, include a document index, and add a teams page with contact details. Give the document a clear name - for example, "IPS ARC Preconstruction Appointment Document" - and click Create. The PDF will be generated and stored in File Manager.
The contract comes directly from the scope. There is no separate document to maintain, no risk of the contract drifting from the actual requirements.
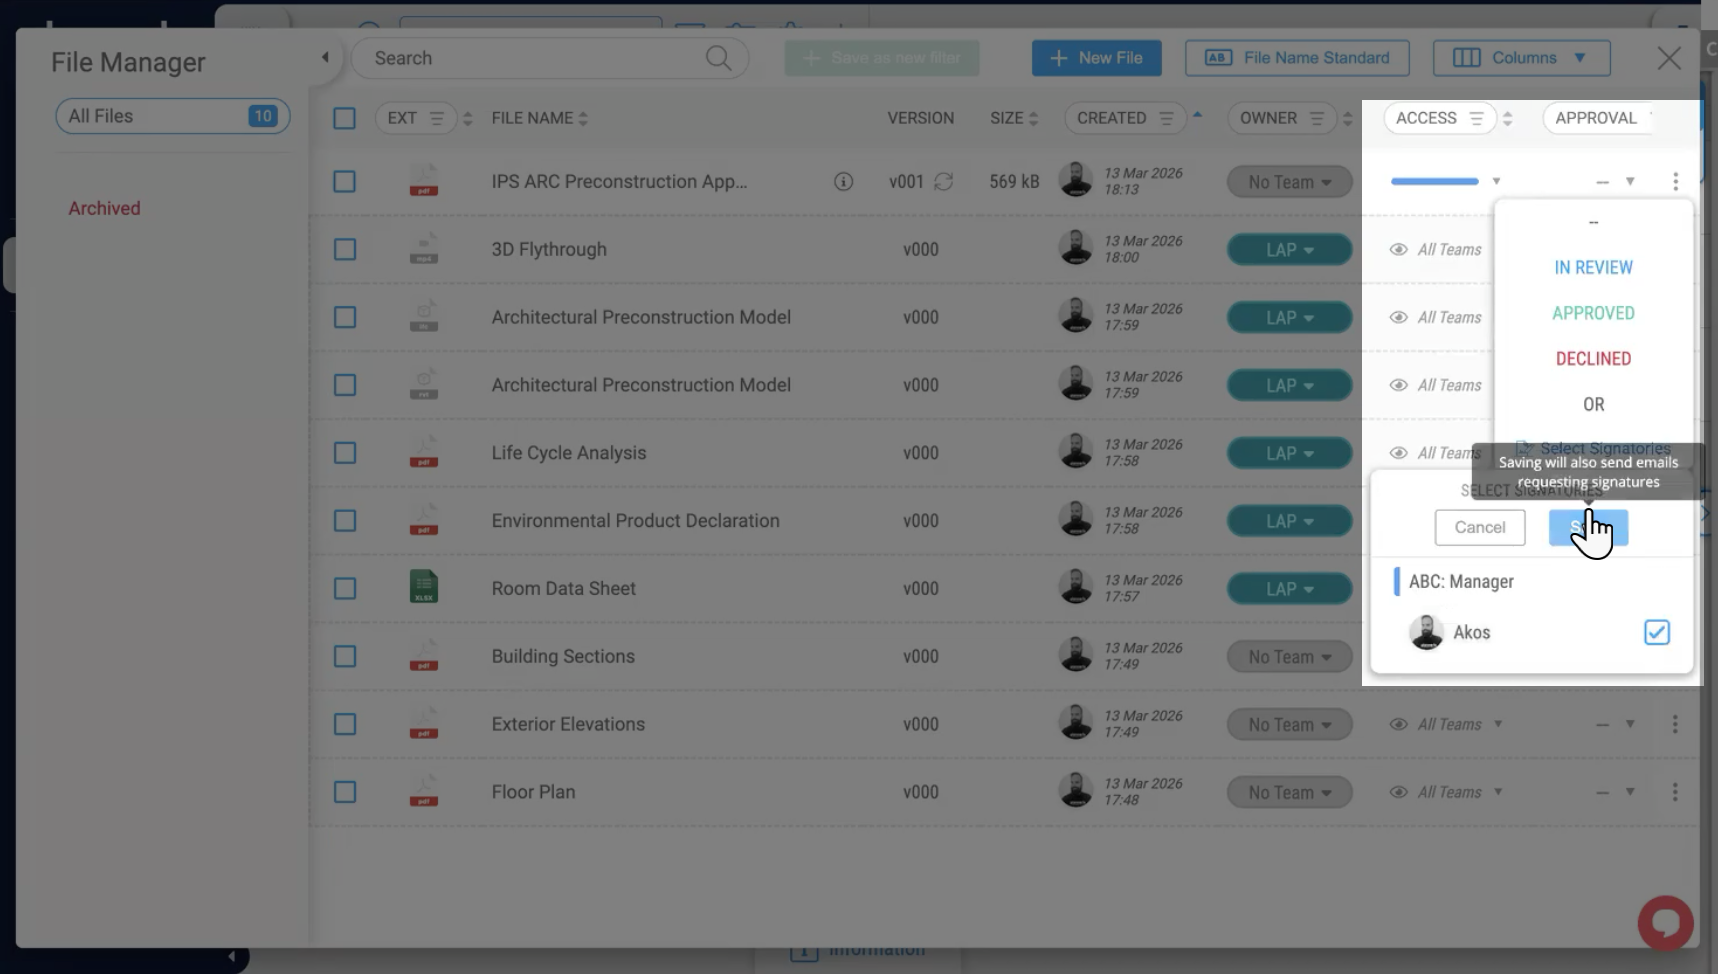
3.2 - E-sign and verify chain of custody
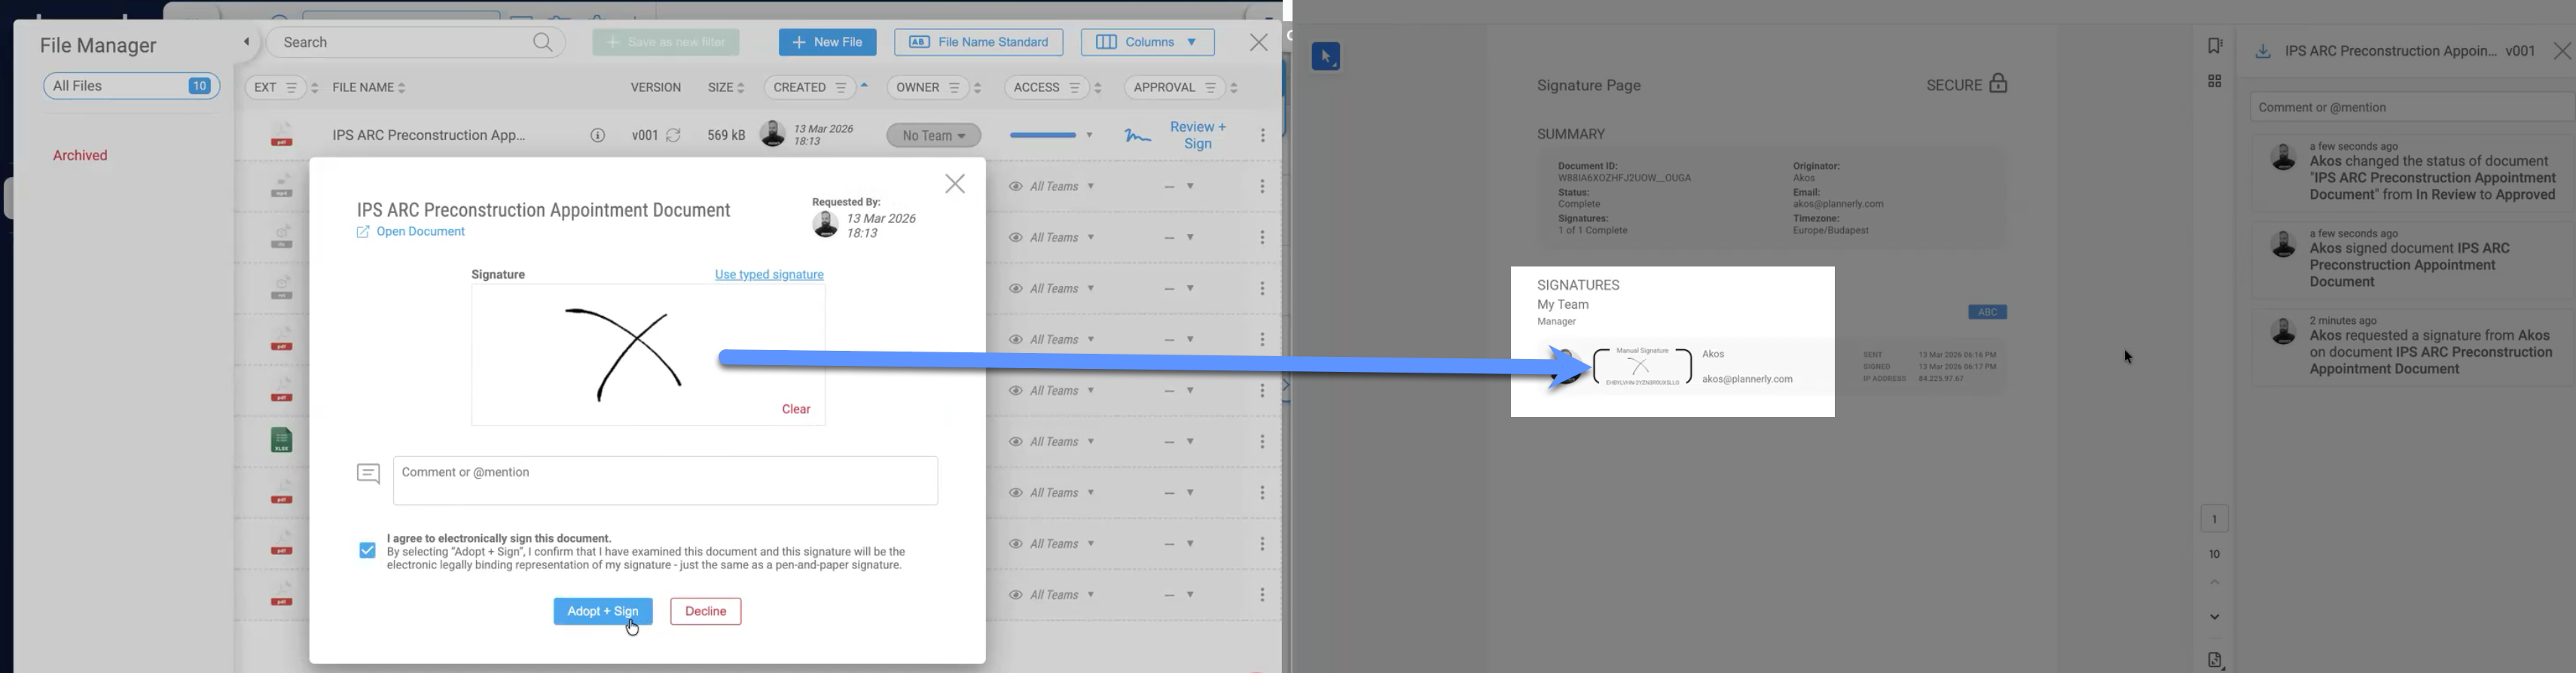
In File Manager, locate the exported PDF. Click on the document row and then click the File Approval Status dropdown. Select "Select Signatories". Check the boxes next to the team members who need to sign this document. Click Save. Plannerly will automatically send each signatory an email with a link to review and sign.
When signatories open the signing interface, they can:
- Review the full PDF document
- Type or draw their signature
- Add comments with @mentions if needed
- Check "I agree to electronically sign this document"
- Click Adopt and Sign
Plannerly's e-signature system includes user authentication, IP address tracking, timestamps, and a cryptographic audit trail. Once all signatories have signed, you can click on the document to view the complete chain of custody:
- Document ID - unique identifier for this document
- Signing status - how many signatories have signed and how many remain
- Complete chain of custody - from the originator through every signatory
- Timestamp and IP address for each individual signature
- Full history thread - who requested signatures, who signed, all status changes
This information is permanently attached to the document and cannot be altered after signing.
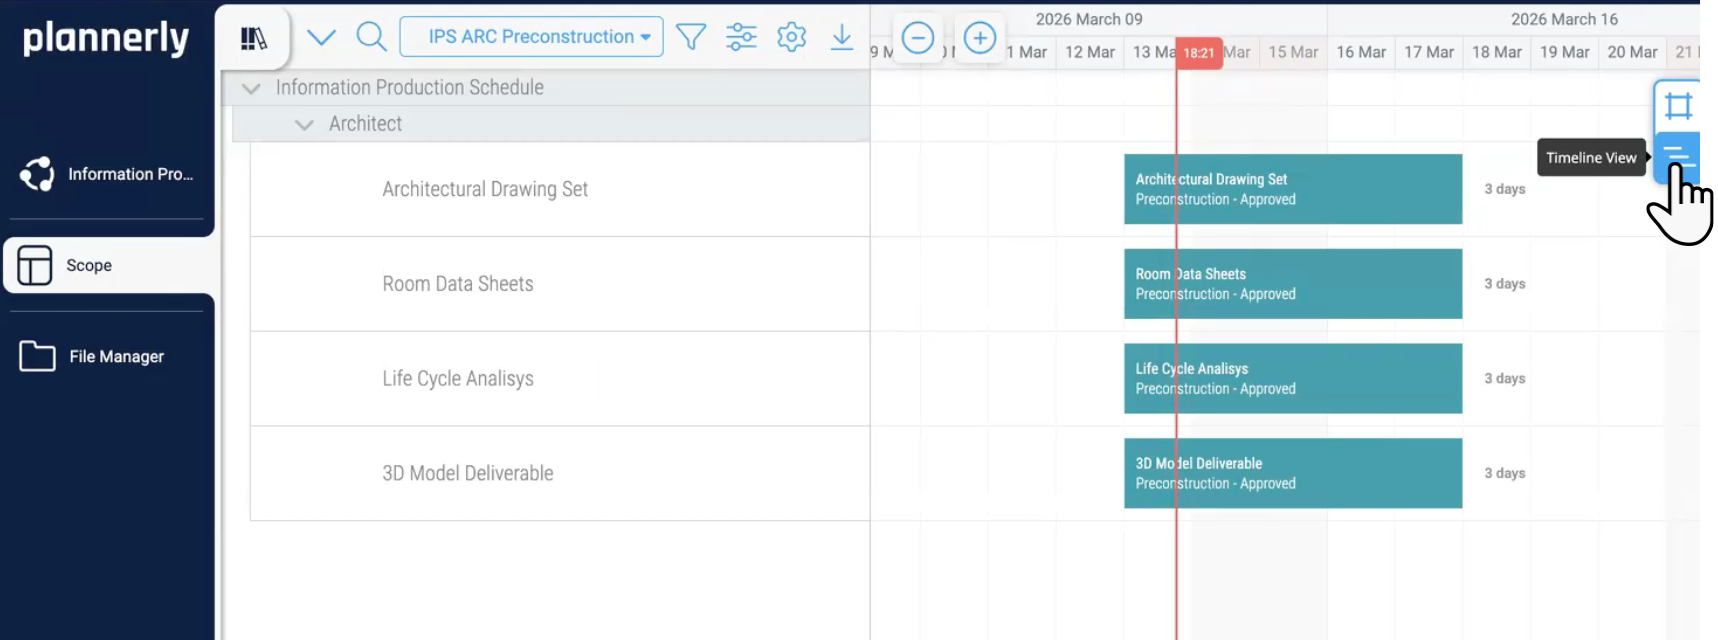
3.3 - Schedule tasks with durations and dependencies
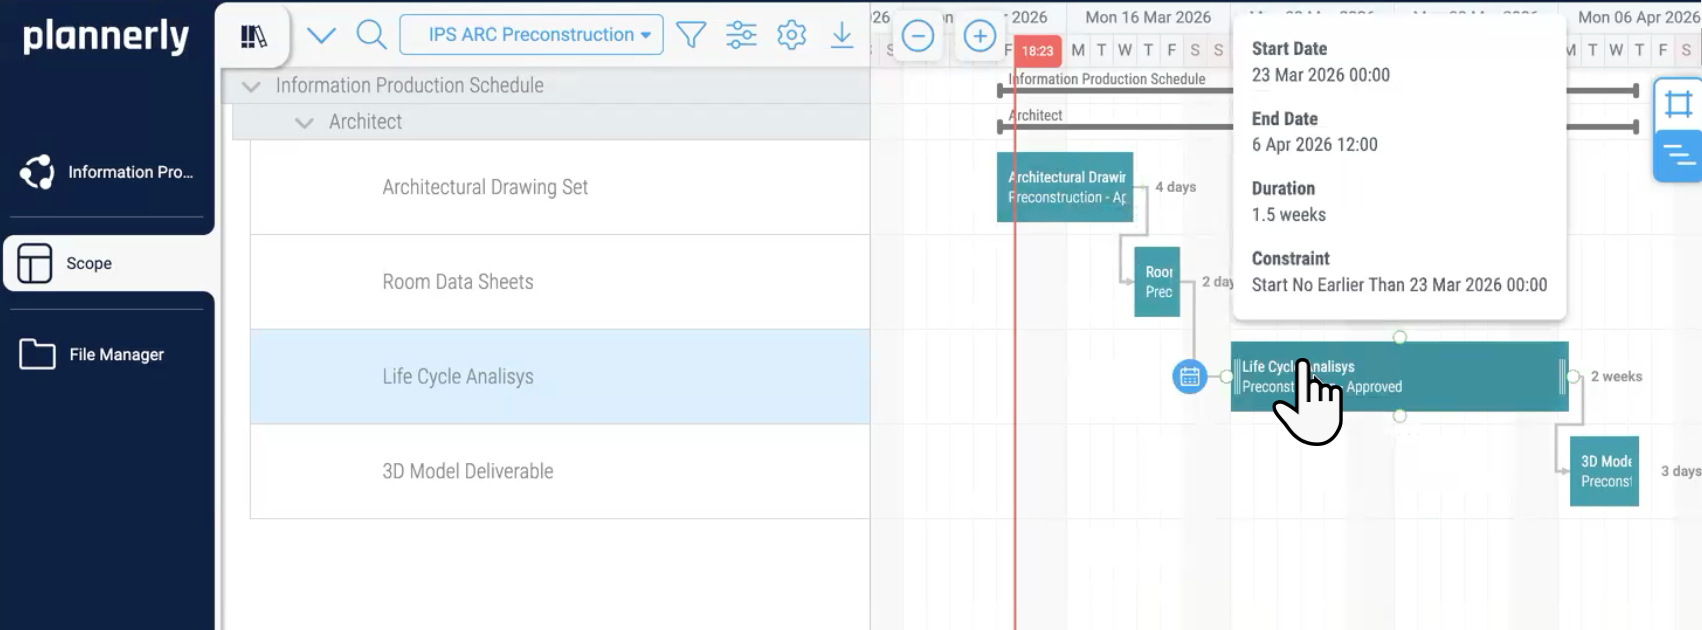
Click the Timeline View toggle on the right side of the Scope screen. Your tasks will appear as blocks on a Gantt-style timeline. You can set task durations in several ways:
- Drag - click and drag the right edge of a task bar to extend or shorten it
- Calendar icon - click the blue calendar icon on the left of a task and use the up/down arrows
- Natural language - click the calendar icon and type a duration in plain language, e.g., "1.5 weeks", "10 days", or "1.5w"
- Specific dates - enter exact start and end dates directly
Next, create dependencies to define the logical order of production. Drag from the node at the end of one task to the beginning of the next task. This creates a finish-to-start link, meaning the second task cannot start until the first is complete. For example, the Drawing Set may depend on the Preconstruction Model being complete, while Room Data Sheets may depend on the Drawing Set. Tasks without dependencies can run in parallel. The timeline automatically reschedules downstream tasks when you add or adjust dependencies.
Finally, assign individual team members to each task. Double-click a task in the Timeline view to open the task modal. In the tracking details panel, click to assign a team member. Once assigned, the team member's avatar appears on the task in the Timeline view, making it immediately visible who is responsible for each deliverable.
Step 4 - Delivery Tracking and Monitoring
The Information Production Schedule is defined, agreed, contracted, and scheduled. Now you need to track actual delivery against the plan. In this final step you will enable the Docs module for dashboarding, create live charts that automatically show delivery progress, upload deliverables against placeholders, and monitor everything in real time. No more chasing emails for status updates - the system tells you exactly where you stand.
Video: Setting up dashboards, uploading deliverables, and monitoring progress
Required checklist
- Enable the Documents module in project settings
- Create a chart section in Docs using the Scope Documents metric
- Configure chart title, description, filters (milestone, folder, team), and set to 1 column
- Upload deliverables against placeholders (from Scope grid, task modal, or File Manager)
- Confirm dashboards update automatically as documents are delivered
4.1 - Set up delivery dashboards
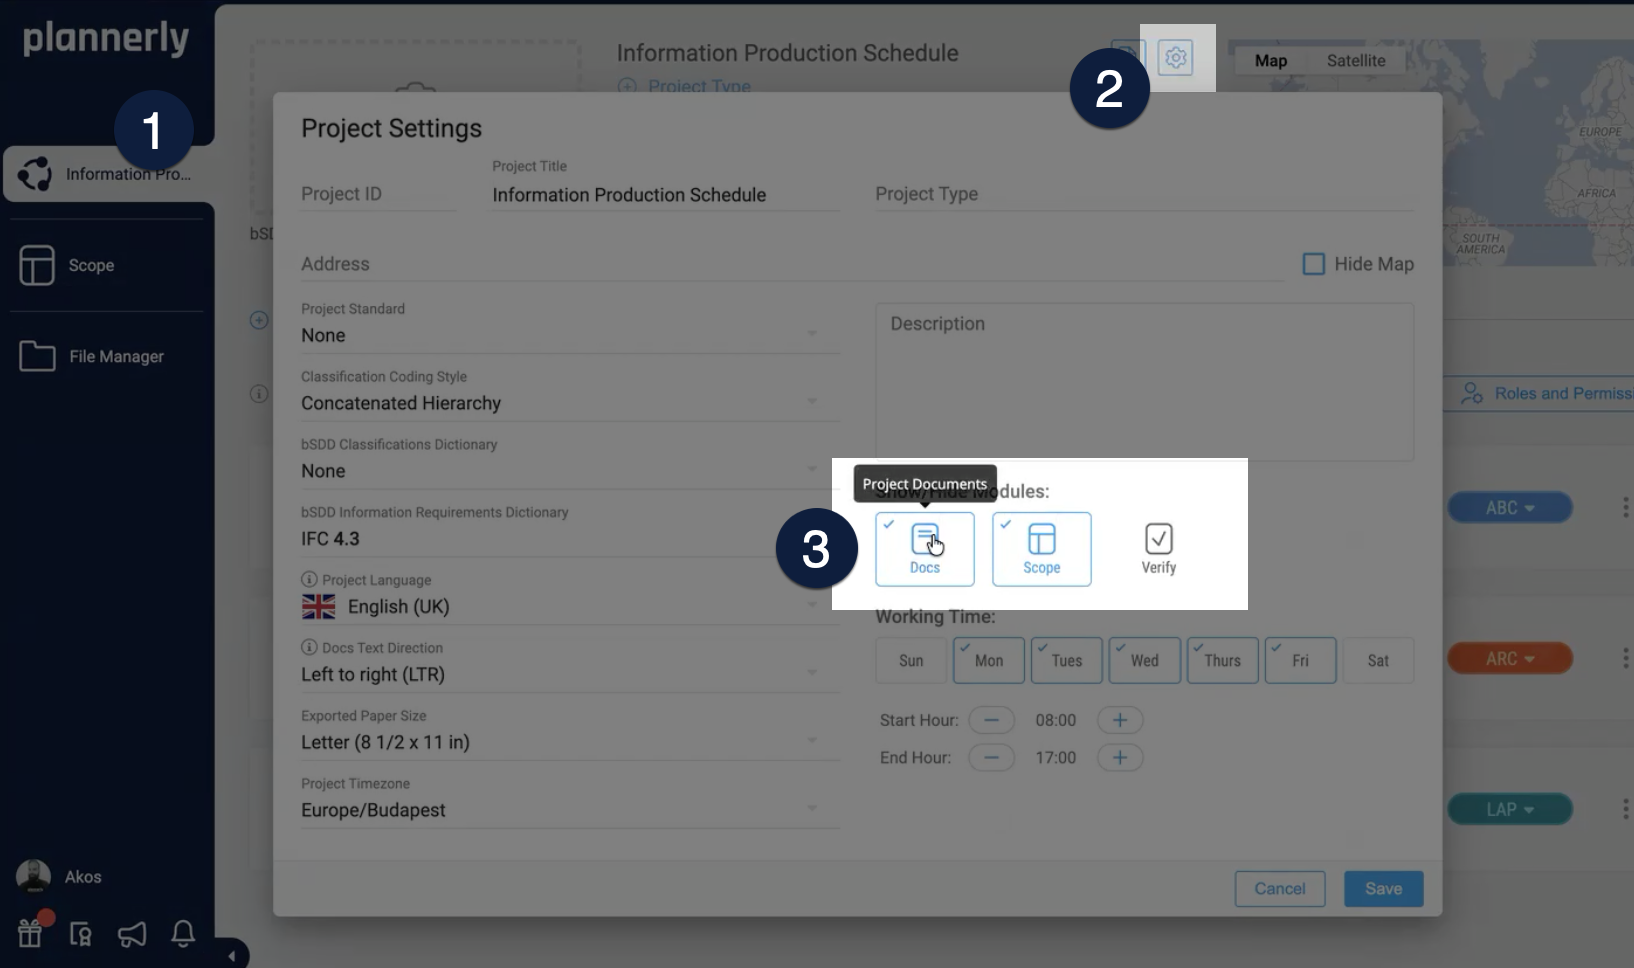
Click the settings cog in your project to open project settings. Check the Documents module to add it to your project and click Save. This enables the Docs module where you will create dashboards to monitor document delivery progress.
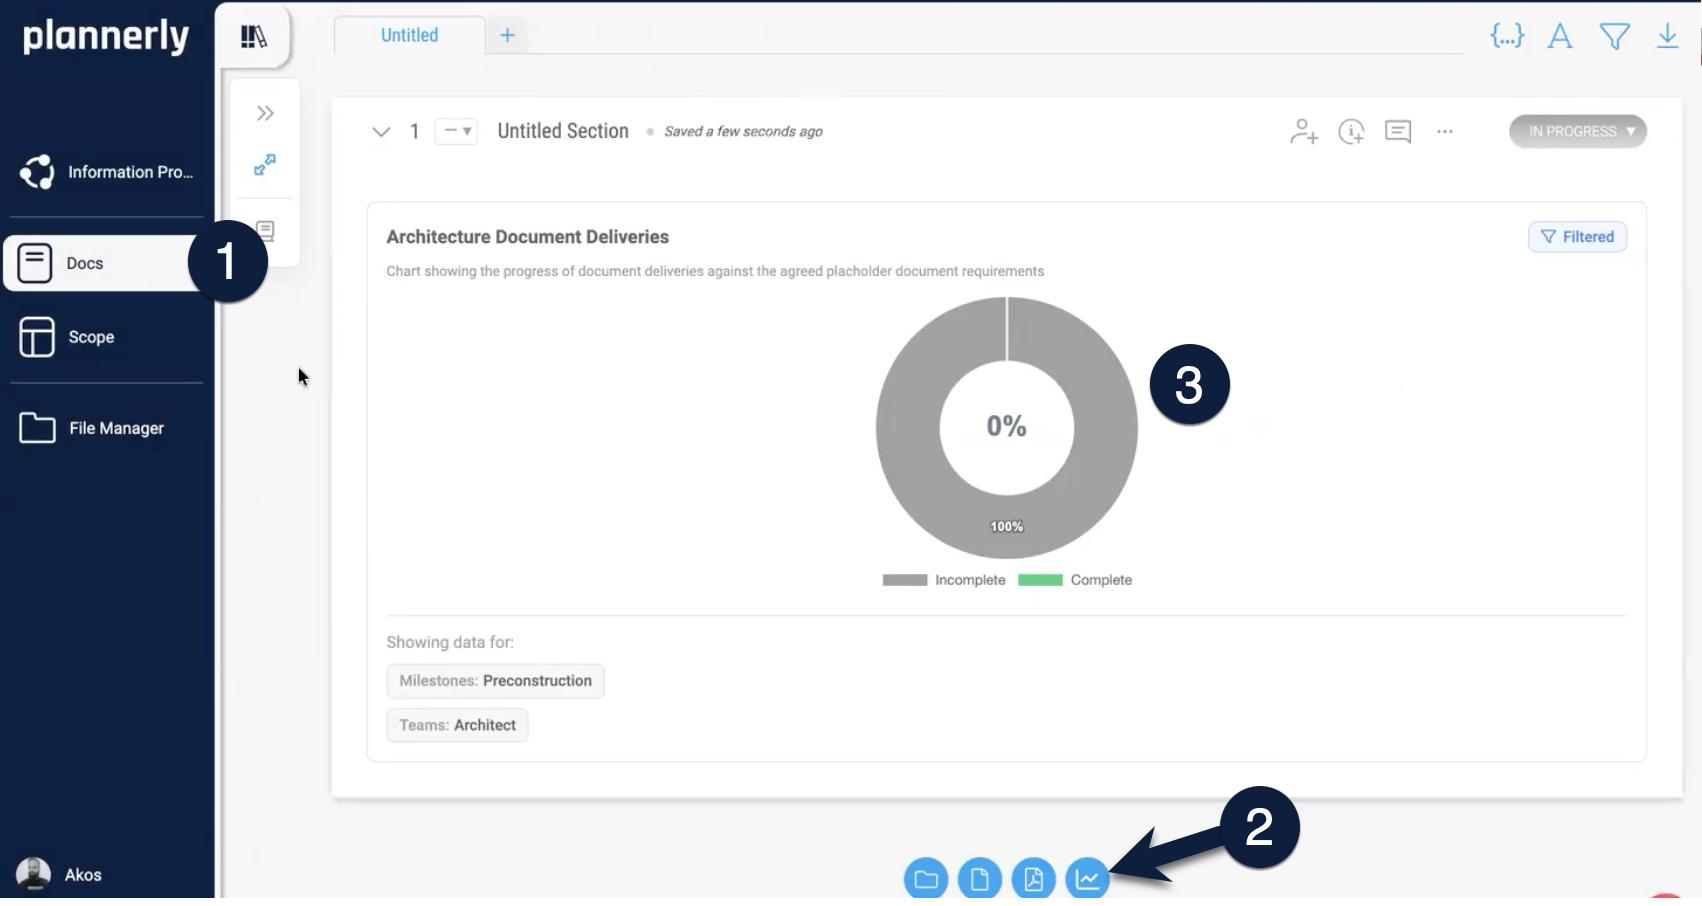
Navigate to the Docs module and click Add Chart Section. Click to add your first metric and select Scope Documents (or Documents) from the dropdown. Configure the chart:
- Chart title - e.g., "Architecture Document Deliveries"
- Description - e.g., "Progress of document deliveries against agreed placeholder requirements"
- Filters - select the relevant milestone (e.g., Pre Construction), folder (e.g., Architecture), and team (e.g., Architect)
- Column layout - set to 1 column so the chart spans the full width
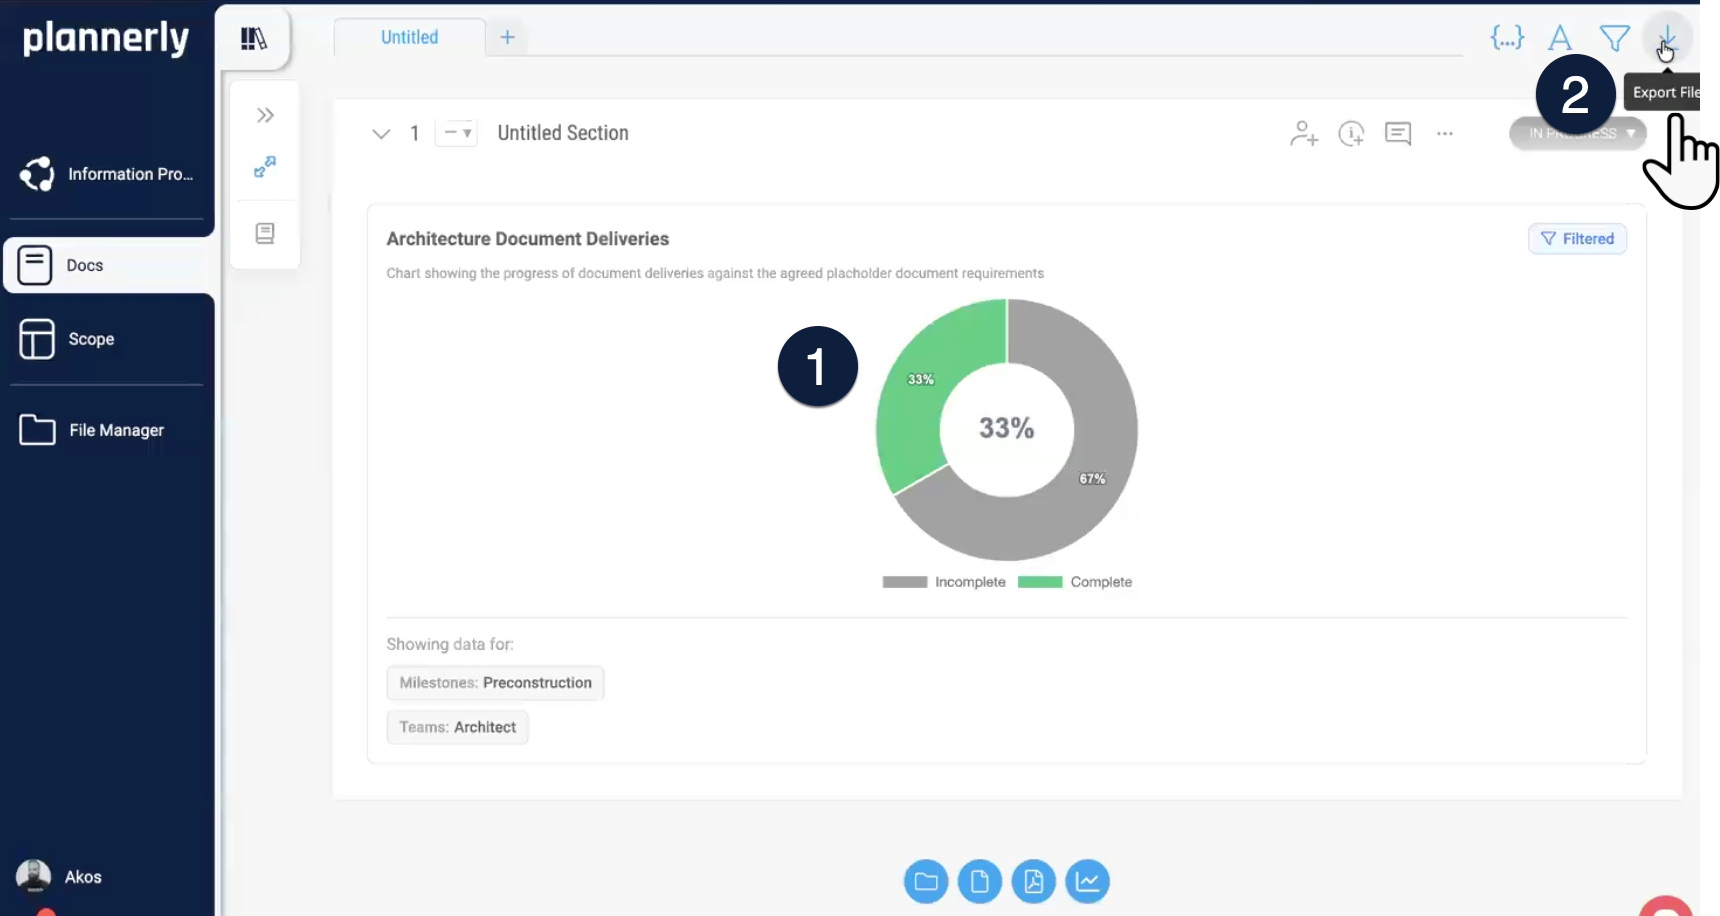
Click Apply Configuration. The chart will automatically populate, showing the percentage of documents delivered versus placeholder requirements for that team and milestone. Create additional charts for each team or milestone combination you want to monitor.
4.2 - Upload deliverables and monitor progress
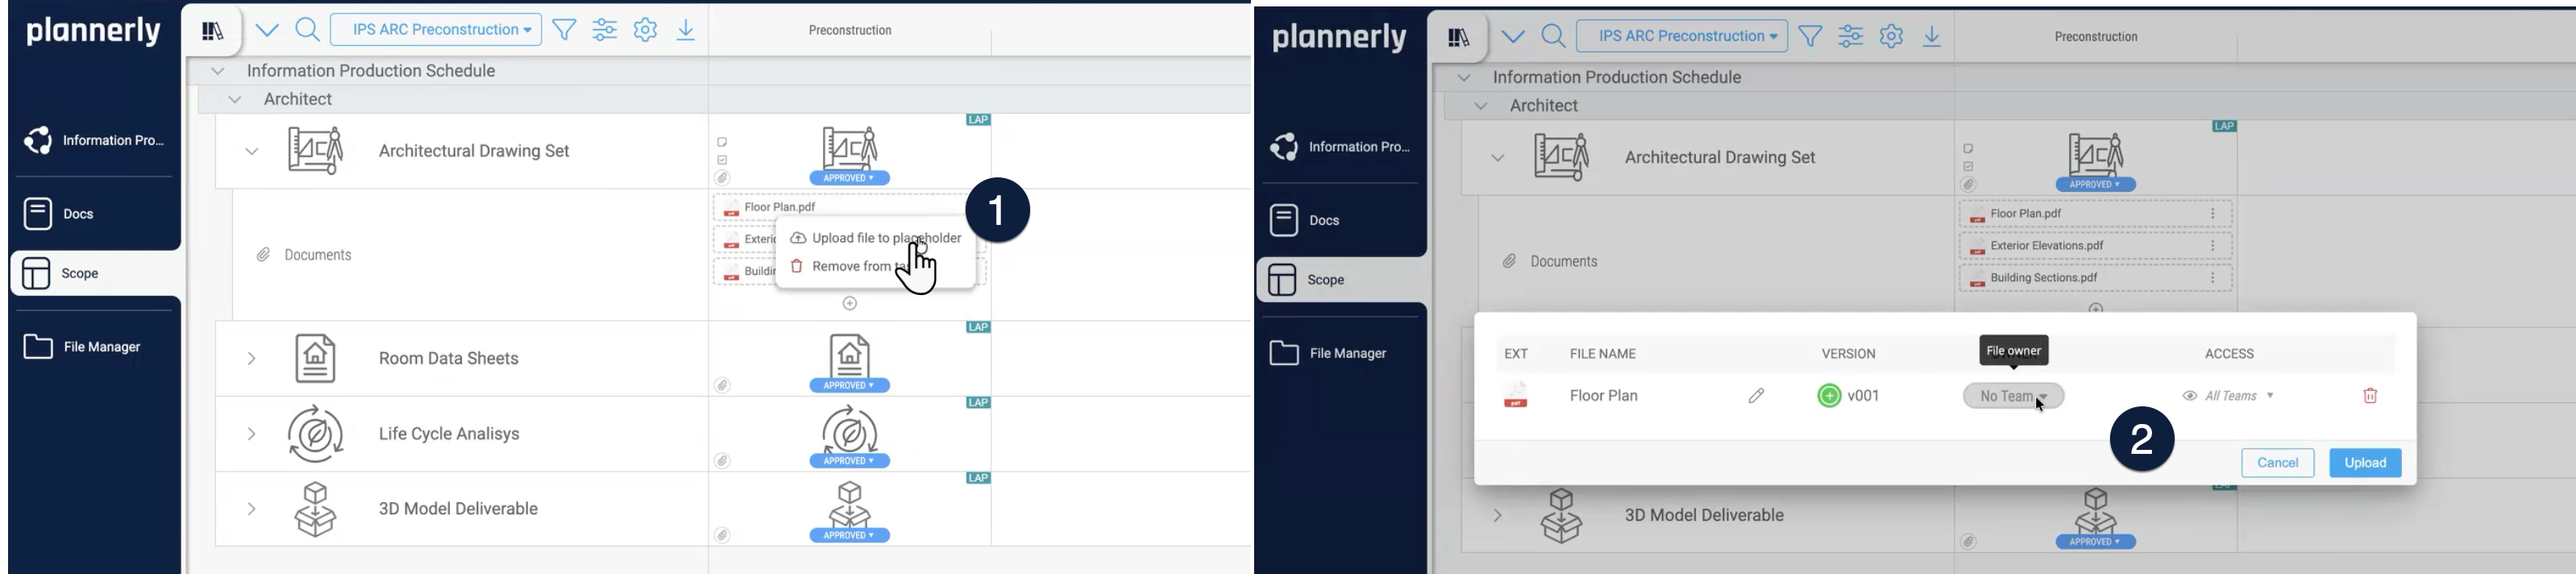
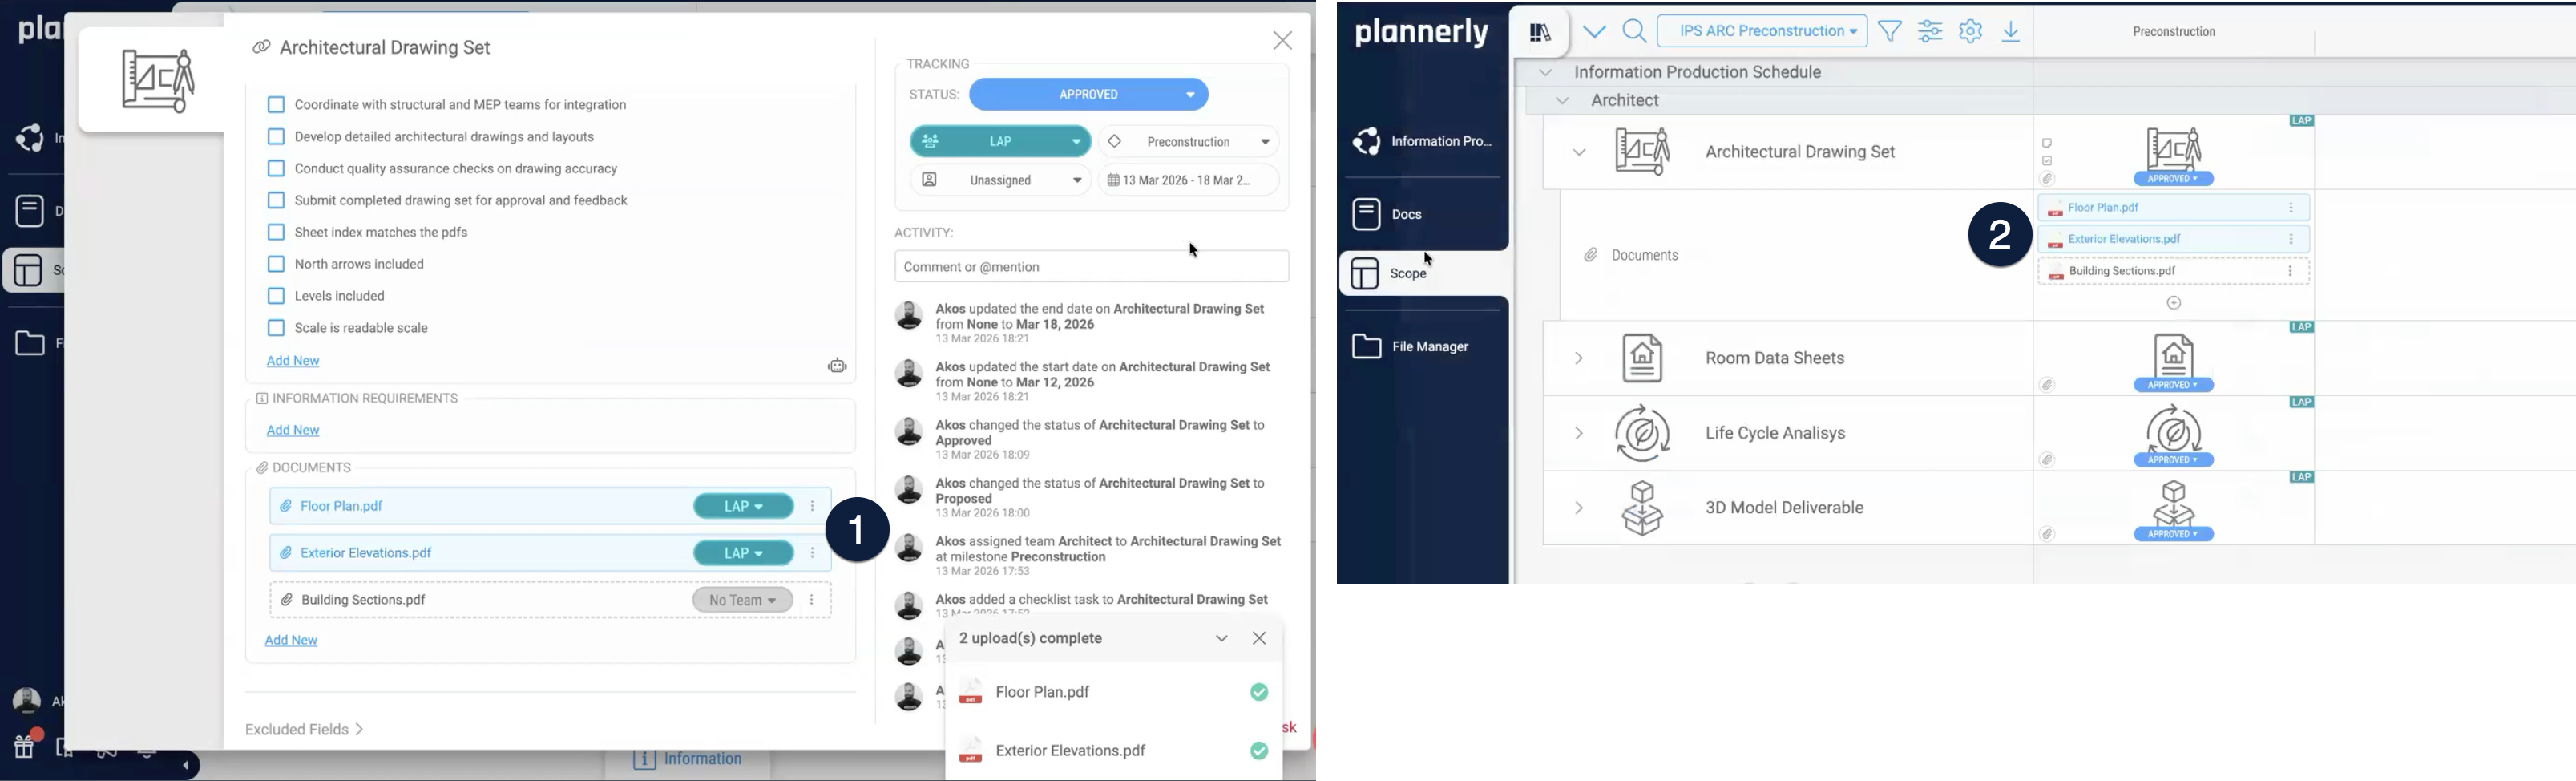
When teams are ready to deliver, they can upload their files in three ways:
- From the Scope grid - click the three dots on a document placeholder row and select Upload File to Placeholder
- From the task modal - click on a task cell and use the upload button to attach files against placeholders
- From File Manager - drag and drop files directly, or click Add New and upload; the system automatically matches documents to their placeholders
When a file is uploaded against a placeholder, Plannerly automatically validates the file format, renames the file to match the agreed placeholder name, updates the version from v0 (placeholder) to v1 (delivered), and changes the visual indicator from a gray dashed line to a blue shaded box.
As teams upload deliverables, your dashboards in the Docs module update automatically in real time. There is no manual data entry, no spreadsheet reconciliation, and no chasing teams for status updates. You can also:
- Export dashboards as versioned reports using automated PDF exports
- Email progress reports to responsible teams on a weekly basis
- Compare actual delivery against agreed milestones across all teams simultaneously
This closes the loop: requirements were defined, agreed, contracted, scheduled, and now delivery is automatically tracked against that same baseline. The entire information lifecycle lives in one connected system.
What You Have Achieved
Your completed Information Production Schedule
By following this workflow, you have built a complete, connected information delivery system that:
- Defines every deliverable with clear acceptance criteria and document requirements
- Assigns responsibility to named teams and individuals
- Gets genuine agreement through collaborative review, not blind signatures
- Creates contract-ready exports directly from the scope, with secure e-signatures and full audit trails
- Schedules tasks with realistic durations, dependencies, and milestone alignment
- Tracks delivery automatically through live dashboards that update in real time
This workflow replaces disconnected Word documents, Excel spreadsheets, Gantt charts, email chains, and manual status reports with a single, integrated system. Whether you are following ISO 19650 or simply want a structured way to manage information delivery, these steps give you a repeatable, auditable, and scalable approach.
Continue learning
- Free certified training courses - deepen your skills with structured courses covering Scope, Docs, Verify, and File Manager
- ISO 19650 Specialist assignment - practise the full ISO 19650 workflow including EIR, BEP, verification, and handover acceptance
- Understanding the proposed ISO 19650 revisions - stay current on upcoming changes to the standard
- UK BIM Framework - authoritative guidance on ISO 19650 implementation from the UK Government
- buildingSMART International - open standards for digital construction and information exchange
- ISO 19650 official standard - the international standard for information management using BIM