
TL;DR - Copy your delivery list from a spreadsheet and paste it into File Manager. Select Review list, pick the team that owes the files, then select Request files. Each file appears as a placeholder marked Requested.

Who this is for
Project managers and anyone with the Manage Files permission. Attaching a request to a task also needs permission to edit that task.
Why it matters
A delivery list kept in a spreadsheet gets checked about as often as the fire extinguisher. As requests in File Manager, the list is visible to everyone, owned by a team, and updates itself when the file arrives. You ask for information by name, before it is due.
Paste your list and request the files
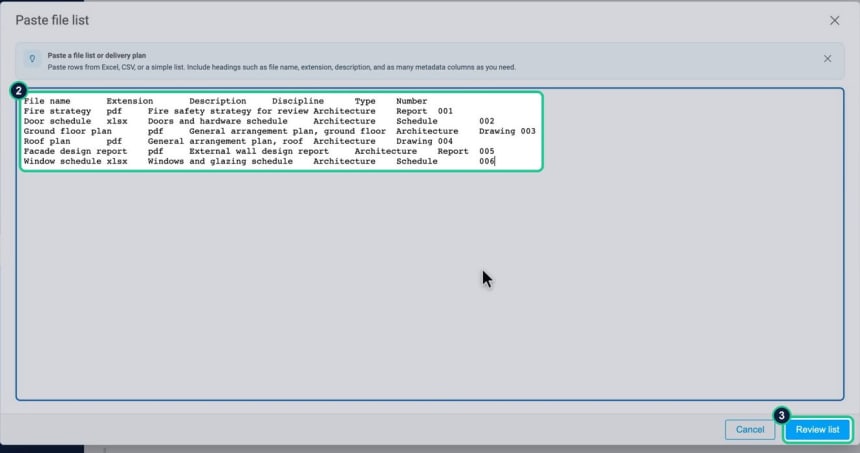
- In your spreadsheet, copy the rows. Include headings such as file name, extension and description, and any other columns you need, such as discipline.
- Open File Manager and paste (Cmd+V on Mac, Ctrl+V on Windows). The Paste file list window opens. You can also select Request files at the end of the list, or on the empty File Manager page.
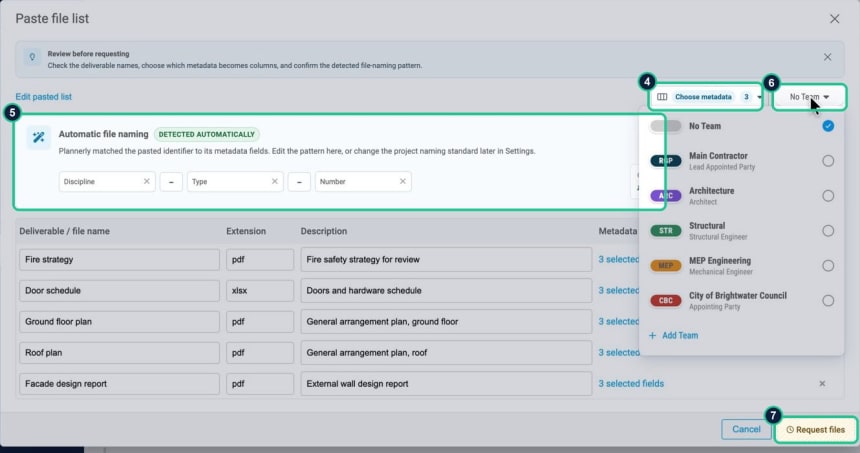
- Select Review list. The step Review before requesting shows each row as a deliverable or file name, extension, description and metadata.
- If you want extra columns to become file information, select Choose metadata, tick them and select Apply selections.
- Look at Automatic file naming. It shows Detected automatically when your list follows a pattern. With three or more metadata columns and no pattern, select Build from metadata so every file gets its standard name.
- Choose the team that owes the files. You can change individual assignments later.
- Select Request files.
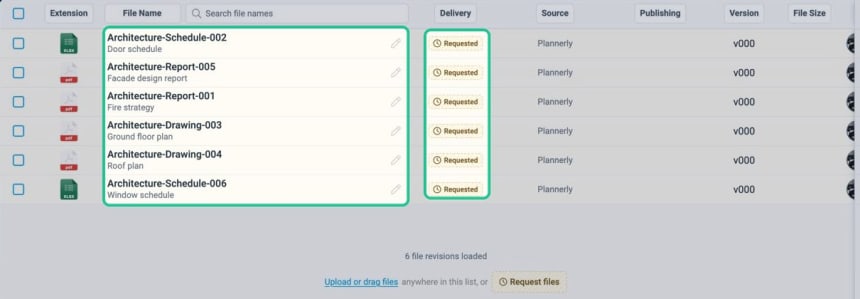
A message confirms what happened, for example "File requests added: 6. Existing files reused: 0." Each request is a placeholder row marked Requested in the Delivery column, owned by the team you chose.
Attach a request to the tasks that need it
- In Scope, open the task and find its file field.
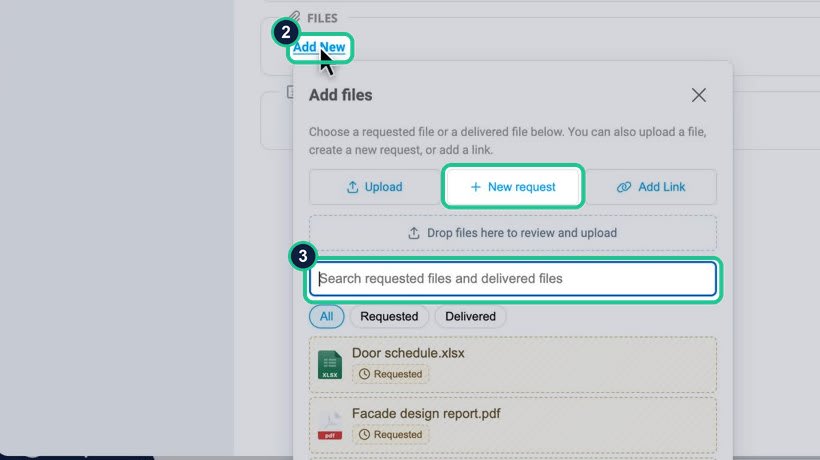
- Select Add New in the file field. The Add files panel opens.
- Search the list (Search requested files and delivered files), choose the request, or select New request to create one with a file name, extension and team.
- Do the same on every task that needs that file, in any milestone.
One delivery now fills the request everywhere it is attached.
If it doesn't work
Pasting does nothing
Pasting only works in File Manager, with the Manage Files permission, and the text must come from a spreadsheet or a plain list with one file per line. Select Request files if you prefer to open the window yourself.
I cannot see Build from metadata
It appears only when the list has three or more metadata columns and no naming pattern was detected. Use Choose metadata to add columns first.
"Existing files reused" is more than zero
Those rows matched files already in the project, so no duplicate was made. This is normal if you paste a list a second time.
I cannot find Request files once the list has files
Scroll to the end of the list: Request files sits there beside "Upload or drag files". Pasting anywhere in File Manager also works.
Common questions
What is a requested file in Plannerly?
A placeholder that reserves a file name and extension for an expected delivery. It shows as Requested until someone uploads a file with that name, then it becomes Delivered.
Can I turn my MIDP spreadsheet into file requests?
Yes. Copy the rows with file name, extension and metadata columns, and paste them into File Manager. Review the list, choose the team and select Request files.
Can one request be needed by more than one task?
Yes. Attach the same request to as many tasks as need it, in any milestone. When the file is delivered, every one of those tasks shows it delivered.
Can I assign the requested files to different teams?
Yes. Choose one team for the whole list, then change individual assignments afterwards.
Related
- Set the file naming standard once - so requests get standard names.
- Deliver a requested file and tick off every task at once - what the team does next.
- Using Plannerly as a Common Data Environment (CDE)
- Where can I upload coordination files for my team or consultants?
- IMI Framework, formerly the UK BIM Framework - guidance on information delivery planning.
Take the free Plannerly Essentials course - every lesson is a short video like this one, with a certificate when you finish.